Tigernut Flour Bread Grain Free
Learn how to make tigernut flour bread grain free with this simple overnight recipe. Perfect paleo tigernut bread for busy families—no kneading required!
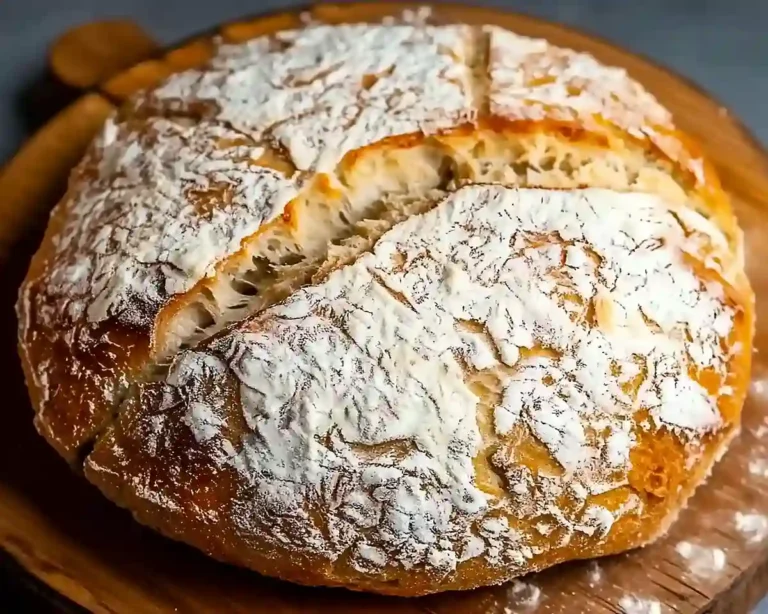
I’ll never forget the first time I sliced into a warm loaf of tigernut flour bread grain free from my own oven. The crust crackled just right, the inside was tender and airy, and for the first time in years, I felt like I was eating real bread again.
If you’re navigating the gluten-free world, you know that grain-free baking can feel like learning a new language. But here’s the beautiful truth: this tigernut loaf doesn’t require fancy equipment or professional skills. Just a bowl, some patience (mostly while you sleep), and ingredients that actually nourish your body.
According to the Celiac Disease Foundation, finding naturally gluten-free alternatives that don’t rely on processed grain flours can make a real difference in how we feel. That’s exactly what this gluten free tigernut flour bread delivers—wholesome nutrition without compromise.
Table of Contents
Why You’ll Love This Grain Free Tigernut Loaf
This isn’t your average gluten-free bread that crumbles into sad little pieces. This tigernut flour bread grain free recipe creates a sturdy, sliceable loaf that actually holds together for sandwiches. Imagine that!
The overnight fermentation does magical things here. While you sleep, the psyllium husk and flours hydrate completely, creating that tender crumb we all crave in paleo tigernut bread. No gummy texture, no weird aftertaste—just honest, delicious bread.
I love that this gluten free tigernut flour bread works for so many dietary needs. It’s naturally paleo, grain-free, and can easily be made nut-free by choosing your seed flour wisely. Perfect for families with multiple food sensitivities or anyone embracing a more ancestral way of eating.
Ingredients

- 1 cup organic green banana flour (100g)
- 3/4 cup light buckwheat flour (75g)
- 3/4 cup seed/nut flour* (65g)
- 1/2 cup tiger nut flour (60g)
- 1/2 arrowroot starch (50g)
- 2 tablespoons whole psyllium husk (14g)
- 1 tablespoon coconut palm sugar
- 1/2 tablespoon sea salt
- 1–3/4 cups water, room temp. (420g)
- 2 tablespoons GF baking powder**
*For the seed/nut flour, I typically use sunflower seed flour to keep it nut-free, but almond flour works beautifully too.
Make sure your baking powder is certified gluten-free—it matters!
Instructions
Step 1: In a large bowl, sift and combine all dry ingredients—except for the GF baking powder. This helps prevent any clumps in your grain free tigernut loaf.
Step 2: Add 1 cup of water to start and mix until absorbed. Then add the remaining 3/4 cup of water and mix until everything comes together nicely.
Step 3: Cover your bowl and tuck it into the refrigerator overnight for at least 12 hours. This is where the magic happens with your paleo tigernut bread.
Step 4: In the morning, remove the bowl from the refrigerator and let it come to room temperature for about 2 hours. I usually do this while I’m having my coffee and getting the day started.
Step 5: When you’re ready to bake, preheat your oven and Dutch oven (and baking stone if you have one) to 450°F for a minimum of 45 minutes on the middle rack. A hot oven is crucial for this gluten free tigernut flour bread.
Step 6: Uncover your dough, loosen the edges with a spatula, add the GF baking powder, and mix it in with your hand or a spoon directly in the bowl.
Step 7: Sprinkle your working surface with a little flour. I love using tiger nut flour here because it adds a subtle sweetness to your bread grain free loaf.
Step 8: Remove the dough from the bowl, sprinkle with flour, and gently flatten with your fingers to an approximately 8 x 10-inch rectangle.
Step 9: Fold the dough in half. If it’s sticky, sprinkle with a bit more flour, then fold in half again.
Step 10: Repeat this folding process one to two more times until your tigernut loaf dough comes together beautifully. Don’t worry about perfection here—rustic is charming!
Step 11: Tuck the seams underneath to create a nice dough ball, dust with flour, and place onto parchment paper.
Step 12: Cover with a tea towel for 15-30 minutes or until your oven is properly preheated (45 minutes to an hour gives the best results).
Step 13: With oven mitts, carefully remove the preheated Dutch oven from the oven—it’ll be extremely hot! If you’re using a cookie sheet instead, simply get ready to transfer your dough.
Step 14: Uncover your paleo tigernut bread loaf, dust with more flour if needed, and score the top with lines or a simple pattern. This helps with expansion and looks gorgeous.
Step 15: Spray with a light mist of water or olive oil (optional but nice), then transfer your dough and parchment paper to the Dutch oven or baking sheet.
Step 16: Cover the Dutch oven and place it in the oven onto your hot baking stone—or directly on the middle rack if you don’t have one.

Step 17: Bake for 25 minutes covered, 25 minutes uncovered, and 10 minutes directly on the baking stone or oven rack without parchment paper. The total time stays the same whether you’re using a Dutch oven or a regular baking sheet for your gluten free tigernut flour bread.
Step 18: Remove your bread from the oven and place it on a wire rack to cool completely. I know waiting is hard, but this helps the texture set perfectly.
Step 19: Slice and enjoy! This bread grain free is amazing fresh and absolutely delicious toasted with your favorite spreads.
Smart Substitutions for Your Grain Free Tigernut Loaf
Sometimes we need to work with what’s in the pantry, and that’s totally okay. This paleo tigernut bread recipe is surprisingly forgiving.
For the seed/nut flour: Sunflower seed flour keeps things nut-free and works perfectly. Almond flour creates a slightly richer taste. Pumpkin seed flour adds a lovely green tint and extra nutrition to your gluten free tigernut flour bread.
For green banana flour: Cassava flour can work in a pinch, though you might need slightly less liquid. The texture of your grain free tigernut loaf will be a touch different but still delicious.
For buckwheat flour: Despite its name, buckwheat is naturally gluten-free and grain-free! If you can’t find it, try using more tiger nut flour plus a bit of coconut flour, adjusting the liquid as needed for your recipe.
Troubleshooting Your Gluten Free Tigernut Flour Bread
My dough is too sticky: This happens sometimes, especially in humid weather. Just sprinkle more tiger nut flour as you work with your grain free tigernut loaf dough. Don’t be shy about it!
The bread didn’t rise much: Make sure your baking powder is fresh and that you let the dough come to full room temperature before baking. Cold dough won’t rise as well in your paleo tigernut bread.
The crust is too hard: Try reducing your oven temperature by 25 degrees and adding a few extra minutes to the covered baking time. Every oven behaves differently with gluten free tigernut flour bread.
It’s crumbly when I slice it: Wait until the bread is completely cool—I mean stone cold—before slicing. Warm bread always crumbles more. Also, a serrated knife works wonders on this bread grain free loaf.
The center is gummy: This usually means it needs more baking time. Those final 10 minutes directly on the rack are crucial for drying out the center of your loaf properly.
Storage and Meal Prep Magic
This paleo tigernut bread stores beautifully, which makes my busy-mom heart so happy. Once completely cooled, wrap your gluten free tigernut flour bread tightly in plastic wrap or store in an airtight container at room temperature for 3-4 days.
For longer storage, slice your tigernut flour bread grain free loaf and freeze individual slices with parchment paper between them. They’ll keep for up to 3 months, and you can toast slices straight from frozen—perfect for those hectic mornings!
I like to make two loaves of this grain free tigernut loaf on Sunday afternoons. One for eating fresh during the week, and one for the freezer as backup. According to Harvard Health, having nutritious, ready-to-eat options on hand helps us make better food choices when life gets chaotic.
The dough can also be prepared through the overnight rest, then kept in the fridge for an extra day before baking if your plans change. This paleo tigernut bread is wonderfully accommodating!
Serving Suggestions That’ll Make You Smile
Toast a slice of this gluten free tigernut flour bread and slather it with grass-fed butter and a drizzle of raw honey. That’s breakfast perfection right there.
This grain free loaf makes incredible sandwiches. Try it with those easy gluten-free chicken taquitos for a fun lunch twist, or create a simple turkey and avocado sandwich that actually holds together.
For a cozy snack, toast a slice and top with almond butter and sliced banana. The subtle sweetness of the tigernut flour bread grain free pairs beautifully with nut butters.
This paleo tigernut bread also shines as a base for bruschetta, makes wonderful breadcrumbs when dried out and pulsed, and even works for French toast if you’re feeling adventurous on a weekend morning!
If you’re looking for more bread options, check out this easy protein gluten-free bread recipe for variety in your weekly rotation.
Variations to Keep Things Interesting
Herb Garden Loaf: Add 2 tablespoons of mixed dried herbs (rosemary, thyme, oregano) to your dry ingredients before mixing your grain free tigernut loaf. It’s perfect alongside soups!
Sweet Cinnamon Version: Increase the coconut sugar to 3 tablespoons and add 1 tablespoon of cinnamon for a sweeter paleo tigernut bread that’s lovely toasted for breakfast.
Seedy Everything: Mix in 1/4 cup of mixed seeds (sunflower, pumpkin, sesame) for extra crunch and nutrition in your gluten free tigernut flour bread.
Kid-Friendly Mini Loaves: Divide your bread grain free dough into mini loaf pans for perfectly portioned bread that kids love. Just reduce baking time by about 10 minutes.
Frequently Asked Questions
Is tiger nut flour grain free?
Yes! Despite the confusing name, tiger nuts aren’t nuts at all—they’re actually small root vegetables (tubers). This makes tigernut flour bread grain free, nut-free, and perfect for paleo eating. Tiger nuts have been enjoyed for thousands of years and are naturally sweet and nutritious.
Is there bread without grains?
Absolutely, and this recipe proves it! This loaf uses alternative flours like tiger nut, green banana, and buckwheat (which is actually a seed, not a grain). Many people find that tigernut bread and other grain-free options are easier to digest and more satisfying than traditional wheat bread.
Can you bake with TigerNut flour?
You definitely can! Tiger nut flour works beautifully in baking, though it usually needs to be combined with other flours for the best structure, exactly like we do in this gluten free tigernut flour bread recipe. It adds a naturally sweet, slightly nutty flavor that’s really lovely. Tiger nut flour is also packed with fiber and resistant starch, which supports healthy digestion.
Is TigerNut a grain?
Nope! Tiger nuts are tubers—the small roots of a grass-like plant called Cyperus esculentus. They’re more similar to potatoes or sweet potatoes than to grains, which is why tigernut flour bread grain free fits perfectly into paleo and grain-free lifestyles. They’re naturally gluten-free, nutrient-dense, and have been cultivated since ancient Egyptian times.

Final Thoughts on This Gluten Free Tigernut Flour Bread
Creating a beautiful loaf of tigernut flour bread grain free in your own kitchen is one of those small joys that makes the whole gluten-free journey feel a little easier. There’s something deeply satisfying about slicing into a crusty loaf you made yourself, knowing exactly what’s in it.
This paleo tigernut bread has become more than just a recipe in my house—it’s become a weekly ritual. The simple act of mixing the dough before bed, then waking up to bake it the next day, feels grounding somehow. Plus, my kids think I’m a kitchen wizard when they smell it baking!
Whether you’re brand new to grain-free baking or you’ve been at it for years, I hope this gluten free tigernut flour bread brings you as much comfort and satisfaction as it’s brought to my table. Here’s to good food, happy bellies, and the simple pleasure of homemade bread.

Tigernut Flour Bread Grain Free
Equipment
- Large mixing bowl
- Dutch oven
- Baking stone (optional)
- Parchment paper
- Tea towel
- Spatula
- Wire cooling rack
- Oven mitts
Ingredients
- 1 cup organic green banana flour 100g
- ¾ cup light buckwheat flour 75g
- ¾ cup seed/nut flour 65g, sunflower seed flour or almond flour
- ½ cup tiger nut flour 60g
- ½ cup arrowroot starch 50g
- 2 tablespoons whole psyllium husk 14g
- 1 tablespoon coconut palm sugar
- ½ tablespoon sea salt
- 1-3/4 cups water, room temperature 420g
- 2 tablespoons gluten-free baking powder certified GF
Instructions
- In a large bowl, sift and combine all dry ingredients—except for the GF baking powder.
- Add 1 cup of water to start and mix until absorbed. Then add the remaining 3/4 cup of water and mix until well combined.
- Cover bowl and place in the refrigerator overnight for at least 12 hours.
- In the morning, remove the bowl from the refrigerator and let it come to room temperature (2 hours).
- When ready to bake, preheat the oven and Dutch oven (and baking stone if using) to 450°F for a minimum of 45 minutes on the middle rack.
- Uncover dough, loosen edges with a spatula, add GF baking powder, and mix in with hand or spoon directly into the mixing bowl.
- Sprinkle the working surface with a little tiger nut flour. Remove dough from the bowl, sprinkle with flour and gently flatten with fingers to an approximately 8 x 10-inch rectangle.
- Fold the dough in half. If the dough is very sticky, sprinkle with a little more flour, and fold in half again.
- Repeat this step (flatten to a rectangle, fold in half and half again) one to two more times until the dough comes together nicely.
- Tuck seams underneath to create a nice dough ball, dust with flour and place onto parchment paper.
- Cover with a tea towel for 15-30 minutes or until the oven is nice and hot (preheated for 45 minutes up to 1 hour).
- With oven mitts, remove the preheated Dutch oven from the oven and set aside. If baking on a cookie sheet, simply prepare to place your dough.
- Uncover your loaf, dust with more flour if necessary, and score the top of your dough with lines or a simple pattern.
- Spray with a mist of water/olive oil (optional), then transfer dough and parchment paper to Dutch oven or baking sheet.
- Cover Dutch oven and place in the oven onto hot baking stone (if using) or directly on middle oven rack.
- Bake for 25 minutes covered, 25 minutes uncovered and 10 minutes directly onto the baking stone or oven rack without parchment paper.
- Remove the bread from the oven and place it on a wire rack to cool completely before slicing.


