Gluten-Free Ghost Cookies
Make gluten-free ghost cookies with a chilled cut-out dough and white outline icing. Includes step-by-step piping, troubleshooting, and storage tips.
The first batch of gluten-free ghost cookies I ever made spread into shapeless puddles, and my kids named them “sad blobs.” I had skipped the chilling steps because the trick-or-treaters were already lining up in my head. Ever pull a tray of ghosts out of the oven and wonder where their arms went?
Honestly… the fix was simple and I should have known better. Chilling the dough and freezing the cutouts keeps the butter firm long enough for the cookies to set before they spread. Now the ghosts hold their shape, and the icing does the rest.
These cookies use a cup-for-cup flour blend with xanthan gum, a quick white icing, and a toothpick for smoothing. You pipe an outline, fill it in, and add a spooky icing face once the white icing sets. Kids love this part, and it’s very forgiving.
What Makes This Gluten-Free Ghost Cookie Recipe Worth Making
- Texture and flavor: Crisp edges, a soft center, and a sweet vanilla or almond icing that sets smooth enough to stack.
- Difficulty: Confident beginner. You roll, cut, chill, bake, and pipe, and every step has a visual cue to check.
- Kid-friendly: Children can spread the icing with a toothpick and add the faces. Use vanilla extract in the icing for a nut-free option.
- Best for: Halloween parties and classroom treats. The recipe makes 24 cookies.
The Science Behind Great Gluten-Free Ghost Cookies
- Cold butter controls spread. Chilling the dough for 1 hour and freezing the cutouts for 10 minutes keeps the butter solid, so the cookies set before the fat melts and spreads.
- Xanthan gum replaces gluten’s structure. A flour blend with xanthan gum binds the dough so it rolls and cuts cleanly instead of crumbling at the edges.
- Corn syrup keeps icing glossy and tender. It prevents the icing from drying brittle, so it sets firm on top but doesn’t crack when you bite or stack the cookies.
- An outline holds the flood icing in. The thicker piped border acts like a dam, while the thinner icing flows into the center and levels out smoothly.
Table of Contents
Ingredients
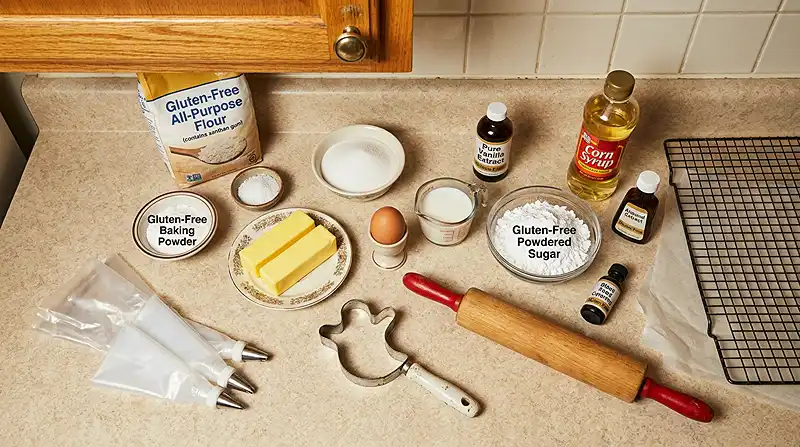
Servings: 24 cookies
For the Cookie Dough
- 3 cups gluten-free all-purpose flour blend with xanthan gum, plus extra for rolling
- 1 teaspoon baking powder labeled gluten-free
- ½ teaspoon kosher salt
- 1 cup (2 sticks) unsalted butter, softened
- 1 cup granulated sugar
- 1 large egg
- 1 tablespoon milk
- 1 teaspoon pure vanilla extract labeled gluten-free
For the Sugar Cookie Icing
- 3 cups powdered sugar labeled gluten-free
- ¼ cup light corn syrup
- ¼ cup milk, plus more for thinning
- ¼ teaspoon almond extract or vanilla extract labeled gluten-free
- Black food coloring labeled gluten-free
Use a flour blend that already contains xanthan gum, since it’s the binder that replaces gluten in this dough. This registered-dietitian guide to gluten-free flours explains how xanthan gum works and why recipes rely on it.
I learned the hard way that powdered sugar, extracts, and food coloring can all hide gluten or cross-contact. Look for products that meet the 20 parts per million gluten-free labeling standard, explained by the Celiac Disease Foundation.
Instructions
Make and Chill the Dough
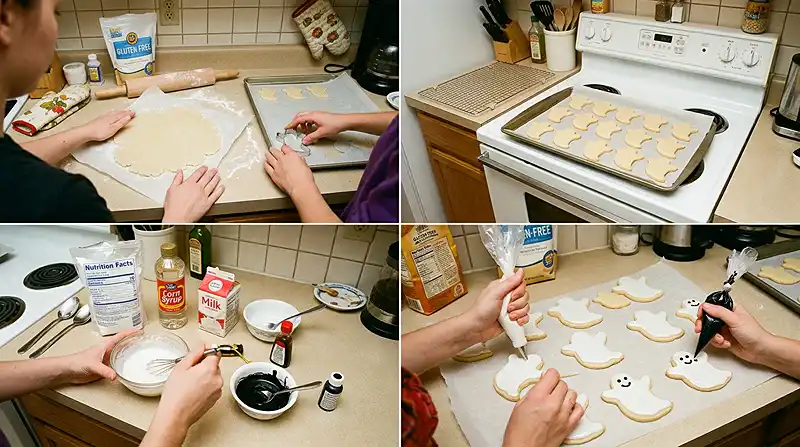
- Make the dough. In a medium bowl, whisk together the gluten-free flour, baking powder, and salt. In a separate large bowl, beat the softened butter and sugar until light and creamy. Beat in the egg, milk, and vanilla extract. Gradually add the dry ingredients, mixing just until a soft dough forms. Pro Tip: stop mixing as soon as no dry streaks remain.
- Chill. Shape the dough into a disk, wrap it, and refrigerate for 1 hour. The dough should feel firm and cool, like clay straight from the fridge.
Roll, Cut, and Bake
- Roll and cut. Preheat the oven to 350°F. Line two large baking sheets with parchment paper. Lightly dust the work surface and rolling pin with gluten-free flour. Roll the dough to about ⅛ inch thick, cut out ghost shapes with a cookie cutter, and reroll scraps as needed.
- Chill the cutouts. Arrange the cookies on the prepared baking sheets and freeze for 10 minutes to help them hold their shape. Pro Tip: don’t skip this step, because it’s the difference between ghosts and blobs.
- Bake. Bake for 8–12 minutes, until the edges are just beginning to turn golden. Let the cookies cool on the baking sheets for a few minutes, then transfer them to a wire rack to cool completely. The cooled edges should snap like a thin graham cracker.
Ice and Decorate
- Prepare the icing. In a medium bowl, whisk together the powdered sugar, corn syrup, ¼ cup milk, and almond or vanilla extract until smooth. If needed, add a little more milk to achieve a pipeable consistency.
- Color the icing. Transfer about one-quarter of the icing to a small bowl and mix in black food coloring. Keep the remaining icing white.
- Outline and fill. Place some of the white icing in a piping bag fitted with a small round tip. Pipe an outline around each cooled cookie. Thin the remaining white icing with milk, adding 1 teaspoon at a time, until it flows easily but isn’t watery. Pipe it into the outlined centers and use a toothpick to spread the icing and pop air bubbles. Let the icing set for about 15 minutes.
- Add ghost faces. Transfer the black icing to a piping bag with a small round tip. Pipe two eyes and a mouth onto each ghost. Let the icing dry completely before storing or serving.
Ways to Customize This Recipe
For marshmallow ghosts, set a gluten-free marshmallow on each cooled cookie with a dab of white icing. Then pipe the face right onto the marshmallow. Check the marshmallow label, since not all brands are gluten-free.
Look… white chocolate is a fun alternative if you don’t want to pipe an outline. Melt gluten-free white chocolate and spread it over each cooled cookie, then add the face before it sets. It firms up quickly and gives a thicker, creamier coating than icing.
For a spooky icing face with more personality, try different expressions: wide eyes, a surprised mouth, or tiny eyebrows. Keep the black icing thick so the lines hold their shape. A small round tip gives you the cleanest edges.
If almond isn’t an option, use vanilla extract labeled gluten-free in the icing. Almond gives a slightly nutty, bakery-style flavor, while vanilla is milder and kid-friendly. Both work with the same ¼ teaspoon measurement.
If Something Went Wrong, Start Here
The ghosts spread into blobs. Chill the dough for the full hour and freeze the cutouts for 10 minutes before baking. Cold butter melts more slowly, so the cookie edges set before the fat can spread them.
The dough cracks or crumbles when you roll it. Let it sit for a few minutes until it’s pliable, then press the cracks together with warm hands. Gluten-free flours need time to absorb moisture, and a slightly softer dough rolls without breaking.
The icing runs off the edges. Make sure the outline is fully piped and let it firm up before filling. Oh wow… a thin icing without a border will flood right over the side, so the outline is your safety wall.
The icing has bubbles or craters. Drag a toothpick through the wet icing right after piping. This pops trapped air and levels the surface before it sets.
The icing never fully dries. Leave the cookies in a single layer, uncovered, and give them extra time on humid days. Sugar icing absorbs moisture from the air, so a dry room helps it set.
Storage & Meal Prep
| Method | Duration | Notes |
|---|---|---|
| Counter | 2-3 days | Airtight container, only after the icing is completely dry |
| Fridge | 5-7 days | Bring to room temp |
| Freezer | 2-3 months | Wrap individually |
Layer cookies with parchment paper so the faces don’t smudge. If undecorated cookies lose some crispness, warm them briefly in the oven before icing. Crumble any broken ghosts over yogurt or ice cream so nothing goes to waste.
Frequently Asked Questions
Can I make the cookie dough ahead of time?
Yes, wrap the dough disk tightly and refrigerate it overnight. Let it sit at room temperature until it’s soft enough to roll without cracking. Then follow the rolling, cutting, and chilling steps as written.
How do I get the icing to the right consistency?
Add milk 1 teaspoon at a time until the icing flows easily but isn’t watery. A thicker icing works for the outline and the faces. A thinner icing works for filling the center.
What’s the best gluten-free flour blend for ghost cookies?
Use a gluten-free all-purpose flour blend that already contains xanthan gum. The xanthan gum binds the dough so it rolls and cuts without crumbling. Check that the label says gluten-free.
Why did my ghost cookies spread in the oven?
The butter was likely too warm when the cookies went in. Chill the dough for 1 hour and freeze the cutouts for 10 minutes before baking. Cold dough holds its shape while the edges set.
Can I freeze decorated ghost cookies?
Yes, once the icing is completely dry, wrap each cookie individually and freeze for 2-3 months. Thaw them in their wrapping so condensation doesn’t smudge the faces. Undecorated cookies freeze just as well.
Serving Suggestions
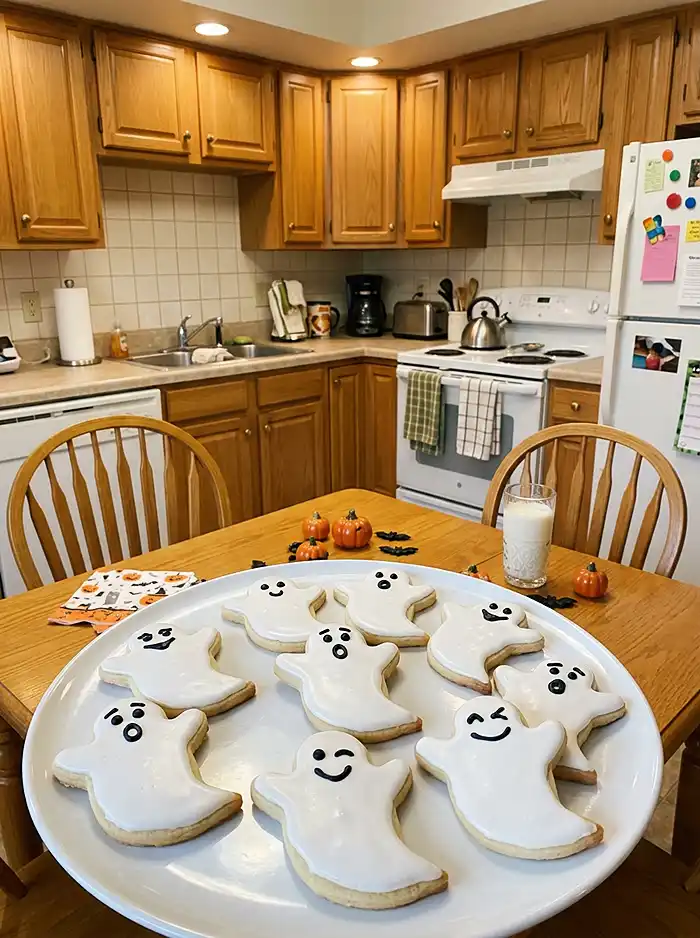
Serve the ghosts with cold milk or a mug of cocoa on Halloween night. They’re a hit on a classroom party table, and kids love finishing the faces themselves.
For a quick dinner before trick-or-treating, try this gluten-free mozzarella grilled cheese or the red curry beef broth bowls.
If an egg allergy joins the party, bake these gluten-free eggless cookies instead.
Final Thoughts
If you make these gluten-free ghost cookies, I’d love to hear how your ghosts turned out. Leave a star rating and tell me in the comments about any changes you made. Pin the recipe to your Halloween board on Pinterest so it’s ready for next October.

Gluten-Free Ghost Cookies
Equipment
- Mixing bowls
- Whisk
- Electric mixer
- Measuring cups
- Measuring spoons
- Rolling Pin
- Ghost-shaped cookie cutter
- Plastic wrap
- Baking sheets
- Parchment paper
- Wire cooling rack
- Piping bags
- Small round piping tips
- Toothpick
- Small bowls for icing colors
Ingredients
For the Cookie Dough
- 3 cups gluten-free all-purpose flour blend must contain xanthan gum, plus extra for rolling
- 1 teaspoon baking powder labeled gluten-free
- ½ teaspoon kosher salt
- 1 cup unsalted butter 2 sticks, softened
- 1 cup granulated sugar
- 1 large egg
- 1 tablespoon milk
- 1 teaspoon pure vanilla extract labeled gluten-free
For the Sugar Cookie Icing
- 3 cups powdered sugar labeled gluten-free
- ¼ cup light corn syrup
- ¼ cup milk plus more as needed for thinning
- ¼ teaspoon almond extract or vanilla extract labeled gluten-free; use vanilla for a nut-free option
- As needed black food coloring labeled gluten-free
Instructions
- Make the dough. In a medium bowl, whisk together the gluten-free flour, baking powder, and salt. In a separate large bowl, beat the softened butter and sugar until light and creamy. Beat in the egg, milk, and vanilla extract. Gradually add the dry ingredients, mixing just until a soft dough forms. Stop mixing as soon as no dry streaks remain.
- Chill the dough. Shape the dough into a disk, wrap it, and refrigerate for 1 hour. The dough should feel firm and cool before rolling.
- Roll and cut. Preheat the oven to 350°F. Line two large baking sheets with parchment paper. Lightly dust the work surface and rolling pin with gluten-free flour. Roll the dough to about 1/8 inch thick, cut out ghost shapes with a cookie cutter, and reroll scraps as needed.
- Chill the cutouts. Arrange the cookies on the prepared baking sheets and freeze for 10 minutes to help them hold their shape during baking.
- Bake. Bake for 8–12 minutes, until the edges are just beginning to turn golden. Let the cookies cool on the baking sheets for a few minutes, then transfer them to a wire rack to cool completely before icing.
- Prepare the icing. In a medium bowl, whisk together the powdered sugar, corn syrup, 1/4 cup milk, and almond or vanilla extract until smooth. If needed, add a little more milk to achieve a pipeable consistency.
- Color the icing. Transfer about one-quarter of the icing to a small bowl and mix in black food coloring. Keep the remaining icing white.
- Outline and fill. Place some of the white icing in a piping bag fitted with a small round tip. Pipe an outline around each cooled cookie. Thin the remaining white icing with milk, adding 1 teaspoon at a time, until it flows easily but isn’t watery. Pipe it into the outlined centers and use a toothpick to spread the icing and pop air bubbles. Let the icing set for about 15 minutes.
- Add ghost faces. Transfer the black icing to a piping bag with a small round tip. Pipe two eyes and a mouth onto each ghost. Let the icing dry completely before storing or serving.