Gluten-Free Strawberry Lemonade Lasagna
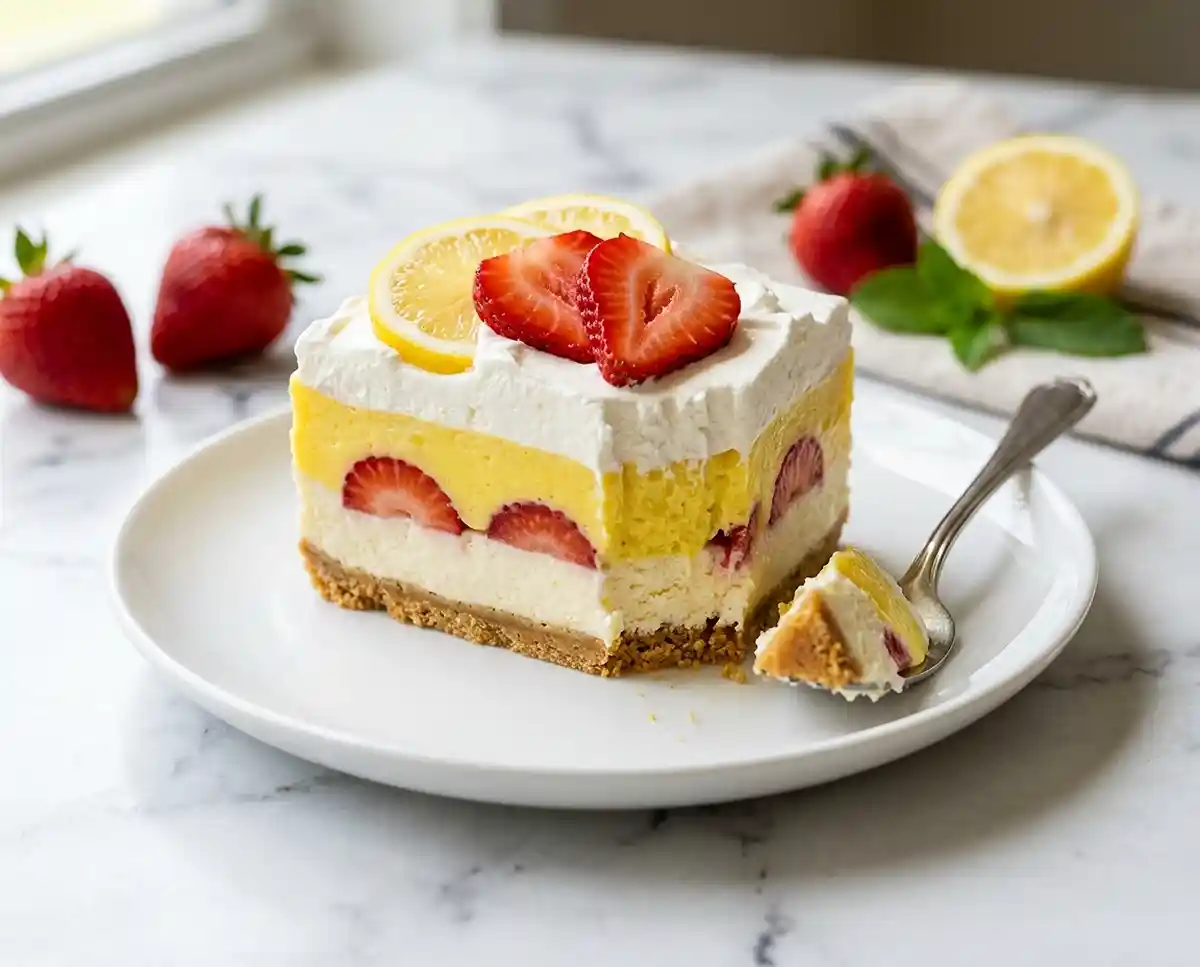
This Gluten-Free Strawberry Lemonade Lasagna layers a cookie crust, lemon cheesecake filling, fresh strawberries, and whipped cream — no oven required.
I’ll never forget the first time I tried to build a layered icebox dessert for my cousin’s baby shower. I’d poured hours into a gorgeous no-bake cheesecake situation, carried it proudly to the party, and watched it slide apart the second I cut the first slice. The filling hadn’t set, the crust was soggy, and I spent the rest of the afternoon pretending it was “deconstructed on purpose.”
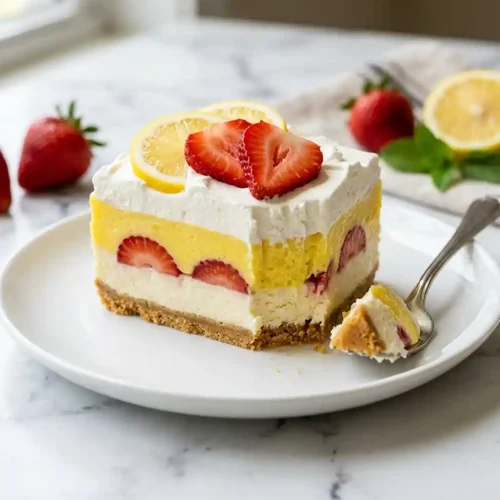
What if you could bring one dish to a summer cookout that looks like it came from a bakery, doesn’t require an oven, and happens to be completely gluten-free? That’s this recipe. It stacks a buttery vanilla-cookie-and-graham crust under a tangy lemon cheesecake filling studded with whole fresh strawberries, then finishes with a billowy layer of homemade whipped cream and gorgeous fruit on top.
Table of Contents
Why You’ll Love This Gluten-Free Strawberry Lemonade Lasagna
- Layered flavor with real depth: A buttery cookie crust gives way to bright, tangy lemon cheesecake, juicy whole strawberries, and a cloud of vanilla whipped cream — it tastes like drinking a strawberry lemonade on a summer porch.
- Beginner-friendly and no-bake: No oven, no tempering, no candy thermometer. If you can press crumbs into a pan and run a stand mixer, you can make this.
- Feeds a crowd: Serves 8 generous portions from a standard 9×13 dish — scale up easily for larger gatherings.
- Make-ahead magic: This icebox dessert actually improves overnight, making it the ideal bring-along for Memorial Day barbecues, Fourth of July spreads, or any summer potluck where you want to show up with something spectacular.
The Secret Behind This Gluten-Free Strawberry Lemonade Lasagna
- Triple-lemon intensity: Instant lemon pudding mix, fresh lemon juice, and lemon extract work together to create a layered citrus flavor that doesn’t taste artificial. The pudding mix also acts as a stabilizer, helping the filling set firmly without gelatin.
- Strategic freezer intervals: Chilling the crust, then the white layer, then the yellow layer in stages prevents the filling from mixing or sliding. Each freeze creates a “shelf” that supports the next layer — this is the technique I learned the hard way after that baby-shower disaster.
- Whole strawberries embedded in the filling: Placing stemmed berries point-side up and then covering them with the yellow cheesecake mixture locks the fruit in place so every slice reveals a beautiful cross-section of red and yellow.
- Homemade whipped cream vs. store-bought: Whipping heavy cream to stiff peaks with powdered sugar creates a denser, more stable topping than most frozen whipped toppings. It holds its shape for days in the fridge and doesn’t weep. According to the King Arthur Baking whipped cream guide, powdered sugar contains a small amount of cornstarch that naturally stabilizes the cream — a bonus for make-ahead desserts.
Ingredients
Gluten-Free Crust
| Amount | Ingredient | Notes |
|---|---|---|
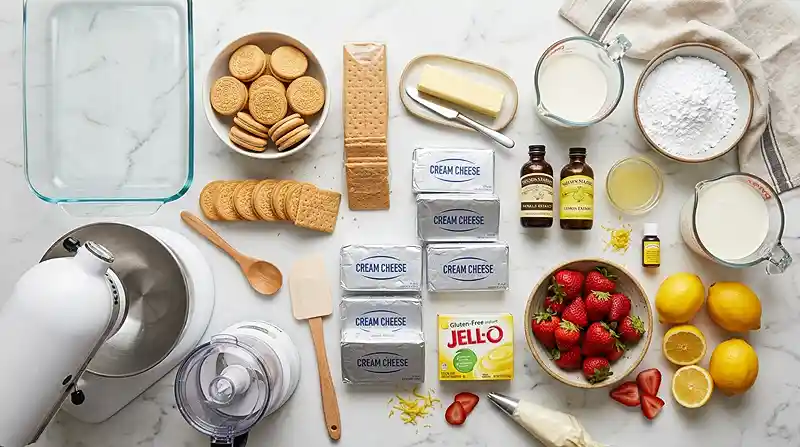
| 26 | gluten-free vanilla sandwich cookies | such as Glutino or Kinnikinnick |
| 1 sleeve | gluten-free graham crackers | such as Schar or Kinnikinnick |
| 8 Tablespoons | butter (1 stick) | melted |
Lemon Cheesecake Filling
| Amount | Ingredient | Notes |
|---|---|---|
| 5 | 8-ounce packages cream cheese | softened to room temperature |
| 1 | 6-ounce package gluten-free instant lemon pudding mix | verify gluten-free label |
| 1 1/2 cups | half and half | |
| 1 cup | powdered sugar | |
| 1 teaspoon | vanilla | |
| 1 teaspoon | lemon juice | fresh preferred |
| 1 teaspoon | lemon extract | |
| yellow food coloring gel | to desired brightness | |
| 1 pound | fresh strawberries | |
| 4 | Meyer lemons | for garnish slices |
| 3 ounces | cream cheese | for garnish if desired |
Whipped Topping
| Amount | Ingredient | Notes |
|---|---|---|
| 3 cups | heavy whipping cream | or gluten-free frozen whipped topping |
| 1 cup | powdered sugar | |
| 1 teaspoon | vanilla |
A quick note on the pudding mix: not all instant pudding is gluten-free. Jell-O brand instant pudding is generally considered gluten-free, but always check the label for your specific box. The Celiac Disease Foundation’s gluten-free food guide is a reliable resource for verifying packaged ingredients.
Instructions
Step 1 — Build the crust
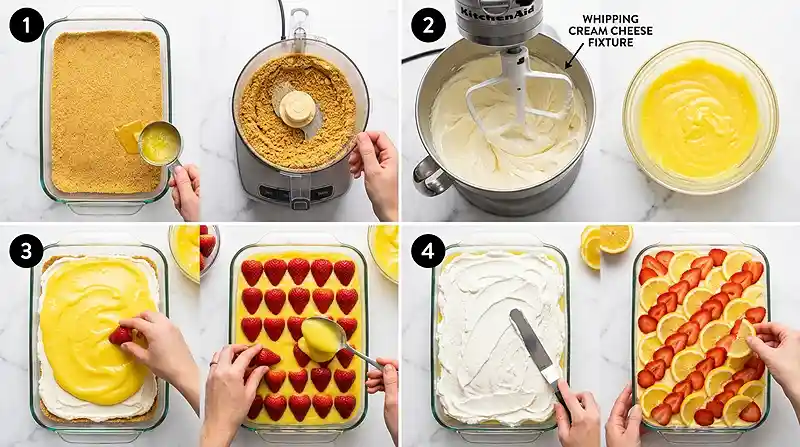
Spray a 9×13 baking dish with cooking spray. Place the 26 gluten-free vanilla sandwich cookies and 1 sleeve of gluten-free graham crackers in a food processor and blend until they become fine, even crumbs — no large chunks should remain.
Melt the 8 tablespoons of butter in the microwave, then pour the melted butter into the cookie crumb mixture and pulse a few times until the crumbs are evenly moistened. They should hold together when you press a pinch between your fingers. Press the crumb crust firmly and evenly into the bottom of the 9×13 dish, using the flat bottom of a measuring cup for a compact layer. Place the dish in the freezer while you prepare the filling.
Step 2 — Make the lemon cheesecake base
In a stand mixer fitted with the paddle attachment, beat the 5 packages of softened cream cheese on medium speed until smooth and creamy, about 2-3 minutes. Scrape down the sides of the bowl at least once — lumps now mean lumps later.
In a separate bowl, whisk the gluten-free instant lemon pudding mix and 1 1/2 cups half and half together until smooth. This should thicken slightly within about 2 minutes. Add the pudding mixture to the cream cheese and blend on low until fully combined with no streaks remaining.
Step 3 — Season and layer the white filling
Add the 1 teaspoon vanilla, 1 teaspoon lemon juice, and 1 teaspoon lemon extract to the cream cheese mixture and blend again until incorporated. Then add the 1 cup powdered sugar and continue mixing on low until the filling is smooth and velvety — it should look like a thick, glossy lemon mousse.
Pour about 2 cups of the cheesecake mixture onto the frozen crust and smooth it into an even layer with an offset spatula or the back of a spoon. Place the dish back in the freezer for 30 minutes. This partial freeze is critical — it creates a firm foundation so the next layer doesn’t sink or swirl into the white.
Step 4 — Create the yellow layer and add strawberries
Add about 1 teaspoon of yellow gel food coloring to the remaining cheesecake mixture and blend on low until the color is bright and even — think sunshine yellow. You know… this is the layer that makes people gasp when you cut into the finished dessert.
Remove the dish from the freezer after 30 minutes and spread about half of the yellow mixture over the set white layer. Remove the stems from about 12 small strawberries and set the remaining berries aside for topping. Arrange the stemmed strawberries in neat rows in the dish with the pointed ends facing up — press them gently into the yellow filling so they stand upright.
Spoon the remaining yellow cheesecake filling over the strawberries, using a spatula to carefully cover the berries without knocking them over. Place the dish in the freezer for at least 1 hour until the filling is firm to the touch.
Step 5 — Whip and top
Add the 3 cups heavy whipping cream, 1 teaspoon vanilla, and 1 cup powdered sugar to a large mixing bowl. Whip on medium-high speed until thick with stiff peaks — the cream should hold its shape when you lift the whisk. This takes roughly 3-4 minutes with a stand mixer or 5-6 minutes with a hand mixer.
Remove the dish from the freezer and spread the whipped topping evenly over the cheesecake layer with a large offset spatula. The topping should be thick and billowy — like spreading a blanket of fresh snow over the whole dessert. Return the dish to the freezer.
Step 6 — Garnish and chill
Slice the remaining strawberries and 4 Meyer lemons into thin, even slices. Arrange the strawberry and lemon slices in alternating rows on top of the whipped topping — this is where the “lasagna” gets its stunning striped look.
Refrigerate the dessert for several hours or overnight before serving. When ready to serve, remove the dish from the freezer about 15 minutes before slicing into squares. This brief thaw softens the layers just enough for clean cuts. Garnish each piece with a lemon slice and whole strawberry if desired.
Pro Tip: Run your knife under hot water and wipe it dry between cuts for the cleanest slices every time.
Make It Your Own
Man, oh man… this recipe practically begs you to experiment with it once you’ve nailed the base version.
Swap the fruit: Replace the strawberries with fresh raspberries, blackberries, or even sliced peaches for a different seasonal spin. Blueberries work beautifully if you’re building a red-white-and-blue version for a Fourth of July dessert table. Just keep the total fruit weight close to 1 pound so the structure stays intact.
Go dairy-free: Use a plant-based cream cheese like Violife or Kite Hill, swap the half and half for full-fat coconut milk, and replace the heavy whipping cream with coconut whipping cream. The lemon flavor is strong enough to mask any subtle coconut notes. This turns the recipe into a fully dairy-free icebox dessert that’s still rich and sliceable.
Add a strawberry sauce layer: Blend 1 cup of fresh strawberries with 1 tablespoon of sugar and a squeeze of lemon, then drizzle a thin layer over the white filling before adding the yellow layer. This adds a jewel-toned stripe and a burst of fresh berry flavor.
Use frozen whipped topping: If you prefer convenience, substitute the homemade whipped cream with gluten-free frozen whipped topping (thawed). It’s slightly softer but still holds up well overnight. Just check the label — most Cool Whip varieties are gluten-free, but always verify.
Common Problems and How to Fix Them
Problem: The filling won’t set and stays soft.
Make sure you’re using instant pudding mix, not cook-and-serve. Instant pudding thickens with cold liquid and doesn’t require heat. Also confirm the cream cheese was fully softened before mixing — cold lumps prevent the pudding from integrating properly, which weakens the set. If the filling still seems loose, extend the freezer time by another 30-60 minutes before adding the next layer.
Problem: The crust crumbles when slicing.
This usually means the butter wasn’t distributed evenly or the crumbs weren’t pressed firmly enough. Next time, pulse the crumbs a few extra seconds until they’re uniformly fine, and use a flat-bottomed measuring cup or glass to really compact the crust. A firmer press creates a crust that holds together like a cookie bar rather than loose sand.
Problem: The whipped cream deflates or weeps.
You likely under-whipped or the cream wasn’t cold enough. Start with cream straight from the fridge (ideally chill the bowl and whisk for 10 minutes beforehand). Whip until stiff peaks form — when you turn the whisk upside down, the peak should stand straight up without folding over. The powdered sugar helps stabilize, but under-whipping is the most common culprit.
Problem: The layers blend together instead of staying distinct.
Well… this one is all about patience. Each freezer interval creates a firm surface for the next layer to sit on. If you skip the 30-minute freeze after the white layer or the 1-hour freeze after the strawberry layer, the fillings will merge. Set a timer and resist the urge to rush it.
Storage and Meal Prep
| Method | Duration | Notes |
|---|---|---|
| Counter | Up to 1 hour | Keep covered; cream will soften |
| Refrigerator | 3-4 days | Best storage method; cover tightly with plastic wrap |
| Freezer | Up to 2 months | Wrap individual slices in plastic, then foil; thaw 15-20 min before serving |
For meal prep, this is a dream. Build the entire dessert up to 2 days before your event and store it in the fridge — the flavors actually meld and deepen overnight. If you’re freezing individual slices, place them on a parchment-lined tray in the freezer for 1 hour first, then wrap. This prevents the topping from sticking to the plastic wrap.
To serve after freezing, let slices sit at room temperature for 15-20 minutes. The filling will soften to a creamy, mousse-like texture while the crust stays firm. If the whipped cream looks slightly flat after thawing, a small dollop of fresh whipped cream on top refreshes the presentation instantly.
Your Questions Answered
Can I make this Gluten-Free Strawberry Lemonade Lasagna the day before?
Yes — and you should. This no-bake summer treat benefits from an overnight rest in the refrigerator. The layers firm up, the lemon flavor intensifies, and slicing is significantly cleaner after a full overnight chill compared to just a few hours.
What brand of instant lemon pudding is gluten-free?
Most Jell-O brand instant pudding mixes are considered gluten-free, though they’re not certified. Always read the label on your specific box and check for any “may contain wheat” warnings. If you need a certified option, look for brands like Simply Delish, which are explicitly labeled gluten-free.
Why did my cream cheese filling have lumps?
The cream cheese wasn’t fully softened before mixing. Set your cream cheese out at room temperature for at least 1-2 hours before starting. If you’re short on time, cut each block into cubes and spread them on a plate — they’ll soften in about 30 minutes. Never microwave cream cheese to soften it, as it melts unevenly and creates pockets of liquid that won’t blend smoothly.
Can I use regular lemons instead of Meyer lemons?
Absolutely. Meyer lemons have a slightly sweeter, more floral flavor, but regular lemons work just fine for the garnish slices. The filling already gets its lemon punch from the pudding mix, lemon juice, and lemon extract, so the garnish lemons are primarily visual.
How do I keep the strawberry and lemon slices from sliding off the top?
Press the fruit slices gently into the whipped cream layer immediately after spreading it — the cream acts like soft mortar. Then return the dish to the freezer or fridge right away. Once chilled, the whipped cream firms up around the fruit and holds everything securely in place.
When to Serve This
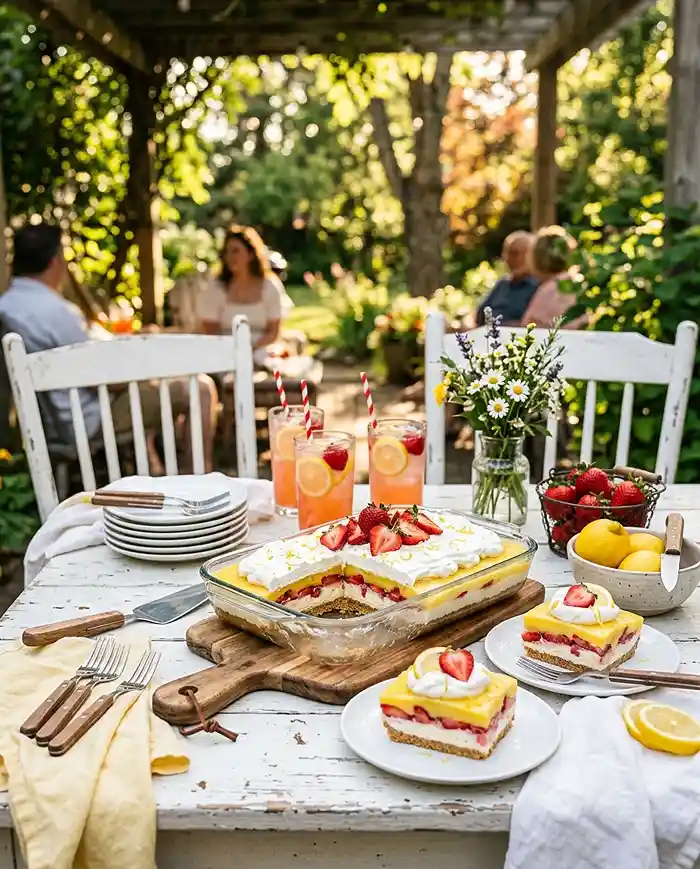
This Gluten-Free Strawberry Lemonade Lasagna is practically made for a Fourth of July dessert spread — the bright red strawberries and sunny yellow lemons look festive without even trying. It’s also a natural fit for Memorial Day picnics, summer birthday parties, or any backyard gathering where you need a dish that feeds a crowd and travels in a cooler.
Pair it with something savory like sweet chili chicken lettuce wraps for a light dinner before dessert, or serve it alongside gluten-free blueberry lemon coconut pops for a full frozen-treat dessert table. If you’re starting with appetizers, a batch of gluten-free hot honey goat cheese dip balances out the sweet with something warm and savory.
Go Make This
If you’ve been searching for a show-stopping summer dessert that happens to be gluten-free, this is the one. Build it the night before, pull it from the fridge, and watch your people light up when they see those layers. I’d love to hear how yours turns out — drop a comment below with your favorite fruit variation or any tweaks you tried. And if you want to save this recipe for your next party, pin it to your gluten-free dessert board so it’s ready when you need it.
Gluten-Free Strawberry Lemonade Lasagna
Equipment
- 9×13 inch baking dish
- Food processor
- Stand mixer with paddle attachment
- Large mixing bowl
- Separate medium mixing bowl
- Offset spatula or back of spoon
- Whisk or hand mixer
- Flat-bottomed measuring cup
- Sharp knife
Ingredients
Gluten-Free Crust
- 26 gluten-free vanilla sandwich cookies such as Glutino or Kinnikinnick
- 1 sleeve gluten-free graham crackers such as Schar or Kinnikinnick
- 8 tablespoons butter 1 stick, melted
Lemon Cheesecake Filling
- 5 8-ounce packages cream cheese softened to room temperature
- 1 6-ounce package gluten-free instant lemon pudding mix verify gluten-free label
- 1 ½ cups half and half
- 1 cup powdered sugar
- 1 teaspoon vanilla
- 1 teaspoon lemon juice fresh preferred
- 1 teaspoon lemon extract
- yellow food coloring gel to desired brightness
- 1 pound fresh strawberries
- 4 Meyer lemons for garnish slices
- 3 ounces cream cheese for garnish if desired
Whipped Topping
- 3 cups heavy whipping cream or gluten-free frozen whipped topping
- 1 cup powdered sugar
- 1 teaspoon vanilla
Instructions
- Spray a 9×13-inch baking dish with cooking spray. Place the 26 gluten-free vanilla sandwich cookies and 1 sleeve of gluten-free graham crackers in a food processor and blend until they become fine, even crumbs with no large chunks remaining.
- Melt the 8 tablespoons of butter in the microwave, then pour the melted butter into the cookie crumb mixture and pulse until the crumbs are evenly moistened. Press the crumb crust firmly and evenly into the bottom of the 9×13 dish using the flat bottom of a measuring cup. Place the dish in the freezer.
- In a stand mixer fitted with the paddle attachment, beat the 5 packages of softened cream cheese on medium speed until smooth and creamy, about 2-3 minutes, scraping down the sides at least once.
- In a separate bowl, whisk the gluten-free instant lemon pudding mix and 1 1/2 cups half and half together until smooth and slightly thickened, about 2 minutes. Add the pudding mixture to the cream cheese and blend on low until fully combined with no streaks remaining.
- Add the 1 teaspoon vanilla, 1 teaspoon lemon juice, and 1 teaspoon lemon extract to the cream cheese mixture and blend until incorporated. Add the 1 cup powdered sugar and continue mixing on low until the filling is smooth, velvety, and glossy.
- Pour about 2 cups of the cheesecake mixture onto the frozen crust and smooth it into an even layer with an offset spatula. Place the dish back in the freezer for 30 minutes to create a firm foundation for the next layer.
- Add about 1 teaspoon of yellow gel food coloring to the remaining cheesecake mixture and blend on low until the color is bright and even. Remove the dish from the freezer after 30 minutes and spread about half of the yellow mixture over the set white layer.
- Remove the stems from about 12 small strawberries and set the remaining berries aside for topping. Arrange the stemmed strawberries in neat rows in the dish with the pointed ends facing up, pressing them gently into the yellow filling so they stand upright.
- Spoon the remaining yellow cheesecake filling over the strawberries, using a spatula to carefully cover the berries without knocking them over. Place the dish in the freezer for at least 1 hour until the filling is firm to the touch.
- Add the 3 cups heavy whipping cream, 1 teaspoon vanilla, and 1 cup powdered sugar to a large mixing bowl. Whip on medium-high speed until thick with stiff peaks that hold their shape when the whisk is lifted, about 3-4 minutes with a stand mixer.
- Remove the dish from the freezer and spread the whipped topping evenly over the cheesecake layer with a large offset spatula. The topping should be thick and billowy. Return the dish to the freezer.
- Slice the remaining strawberries and 4 Meyer lemons into thin, even slices. Arrange the strawberry and lemon slices in alternating rows on top of the whipped topping, pressing gently into the cream so they stay in place.
- Refrigerate the dessert for several hours or overnight before serving. When ready to serve, remove the dish from the freezer about 15 minutes before slicing into squares. Garnish each piece with a lemon slice and whole strawberry if desired. Run your knife under hot water and wipe dry between cuts for the cleanest slices.