Strawberry Banana Pudding Cups
Dairy-free strawberry banana pudding cups made with gluten-free cookies, fresh fruit, and a creamy no-bake filling. Step-by-step recipe, substitutions, and make-ahead tips included.
The first time I brought these cups to a Fourth of July cookout, I watched a teenager eat three of them before asking if they were “the allergy ones.” That moment told me everything. When a dessert disappears before anyone notices it’s gluten-free and dairy-free, you’ve genuinely nailed it.
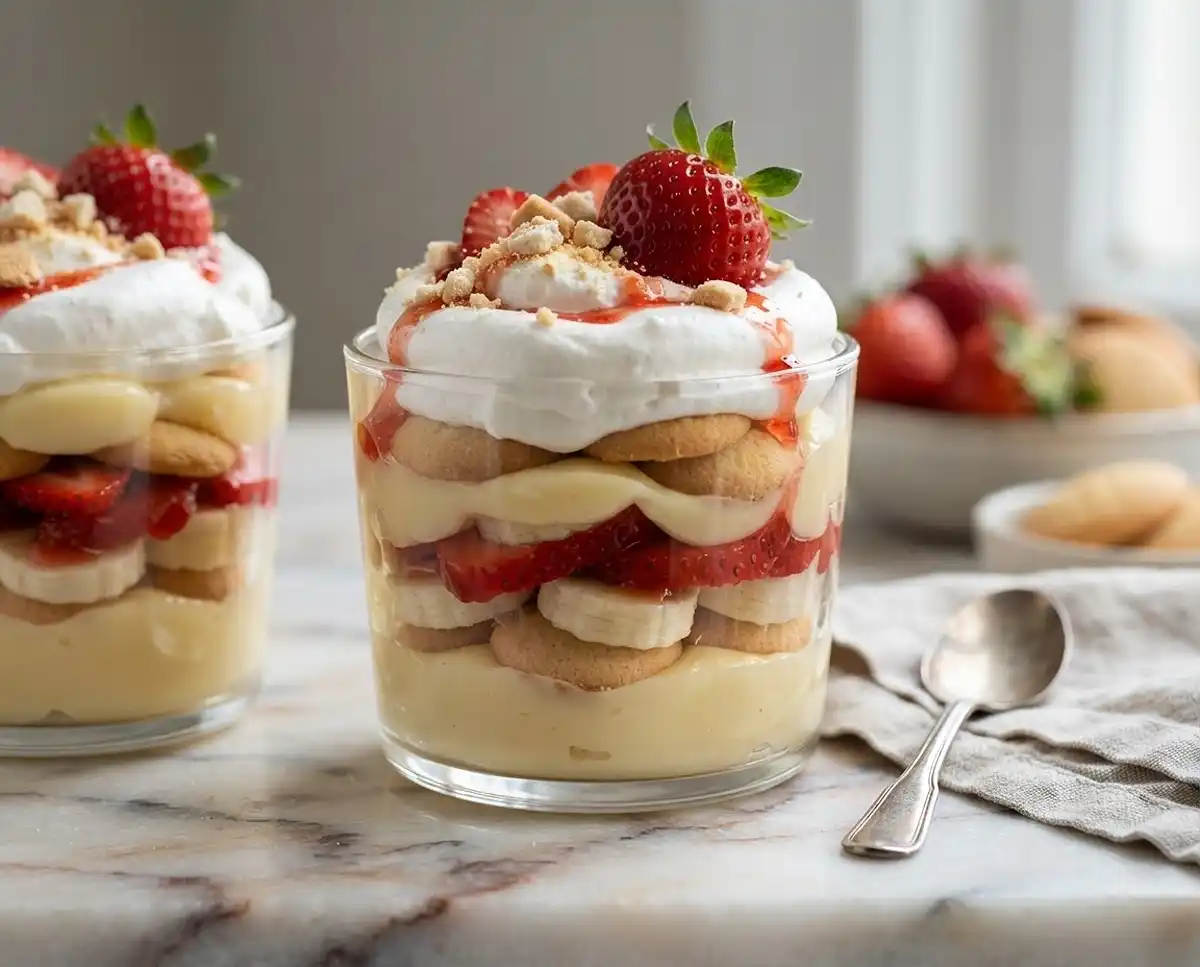
These dairy-free strawberry banana pudding cups layer creamy vanilla-banana filling, fresh fruit, and soft gluten-free cookies into individual servings that are just as crowd-pleasing as any traditional banana pudding. No baking required, no complicated steps, and no one feels left out.
Can a no-bake dessert really rival the real thing? Well… after dozens of batches and one very enthusiastic cookout crowd, I’d say yes. Let’s build something worth talking about.
Why You’ll Love This Recipe
- Creamy, layered texture — the filling sets up thick and luscious, with cookies that soften overnight into something as fluffy as clouds
- Beginner-friendly — no oven, no candy thermometer, no special skills needed
- Naturally allergy-friendly — certified gluten-free cookies and dairy-free ingredients make these safe for celiac families and dairy-sensitive guests
- Make-ahead magic — flavors deepen overnight, so these actually improve the longer they sit
The Secret to Perfect Dairy-Free Strawberry Banana Pudding Cups
- Two pudding mixes, one punch — combining vanilla and banana cream pudding creates layered flavor that neither mix delivers alone
- Cold milk is non-negotiable — warm or room-temperature dairy-free milk won’t allow instant pudding to thicken properly; keep it very cold until you pour
- Cream cheese as the backbone — beating softened dairy-free cream cheese into the pudding adds structure and tang, preventing that loose, watery texture common in dairy-free versions
- Fold, don’t stir — gently folding the whipped topping preserves the air bubbles that keep the filling light; aggressive mixing deflates everything
According to published celiac nutrition research, enriched dairy-free beverages like almond and oat milk are well-supported alternatives for people managing both gluten intolerance and dairy sensitivity — making them a smart base for recipes like this one.
Table of Contents
Ingredients
Dairy-Free Pudding
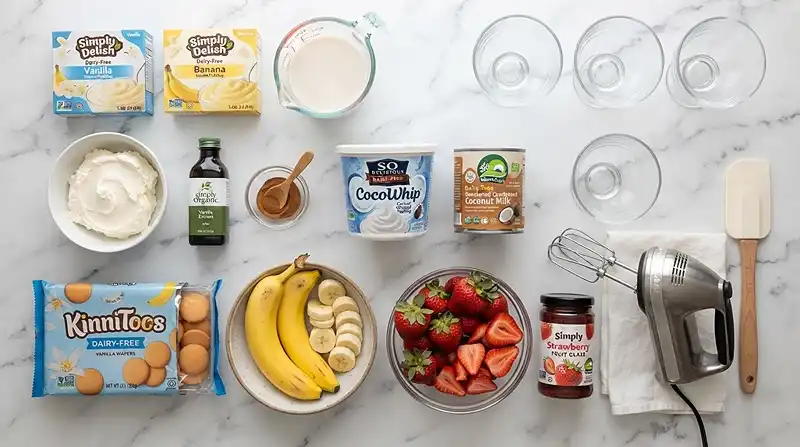
| Ingredient | Amount | Notes |
|---|---|---|
| Dairy-free vanilla instant pudding mix | 1 (3.4-oz) box | Check label for gluten-free certification |
| Dairy-free banana cream pudding mix | 1 (3.4-oz) box | Combines with vanilla for deeper flavor |
| Very cold unsweetened almond milk or oat milk | 4 cups | Must be cold for pudding to set |
| Dairy-free cream cheese, softened | 8 oz | Softened at room temp for smooth blending |
| Vanilla extract | 1 teaspoon | |
| Ground cinnamon | 1 teaspoon | Adds warm depth to the filling |
| Dairy-free sweetened condensed milk | 1 (14-oz) can | Coconut-based versions work well |
| Dairy-free whipped topping | 1 (8-oz) container, plus 1 more for topping | Keep cold until use |
Layers
| Ingredient | Amount | Notes |
|---|---|---|
| Dairy-free, gluten-free vanilla cookies | 1 package | Such as certified gluten-free vanilla wafers |
| Medium bananas, thinly sliced | 2 | Slice just before assembling |
| Fresh strawberries, thinly sliced | 1 cup | |
| Dairy-free strawberry glaze | 1 cup | Optional but recommended |
Instructions
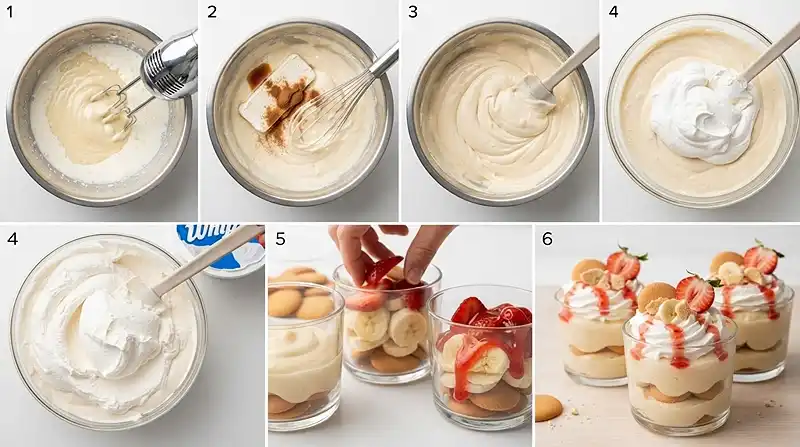
- Make the pudding base. Add the vanilla and banana cream pudding mixes to a large bowl. Pour in the cold dairy-free milk. Using an electric mixer, beat for 2–3 minutes until the mixture thickens noticeably. Set aside.
- Build the cream cheese mixture. In a separate bowl, beat the softened dairy-free cream cheese, vanilla extract, cinnamon, and dairy-free sweetened condensed milk until completely smooth and creamy. Scrape down the bowl sides to catch any lumps before moving on.
- Combine the two mixtures. Add the cream cheese mixture to the prepared pudding. Gently fold together with a spatula until evenly combined — you’re looking for a uniform, creamy color with no streaks.
- Fold in whipped topping. Fold one container of dairy-free whipped topping into the pudding mixture. Mix gently to keep the pudding light and fluffy. Overworking it here will flatten the texture.
- Start assembling. Add a spoonful of pudding to the bottom of each serving cup. This base layer anchors everything above it.
- Add the first fruit and cookie layer. Add a layer of dairy-free vanilla cookies, followed by sliced bananas and strawberries. Drizzle with a little strawberry glaze if using.
- Repeat the layers. Add another layer of pudding and repeat the cookies, bananas, strawberries, and glaze until the cups are nearly full. Two full layers is ideal for most standard cups.
- Finish and garnish. Top each cup with dairy-free whipped topping. Garnish with fresh strawberries, crushed gluten-free cookies, and a small drizzle of strawberry glaze.
- Chill before serving. Cover and refrigerate for at least 30 minutes. Chilling overnight gives the cookies a softer, cake-like texture and allows the flavors to meld beautifully.
Pro Tip: Slice bananas right before layering to prevent browning. If making cups a day ahead, hold the banana layer and add it just before the final garnish.
Make It Your Own
You know… one of the best things about this gluten-free dairy-free pudding recipe is how flexible it is once you understand the structure. The creamy filling is the constant; everything else is fair game.
Swap the fruit. Blueberries, peaches, or mango slices all work beautifully in place of strawberries. Stick with firm, fresh fruit — anything too soft will release excess water and thin out the pudding layer over time.
Try a chocolate base. Replace one pudding mix with dairy-free chocolate pudding for a richer, dessert-forward version. The banana and chocolate combination is a classic for good reason, and it keeps the allergy-friendly dessert format intact.
Make it nut-free. If oat milk isn’t an option, rice milk or hemp milk both work as substitutes in the pudding base. Rice milk tends to produce a slightly thinner set, so add an extra tablespoon of dairy-free cream cheese to compensate.
Skip the glaze. The strawberry glaze adds color and sweetness, but the cups hold up beautifully without it. A simple dusting of powdered sugar on top is an understated alternative for guests who prefer less sweetness.
For more allergy-friendly party ideas, check out these gluten-free cucumber cups — another no-fuss crowd-pleaser that pairs well with these pudding cups at gatherings.
Common Problems & Solutions
Problem: Pudding won’t thicken. The most common cause is warm milk. Dairy-free milks need to be very cold — straight from the refrigerator — to activate the starch in instant pudding mixes. If your pudding stays runny after 3 minutes of beating, it won’t firm up in the cups. Start over with properly chilled milk.
Problem: Filling tastes grainy or lumpy. This usually means the dairy-free cream cheese wasn’t fully softened before beating. Pull it out at least 30 minutes before starting, or microwave it in 10-second intervals until it yields easily to a spoon. Lumps won’t smooth out once mixed with pudding.
Man, oh man… the first time I skipped this step, the texture was so uneven I had to toss the whole batch. Fully softened cream cheese is not optional — it’s the difference between silky and gritty.
Problem: Cups are watery after chilling. Excess moisture usually comes from bananas or strawberries releasing juice over time. Patting fruit dry with a paper towel before layering makes a real difference. Also avoid very ripe, soft bananas — slightly firm ones hold their shape and release less liquid.
Problem: Cookies stay crunchy instead of softening. The overnight chill is what transforms the cookies into that soft, cake-like layer. If you’re serving same-day and prefer a softer texture, lightly brush each cookie with a small amount of dairy-free milk before layering.
Storage & Meal Prep
| Method | Duration | Notes |
|---|---|---|
| Counter | Not recommended | Fresh fruit and cream filling require refrigeration |
| Fridge | 3–4 days | Cover tightly; add fresh garnish before serving |
| Freezer | Not recommended | Whipped topping and fruit don’t freeze well |
To prep ahead without soggy results, assemble the pudding filling and store it separately in a covered bowl in the refrigerator for up to 2 days. Layer the cups the morning of your event, then chill for at least 30 minutes before serving.
If you end up with leftover filling, layer it into a single trifle dish with cookies and fruit for a low-effort next-day dessert. Nothing goes to waste, and the trifle version actually looks more impressive at the table.
Strawberry Banana Pudding Cups FAQs
Can I make these cups ahead of time?
Yes. You can fully assemble the cups up to 24 hours in advance and refrigerate them covered. The cookies will soften and the flavors will deepen, which actually improves the final result. Add fresh strawberry garnish just before serving.
How do I keep the bananas from turning brown?
Slice bananas right before layering them into the cups. You can also toss slices lightly in a small amount of lemon juice to slow oxidation without noticeably changing the flavor. If making cups a day ahead, add the banana layer within a few hours of serving.
What’s the best dairy-free milk to use in this recipe?
Unsweetened almond milk and oat milk both produce a thick, creamy pudding base. Avoid sweetened varieties, which can make the filling overly sweet, and avoid very thin milks like rice milk unless you add extra cream cheese for structure.
Why did my pudding stay runny?
Runny pudding almost always comes down to milk temperature. The milk must be very cold — straight from the refrigerator — for instant pudding to set properly. Room-temperature or warm dairy-free milk will not activate the starch correctly, leaving you with a loose filling.
Can I use homemade whipped topping instead of store-bought?
Yes. You can whip full-fat coconut cream that has been refrigerated overnight. Scoop the solidified cream into a bowl, beat until fluffy, and use it in place of the store-bought container. It won’t be quite as stable for long storage, so plan to serve within a day.
Serving Suggestions
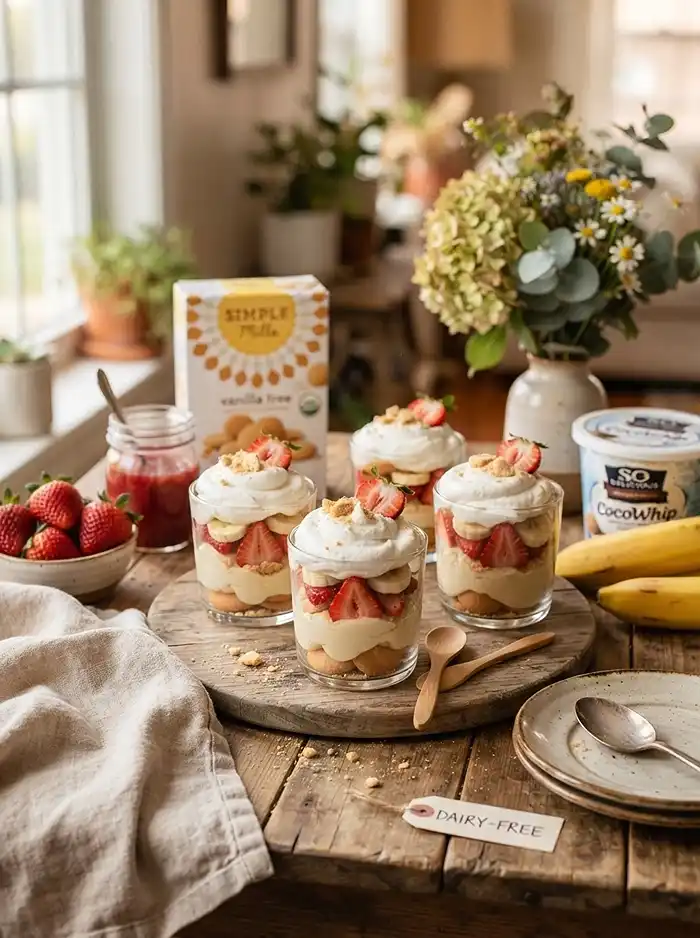
These cups shine as a standalone dessert, but they also pair naturally with a scoop of dairy-free vanilla ice cream on the side for a more indulgent finish. Serve them chilled straight from the refrigerator for the cleanest presentation and firmest texture.
They’re a natural fit for summer cookouts, birthday parties, and baby showers — and they travel well in a cooler, which makes them a reliable option when you need a bring-along dessert that accommodates dietary restrictions without any fuss.
If you’re building out a full spread, these pair really well with this gluten-free unicorn frappuccino for a colorful, crowd-friendly dessert table. And if you need a savory counterpart to round out the menu, this Outback Steakhouse Walkabout soup is a comforting, gluten-free option that keeps everyone satisfied before the sweets come out.
Give these a try and let me know how they went in the comments below — I love hearing which fruit swaps or flavor variations you tried. If you made these for a gathering and they disappeared fast, sharing on Pinterest helps other allergy-friendly families find this recipe too. That kind of small gesture genuinely makes a difference.
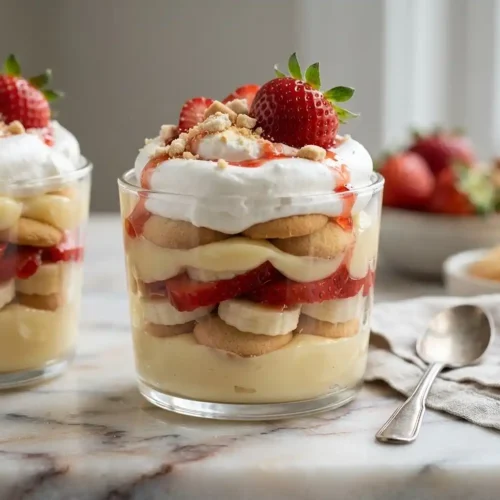
Dairy-Free Strawberry Banana Pudding Cups
Equipment
- Large mixing bowl
- Electric mixer
- Spatula
- Serving Cups
Ingredients
Dairy-Free Pudding
- 1 3.4-oz box Dairy-free vanilla instant pudding mix Check label for gluten-free certification
- 1 3.4-oz box Dairy-free banana cream pudding mix Combines with vanilla for deeper flavor
- 4 cups Very cold unsweetened almond milk or oat milk Must be cold for pudding to set
- 8 oz Dairy-free cream cheese Softened at room temperature for smooth blending
- 1 teaspoon Vanilla extract
- 1 teaspoon Ground cinnamon Adds warm depth to the filling
- 1 14-oz can Dairy-free sweetened condensed milk Coconut-based versions work well
- 1 8-oz container, plus 1 more for topping Dairy-free whipped topping Keep cold until use
Layers
- 1 package Dairy-free, gluten-free vanilla cookies Such as certified gluten-free vanilla wafers
- 2 Medium bananas Thinly sliced just before assembling
- 1 cup Fresh strawberries Thinly sliced
- 1 cup Dairy-free strawberry glaze Optional but recommended
Instructions
- Make the pudding base. Add the vanilla and banana cream pudding mixes to a large bowl. Pour in the cold dairy-free milk. Using an electric mixer, beat for 2–3 minutes until the mixture thickens noticeably. Set aside.
- Build the cream cheese mixture. In a separate bowl, beat the softened dairy-free cream cheese, vanilla extract, cinnamon, and dairy-free sweetened condensed milk until completely smooth and creamy. Scrape down the bowl sides to catch any lumps before moving on.
- Combine the two mixtures. Add the cream cheese mixture to the prepared pudding. Gently fold together with a spatula until evenly combined, looking for a uniform, creamy color with no streaks.
- Fold in whipped topping. Fold one container of dairy-free whipped topping into the pudding mixture. Mix gently to keep the pudding light and fluffy. Overworking it will flatten the texture.
- Start assembling. Add a spoonful of pudding to the bottom of each serving cup. This base layer anchors everything above it.
- Add the first fruit and cookie layer. Add a layer of dairy-free vanilla cookies, followed by sliced bananas and strawberries. Drizzle with a little strawberry glaze if using.
- Repeat the layers. Add another layer of pudding and repeat the cookies, bananas, strawberries, and glaze until the cups are nearly full. Two full layers is ideal for most standard cups.
- Finish and garnish. Top each cup with dairy-free whipped topping. Garnish with fresh strawberries, crushed gluten-free cookies, and a small drizzle of strawberry glaze.
- Chill before serving. Cover and refrigerate for at least 30 minutes. Chilling overnight gives the cookies a softer, cake-like texture and allows the flavors to meld beautifully.