Black Forest Rice Krispie Squares
Make gluten-free black forest rice krispie squares with chocolate, cherries, and white chocolate topping—step-by-step recipe with tips and storage guide.
The first batch of gluten-free Black Forest Rice Krispie Squares I ever made was for a Christmas cookie exchange, and I was genuinely nervous no one would pick them first. They were gone in under four minutes—before the decorated sugar cookies, before the fudge, before anything else on the table.
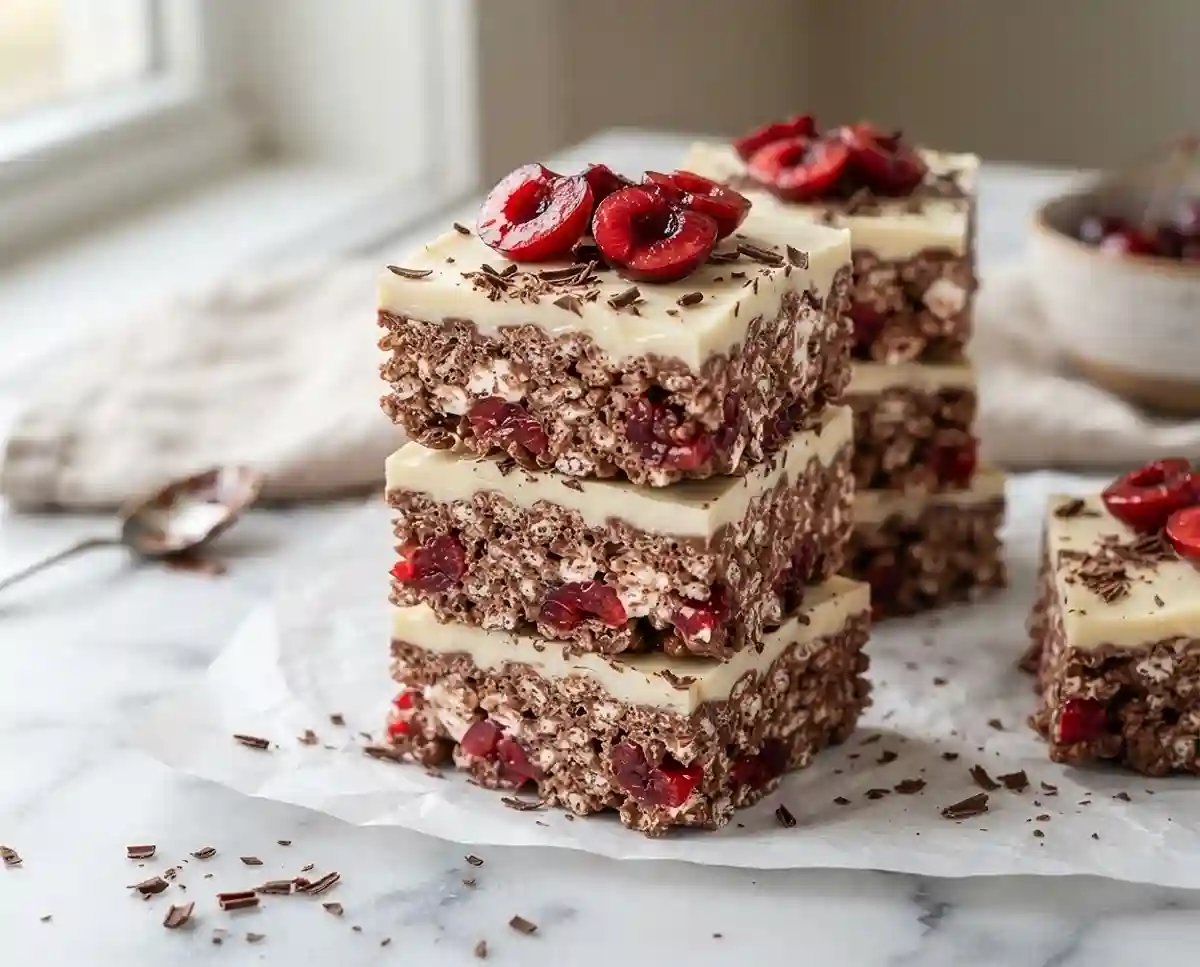
These gluten-free black forest rice krispie squares layer a chewy chocolate-marshmallow base with glazed cherries folded right in, then a poured white chocolate topping that sets into a creamy, crackable shell dusted with grated dark chocolate. The result is as striking as a bakery display case, and it comes together without turning on the oven once.
Well… if you’ve spent any time in the gluten-free world, you know that most no-bake treats are either too sweet or fall apart the moment you pick them up. So what makes these bars hold together beautifully while still tasting like something worth sharing?
Why You’ll Love This Black Forest Rice Krispie Squares Recipe
- Stunning layered look: The white chocolate topping, ruby cherry halves, and dark chocolate shavings create a black forest effect that looks far more effort-intensive than it actually is.
- No oven needed: The whole recipe runs on a stovetop and microwave—perfect for warm-weather entertaining or when the oven is already claimed by something else.
- Naturally adaptable: The base is dairy-free as written using margarine and almond milk, making it accessible for multiple dietary needs without any ingredient hunting.
- Reliable for crowds: One 9×13-inch pan yields 24 squares. They cut cleanly, stack well, and travel without crumbling—a rare combination in gluten-free treats.
The Secret to Perfect Gluten-Free Black Forest Rice Krispie Squares
Most rice krispie bars have one consistent flaw: they’re either pressed so hard they turn into bricks, or they’re too loose to slice cleanly. These squares avoid both problems through a few deliberate steps.
- Chocolate melted into the marshmallow base: Adding the semi-sweet chocolate chips at the same time as the margarine means they melt together into a cohesive mixture rather than seizing or separating. This creates a richer base that sets with more structure than a standard marshmallow bar.
- Gentle pressing, not compacting: A greased spatula lets you even out the surface without flattening the air pockets in the cereal. Overworking the mixture makes the bars dense and hard to bite through cleanly.
- White chocolate topping poured over a set base: Pouring warm white chocolate onto a fully cooled cereal layer keeps the layers distinct. If the base is still warm, the two layers bleed together and the topping won’t set evenly.
- Certified gluten-free cereal matters: Standard crispy rice cereals often contain malt flavoring derived from barley. Always check for the certified gluten-free label—this single detail is the difference between a safe treat and a risky one, as confirmed by trusted celiac labeling guidance from Beyond Celiac.
Ingredients
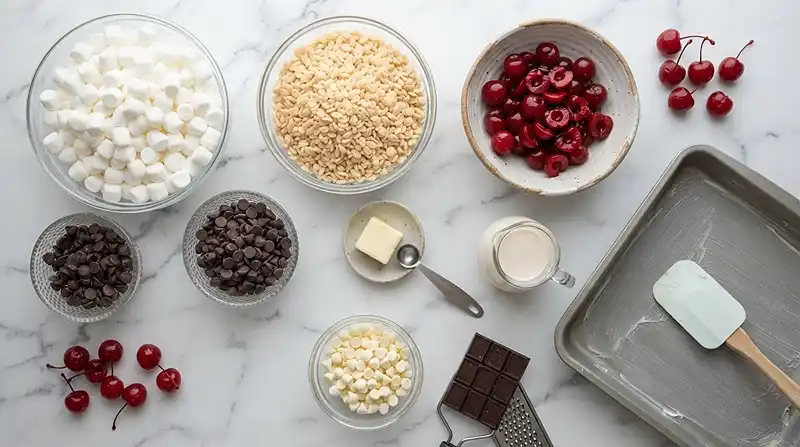
Chocolate Cherry Rice Krispie Squares
| Ingredient | Amount | Notes |
|---|---|---|
| Margarine | ⅓ cup | Plus extra for greasing pan and spatula |
| Semi-sweet chocolate chips | 1 cup | Check label for gluten-free certification |
| Mini marshmallows | 6 cups | Mini melt faster and more evenly than large |
| Certified gluten-free crispy rice cereal | 6 cups | Must be certified GF—standard brands contain malt |
| Glazed cherries, quartered | 1 cup | Folded into the base |
White Chocolate Topping
| Ingredient | Amount | Notes |
|---|---|---|
| White chocolate chips | 2 cups | Good-quality chips melt more smoothly |
| Margarine | 1 tablespoon | Helps the topping pour and set smoothly |
| Unsweetened almond milk | 2 tablespoons | Thins the topping for easy spreading |
| Glazed cherries, halved | 12 | You need at least 24 halves for 24 squares |
| Semi-sweet chocolate baking square, finely grated | ½ square | Grate directly over the set topping |
Instructions
Prep the Pan and Base
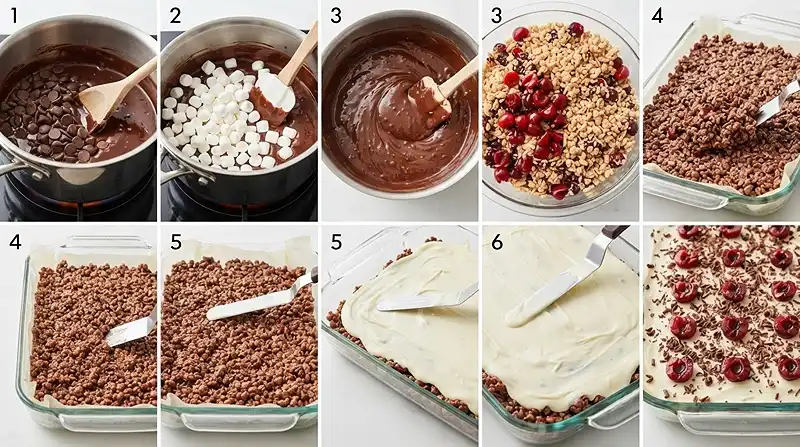
- Grease the pan and spatula. Lightly coat a 9×13-inch baking pan with margarine, making sure to get into the corners. Grease your spatula too—this step is not optional when working with sticky chocolate-marshmallow mixture.
- Melt the chocolate and margarine. Combine the ⅓ cup margarine and 1 cup semi-sweet chocolate chips in a large saucepan over medium-low heat. Stir constantly until both are fully melted and the mixture is smooth and glossy with a deep, nutty chocolate aroma.
- Melt in the marshmallows. Add the 6 cups mini marshmallows to the saucepan and stir continuously. The mixture will look clumpy at first, then gradually smooth out into a thick, ribbony chocolate-marshmallow sauce. Don’t rush this with high heat—slow and steady prevents scorching.
- Remove from heat immediately. Once the marshmallows are fully melted and the mixture is smooth, take the saucepan off the burner. Leaving it on heat any longer will start to break down the structure you need for the bars to set.
Build the Base Layer
- Add the cereal. Pour in the 6 cups of certified gluten-free crispy rice cereal and stir gently until every piece is coated in the chocolate-marshmallow mixture. Work quickly—the mixture starts to set as it cools. Pro Tip: Use a silicone spatula for this step. It’s more flexible than a wooden spoon and makes folding much easier without crushing the cereal.
- Fold in the cherries. Add the 1 cup quartered glazed cherries and fold them in until evenly distributed throughout the cereal mixture. You want the cherry pieces scattered through every section so each square gets some.
- Press into the pan. Transfer the mixture to the prepared pan. Using the greased spatula, press the mixture into an even layer across the entire pan. Apply steady, even pressure—but don’t compact it aggressively or the bars will be too dense to enjoy.
- Let the base set. Allow the bars to cool at room temperature until the surface is fully set and no longer tacky to the touch. This usually takes 20–30 minutes. Don’t rush to the topping stage—a warm base will cause the white chocolate to slide and pool rather than spread evenly.
White Chocolate Topping and Finish
- Prep the cherries for topping. While the base cools, halve the remaining 12 glazed cherries so you have at least 24 halves ready. This gives you one cherry half per square—placed before the topping sets, they sink in just slightly and stay put.
- Melt the white chocolate topping. Combine the 2 cups white chocolate chips, 1 tablespoon margarine, and 2 tablespoons almond milk in a microwave-safe bowl. Microwave at medium-high power in 30-second intervals, stirring well between each one, until almost melted. Keep stirring after the last interval—residual heat will finish the job without overcooking.
- Pour and spread the topping. Pour the melted white chocolate evenly over the cooled cereal base and spread gently with a clean spatula. Work from the center outward so the topping reaches all four edges without disturbing the base layer underneath.
- Decorate and finish. Arrange the cherry halves evenly across the white chocolate surface—one per future square keeps them tidy. Finely grate the ½ semi-sweet chocolate baking square directly over the top for a snow-dusted finish that ties the whole black forest look together.
- Set and cut. Let the squares cool completely at room temperature until the white chocolate topping is fully firm. Cut into 24 squares with a sharp knife, wiping the blade clean between cuts for the cleanest edges.
Make It Your Own
You know… one of the things I love about a rice krispie bar recipe is that the base formula is so stable you can take it in completely different directions without worrying about a structural collapse.
Swap the cherries for dried cranberries: If glazed cherries are hard to source, dried cranberries folded into the base and placed on top work well as a black forest cherry chocolate treat alternative. They’re tarter than glazed cherries, which actually cuts through the sweetness nicely.
Use dark chocolate for the topping: Replacing the white chocolate topping with melted dark chocolate chips gives you a more intense, bittersweet finish. Use the same melting method with margarine and almond milk, and keep the cherry garnish for that classic cherry chocolate treat contrast.
Make them nut-free: This recipe is already nut-free as written, but if you’re using a different non-dairy milk for the topping, check the label carefully. Some oat milks and rice milks are processed in facilities that also handle tree nuts.
Mini version for parties: Press the mixture into a greased mini muffin tin instead of a 9×13 pan for individual gluten-free rice krispie bars. Top each one with a single cherry half and a small drizzle of white chocolate. These are genuinely easier to serve at a buffet than cut squares.
Common Problems & Solutions
Man, oh man… white chocolate has a reputation for being temperamental, and these squares aren’t immune to a few common setbacks. Here’s how to handle them.
Problem: The white chocolate topping seized up and went grainy. This happens when white chocolate overheats or comes into contact with even a drop of water. The solution is to use a completely dry bowl and microwave in short intervals at medium-high—not full power. If it seizes, stir in an extra teaspoon of margarine off heat and keep stirring; it often comes back together.
Problem: The base is too hard to cut cleanly. Overpressing the cereal mixture when it’s still warm compacts it too much. For already-made bars, let them sit at room temperature for 10 minutes before cutting to soften slightly. Going forward, use a light hand with the spatula—even pressure without weight is the goal.
Problem: The cherry halves slide around instead of staying in place. This usually means the white chocolate topping was too warm when you placed the cherries. Let the poured topping sit for 2–3 minutes until it starts to firm slightly at the edges before placing cherries—they’ll grip without sinking entirely.
Problem: The bars taste gritty or stale. This is almost always a cereal issue—either the cereal wasn’t certified gluten-free (and contains malt), or it was stale before it went in. Always check the expiration date and open a fresh box for this recipe. According to authoritative celiac diet guidance, malt flavoring derived from barley is one of the most common hidden sources of gluten in packaged cereals.
Storage & Meal Prep
| Method | Duration | Notes |
|---|---|---|
| Counter | 2–3 days | Airtight container, single layer if possible |
| Fridge | 5–7 days | Bring to room temp before serving for best texture |
| Freezer | 2–3 months | Wrap individually before freezing |
These squares don’t need reheating—they’re best served at room temperature where the white chocolate topping is slightly soft and the base has a gentle chew. If coming from the fridge, let them sit out for 15–20 minutes before serving.
For make-ahead prep, the entire recipe can be made two days in advance and stored covered at room temperature. These gluten-free rice krispie bars also layer well in a gift tin with parchment between layers—no crumbling, no smearing, no stress.
Black Forest Rice Krispie Squares FAQs
Can I use butter instead of margarine?
Yes, unsalted butter works as a direct swap for margarine in the same amounts. The flavor will be richer and slightly more complex. Keep in mind this makes the recipe dairy-containing, so it’s no longer suitable for dairy-free diets.
How do I keep the bars from sticking to the pan?
Greasing both the pan and your spatula generously with margarine before you start is the most important step. If you want extra insurance, line the pan with parchment paper leaving overhang on two sides—this lets you lift the entire slab out before cutting, which makes slicing much cleaner.
What’s the best way to cut these squares cleanly?
A sharp chef’s knife wiped clean between each cut gives the neatest edges. For the cleanest results, refrigerate the finished bars for 20–30 minutes before cutting so the white chocolate topping is fully firm. Score the top lightly first to mark your 24 squares before committing to full cuts.
Why did my white chocolate topping turn lumpy?
Lumpy white chocolate almost always means it overheated or got a small amount of moisture in it. Use medium-high power in 30-second bursts and stir thoroughly between each—the residual heat in the bowl does more work than you’d expect. A tablespoon of margarine stirred in off-heat can rescue a slightly grainy batch.
Can I make these bars ahead for a party or holiday?
Yes, these are one of the best make-ahead gluten-free desserts for exactly this reason. Make the full batch up to 2 days before your event, store covered at room temperature, and they’ll be just as good as day one. Cut them day-of for the freshest-looking edges and most vibrant cherry color.
Serving Suggestions
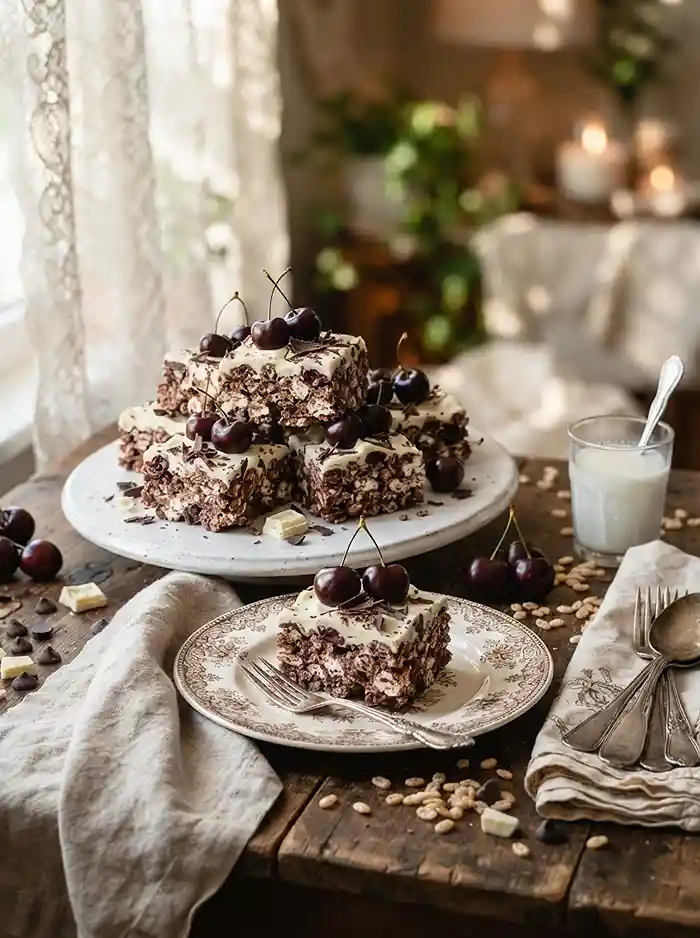
These squares are built for a dessert platter—arrange them cut-side up so the layered cross-section is visible, and they’ll be the first thing people reach for. They’re a natural fit for Valentine’s Day, holiday cookie exchanges, or any gathering where you want something that looks handmade without requiring an entire afternoon in the kitchen.
For a full no-bake dessert spread, pair these with the gluten-free apple cinnamon crumb muffin bars for a sweet contrast of warm spice and cool cherry chocolate. If you’re building a party menu around these, the gluten-free street corn guacamole cups make a savory counterpoint that keeps guests grazing.
Serve alongside a chilled gluten-free dairy-free peach matcha smoothie for a light, refreshing pairing that cuts through the richness of the white chocolate topping.
If you try this recipe, leave a rating and a comment below—I’d genuinely love to hear what occasion you made these for and whether you swapped anything in the topping. Snap a photo and share it on Pinterest so other gluten-free home bakers can find this recipe too. Your feedback is what keeps this community going.
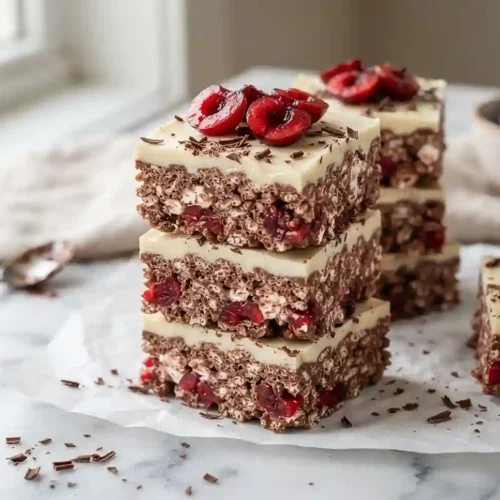
Black Forest Rice Krispie Squares | Simple Gluten-Free Treat
Equipment
- 9×13 inch baking pan
- Large saucepan
- Silicone spatula
- Microwave-safe bowl
- Microwave
- Sharp knife
Ingredients
Chocolate Cherry Rice Krispie Squares
- ⅓ cup Margarine Plus extra for greasing pan and spatula
- 1 cup Semi-sweet chocolate chips Check label for gluten-free certification
- 6 cups Mini marshmallows Mini melt faster and more evenly than large
- 6 cups Certified gluten-free crispy rice cereal Must be certified GF; standard brands may contain malt
- 1 cup Glazed cherries, quartered Folded into the base
White Chocolate Topping
- 2 cups White chocolate chips Good-quality chips melt more smoothly
- 1 tablespoon Margarine Helps the topping pour and set smoothly
- 2 tablespoons Unsweetened almond milk Thins the topping for easy spreading
- 12 Glazed cherries, halved Provides at least 24 halves for decorating the 24 squares
- ½ square Semi-sweet chocolate baking square, finely grated Grate directly over the set topping
Instructions
- Lightly grease a 9×13-inch baking pan with margarine, including the corners. Grease the spatula as well to prevent the sticky chocolate-marshmallow mixture from clinging.
- Combine ⅓ cup margarine and 1 cup semi-sweet chocolate chips in a large saucepan over medium-low heat. Stir constantly until completely melted and smooth.
- Add the 6 cups mini marshmallows and stir continuously until they melt into a thick, smooth chocolate-marshmallow mixture. Keep the heat moderate to prevent scorching.
- Immediately remove the saucepan from the heat once the marshmallows are fully melted and the mixture is smooth.
- Add the 6 cups certified gluten-free crispy rice cereal and gently stir until every piece is coated. Work quickly while the mixture is still workable.
- Fold in 1 cup quartered glazed cherries until they are evenly distributed throughout the cereal mixture.
- Transfer the mixture to the prepared pan and use the greased spatula to press it into an even layer. Apply steady, light pressure rather than compacting it aggressively.
- Allow the base to cool at room temperature for about 20–30 minutes, until fully set and no longer tacky. Do not add the topping while the base is warm.
- Halve the remaining 12 glazed cherries to prepare at least 24 cherry halves for decorating the finished squares.
- Combine 2 cups white chocolate chips, 1 tablespoon margarine, and 2 tablespoons almond milk in a microwave-safe bowl. Microwave at medium-high power in 30-second intervals, stirring well between intervals, until almost melted. Continue stirring to allow residual heat to finish melting.
- Pour the melted white chocolate evenly over the cooled cereal base and gently spread it from the center toward the edges without disturbing the base.
- Arrange the cherry halves evenly over the white chocolate surface, then finely grate ½ semi-sweet chocolate baking square over the top.
- Let the squares cool completely at room temperature until the white chocolate topping is firm. Cut into 24 squares with a sharp knife, wiping the blade clean between cuts.