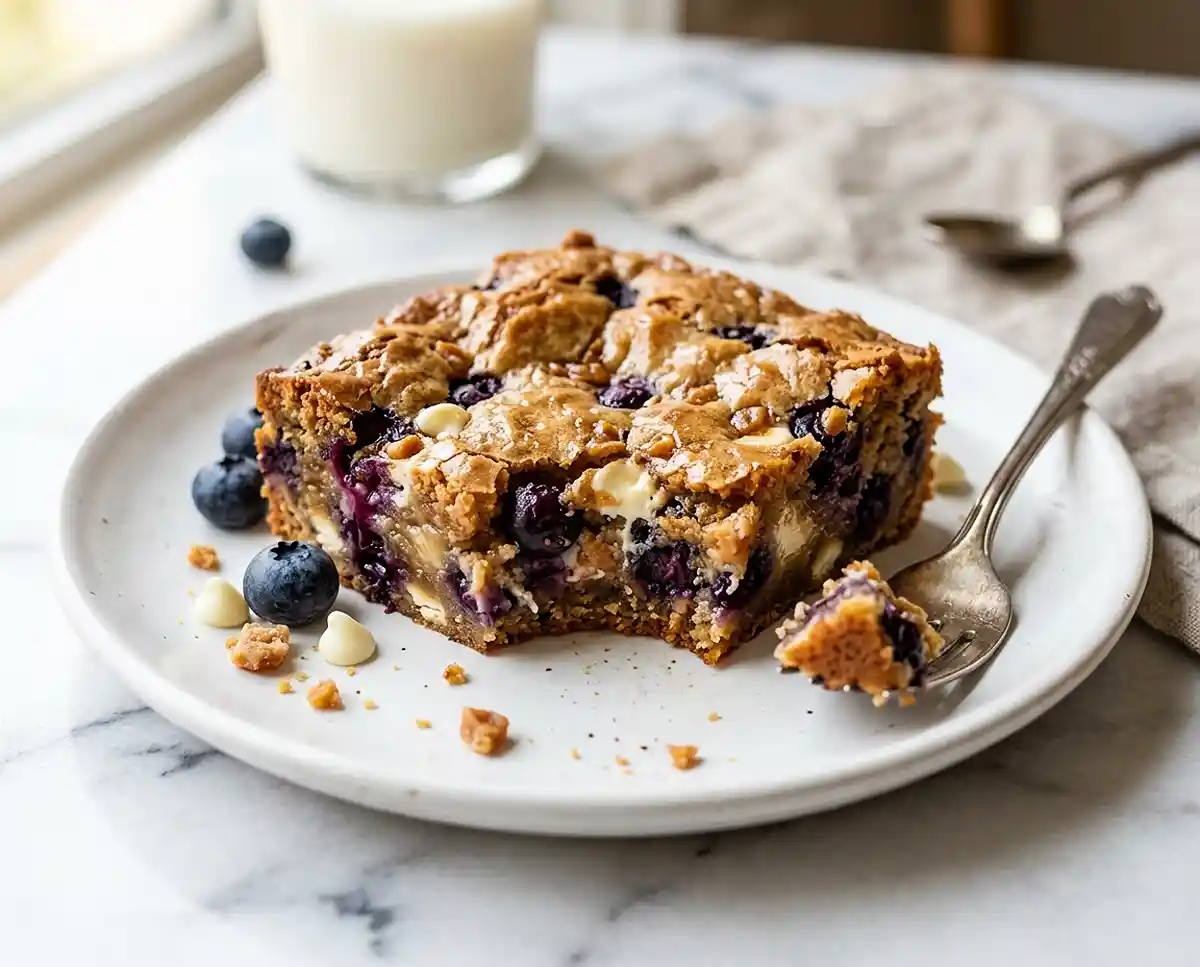
Gluten-Free Brown Butter Blueberry Blondies
Chewy gluten-free brown butter blueberry blondies loaded with white chocolate chips, toffee bits, and fresh berries — fudgy, nutty, and ready in under 30 minutes of baking.
The first time I tried to brown butter in a saucepan for blondies, I burned it. Not a little — full-on black, acrid, smoking disaster that set off every alarm in my house. I scraped the pan, started over, burned it again, and almost gave up on the whole concept of brown butter in gluten-free baking entirely.
Then a fellow baker mentioned browning butter in the microwave, and everything changed. That one technique is how I finally nailed these Gluten-Free Brown Butter Blueberry Blondies — deep, nutty, caramel-rich flavor without the stress of hovering over a hot pan and guessing when golden turns to gone. The microwave method gives you a controlled, foolproof brown butter every single time.
Table of Contents
Why You’ll Love These Gluten-Free Brown Butter Blueberry Blondies
- Rich, complex flavor from brown butter: Browning the butter transforms it from flat and one-dimensional into something deeply nutty and caramel-forward — like the difference between plain toast and brioche that’s been slowly toasted until golden.
- Chewy-fudgy texture with zero gumminess: The combination of brown sugar, egg, and minimal flour produces a dense, chewy center with slightly crackled tops and soft edges — no dry, crumbly gluten-free texture here.
- Beginner-friendly and forgiving: One bowl, no mixer, no chilling, no complicated steps. If you can stir batter with a spatula, you can make these brown butter blueberry bars.
- Loaded with mix-ins: White chocolate chips, toffee bits, and fresh blueberries create pockets of sweetness, crunch, and fruit in every bite. These blondies are meant to be generous.
The Secret to the Best Gluten-Free Brown Butter Blueberry Blondies
- Microwave-browned butter eliminates the guesswork. Traditional stovetop browning requires constant stirring and split-second timing — a few seconds too long and the milk solids burn. The microwave method heats the butter evenly in a covered bowl, and you simply check every 30 seconds after the 4-minute mark until it reaches a deep golden brown. According to King Arthur Baking’s guide to brown butter, the browning process converts milk solids into nutty, caramelized compounds that add layers of flavor impossible to achieve with regular melted butter.
- Cooling the brown butter for 15 minutes before adding the egg prevents the egg from scrambling on contact with hot fat. It also allows the butter to thicken slightly, which helps the batter come together into a cohesive, fudgy consistency rather than a greasy, separated mess.
- Minimal flour keeps the texture chewy, not cakey. Only 1 cup of gluten-free 1:1 baking flour goes into the entire batch. Less flour means less structure, which is exactly what produces that dense, fudgy chew that defines a great blondie. Overmixing or adding extra flour will push these toward cake territory.
- Folding the blueberries in last and gently prevents them from bursting and turning the batter purple. Whole berries create distinct jammy pockets when they bake, while crushed berries bleed moisture and color throughout the bar. A gentle hand here makes a visible difference in the finished product.
Ingredients
Blondie Batter
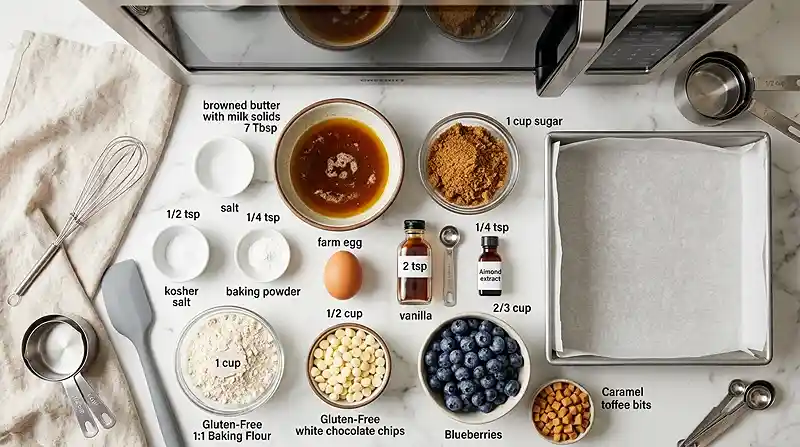
- 7 tablespoons butter (salted or unsalted)
- 1 cup brown sugar (light or dark)
- 1 large egg
- 2 teaspoons vanilla extract
- 1/4 teaspoon almond extract
- 1/2 teaspoon kosher salt
- 1/4 teaspoon baking powder
- 1 cup gluten-free 1:1 baking flour
Mix-Ins and Toppings
- 1/2 cup gluten-free white chocolate chips (plus extra for garnish if desired)
- 1/2 cup gluten-free toffee bits (plus extra for garnish if desired)
- 2/3 cup fresh blueberries (plus extra for garnish if desired)
A note on the flour: use a gluten-free 1:1 baking flour that already contains xanthan gum, such as Bob’s Red Mill or King Arthur Measure for Measure. These blends are formulated to replace all-purpose flour directly without additional binders.
Verify that your white chocolate chips and toffee bits are certified gluten-free. The Celiac Disease Foundation’s gluten-free food guide is a reliable resource for checking packaged ingredient labels when you’re unsure about a specific brand.
Step-by-Step Instructions
Prep the Brown Butter and Pan
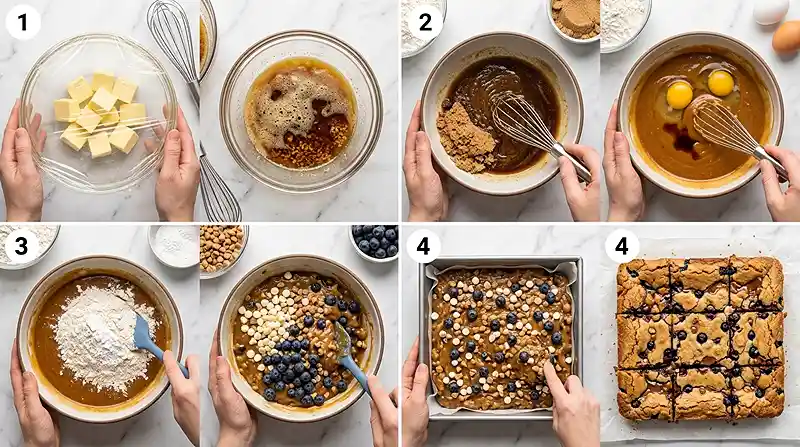
Step 1 — Brown the butter in the microwave. Place the 7 tablespoons of butter in a medium-large microwave-safe bowl. Cover tightly with plastic wrap and cut 3-4 small slits in the top for ventilation. You can also use a microwave-safe plate as a cover.
Cook on high power for about 4-5 minutes, checking every 30 seconds after the 4-minute mark. The butter should turn a deep golden brown with a rich, nutty aroma — like toasting hazelnuts in a warm oven.
Carefully remove from the microwave and allow the browned butter to cool for 15 minutes. This cooling period is essential — don’t skip it.
Step 2 — Preheat and prepare the pan. Position a rack in the center of the oven and preheat to 350 degrees Fahrenheit. Spray an 8-by-8-inch square baking pan with baking spray, then line with parchment paper or foil, leaving overhang on two sides for easy lifting. Lightly spray the lining again and set aside.
Mix and Bake
Step 3 — Build the batter base. Add the 1 cup brown sugar to the cooled browned butter and whisk until smooth and glossy. The mixture should look like wet sand with a caramel sheen. Add the 1 large egg, 2 teaspoons vanilla extract, and 1/4 teaspoon almond extract, then whisk well until fully combined.
Step 4 — Add the dry ingredients. Sprinkle the 1/4 teaspoon baking powder and 1/2 teaspoon kosher salt over the mixture and stir to combine. Add the 1 cup gluten-free 1:1 baking flour and stir gently with a silicone spatula or wooden spoon until just combined. Stop the moment the flour streaks disappear — overmixing develops too much structure.
Step 5 — Fold in the mix-ins. Fold in the 1/2 cup gluten-free white chocolate chips and half of the 1/2 cup gluten-free toffee bits. Then gently fold in the 2/3 cup fresh blueberries, being careful not to crush them. The berries should remain whole and evenly distributed.
Step 6 — Transfer and top. Spread the batter into the prepared pan and smooth the top evenly with the spatula. Sprinkle the remaining toffee bits over the surface. Add extra blueberries and white chocolate chips on top if desired for a more loaded, bakery-style appearance.
Step 7 — Bake. Bake for 23-28 minutes, or until the top is cracked and lightly golden brown. The center may look slightly underset — this is exactly right. Do not overbake. Blondies firm up significantly as they cool, and pulling them out while slightly soft in the middle is the key to a chewy, fudgy result.
Step 8 — Cool completely before cutting. Cool in the pan for at least 1 full hour before lifting out by the parchment overhang and cutting into squares. Cutting too early results in crumbly, falling-apart bars. Patience here is non-negotiable for clean slices.
Pro Tip: For the neatest cuts, use a sharp knife dipped in hot water and wiped dry between each slice. The warm blade glides through the sticky toffee bits and chocolate without dragging.
Make It Your Own
Swap the berries: Fresh raspberries, blackberries, or chopped strawberries all work beautifully in place of blueberries. Keep the total fruit at 2/3 cup so the moisture level stays balanced. Frozen berries are not recommended — they release too much liquid during baking and can make the center soggy.
Change the chocolate: Swap the white chocolate chips for milk chocolate, dark chocolate, or butterscotch chips. Each creates a different flavor profile against the brown butter base. Dark chocolate adds bittersweet depth, while butterscotch doubles down on the caramel-toffee theme of these brown butter blueberry bars.
Man, oh man… if you fold in 1/3 cup of toasted pecans or walnuts alongside the toffee bits, the blondies take on an almost praline-like crunch that’s hard to stop eating. The toasted nuts amplify the nutty brown butter flavor and add a textural contrast that makes every bite more interesting.
Make them nut-free: Simply omit the almond extract and replace it with an additional 1/2 teaspoon of vanilla extract. The blondies will still have incredible depth from the brown butter and toffee bits. Most gluten-free toffee bits are nut-free, but always check the label for your specific brand.
Try different toppings: A light drizzle of melted white chocolate over the cooled bars, a sprinkle of flaky sea salt, or a dusting of powdered sugar all elevate the presentation. These small touches turn a simple easy bake dessert into something that looks like it came from a specialty bakery.
Common Problems and How to Fix Them
Problem: The blondies are dry and crumbly. You overbaked them. At 23-28 minutes, the center should still look slightly soft and underset when you pull the pan out. Gluten-free baked goods dry out faster than wheat-based ones, so err on the side of pulling them early. They’ll firm up completely during the 1-hour cooling period.
Problem: The batter looks greasy and separated. The brown butter was too hot when you added the egg. You know… this is the exact mistake I made my second time around, and the batter looked like a broken sauce. Let the butter cool for a full 15 minutes — it should be warm but not hot to the touch. If the batter does separate, whisk vigorously for 30 seconds and it usually comes back together.
Problem: The blueberries sank to the bottom. This happens when the batter is too thin or the berries are too wet. Pat the blueberries dry with a paper towel before folding them in, and make sure you haven’t added extra liquid to the batter. A slightly thicker batter suspension holds the berries in place better during baking.
Problem: The brown butter didn’t actually brown. Your microwave may run at lower wattage. Simply continue heating in 30-second intervals until the butter turns a deep golden amber and smells distinctly nutty and toasty — not just melted. The color shift is dramatic and unmistakable once it happens. Clear, pale yellow butter is just melted butter, not browned butter.
Storage and Meal Prep
| Method | Duration | Notes |
|---|---|---|
| Counter | 12-24 hours | Airtight container; best texture window |
| Refrigerator | Up to 5 days | Bring to room temp 15-20 min before serving |
| Freezer | Up to 3 months | Wrap individually in plastic, then foil |
These blondies are at their absolute best within the first 12-24 hours, when the brown butter flavor is most pronounced and the texture is at peak chewiness. After that they’re still good, but the edges lose a bit of their crackle.
For freezing, slice the bars first and wrap each one individually so you can thaw exactly what you need. Thaw at room temperature for 20-30 minutes or in the fridge overnight. A quick 10-second microwave burst brings back that just-baked warmth without melting the chocolate chips.
gluten-free Brown Butter Blueberry Blondies FAQs
Can I use a different size pan?
Yes, but it changes the thickness and bake time. A 9-by-9-inch pan produces thinner, crispier bars that bake faster — check at 18 minutes. A 9-by-13-inch pan makes them too thin for a proper chewy texture. The 8-by-8-inch pan is the ideal size for thick, fudgy blondies from this recipe.
Why did my blondies come out gummy in the center?
The most likely cause is underbaking combined with cutting too soon. While you don’t want to overbake, the bars do need the full 23-28 minutes and a complete 1-hour cool to set properly. If they’re still gummy after cooling, return them to a 325-degree oven for 5 more minutes.
What’s the best gluten-free flour for blondies?
A 1:1 gluten-free baking flour blend with xanthan gum already included gives the most reliable results. Bob’s Red Mill 1-to-1 and King Arthur Measure for Measure are both tested and trusted options. Avoid almond flour or coconut flour here — they absorb moisture differently and will change the texture completely.
Can I make these dairy-free?
You can substitute the butter with a plant-based butter like Miyoko’s, but browning dairy-free butter is trickier since plant butters contain different milk solids. The flavor will be slightly less nutty and complex. Use dairy-free white chocolate chips and verify your toffee bits are dairy-free as well.
How do I store these for a bake sale or party?
Wrap each bar individually in plastic wrap or place them in a single layer in an airtight container with parchment between layers. They travel well at room temperature for up to 24 hours. For longer events, keep them covered and out of direct sunlight to prevent the chocolate from melting.
Serving Suggestions
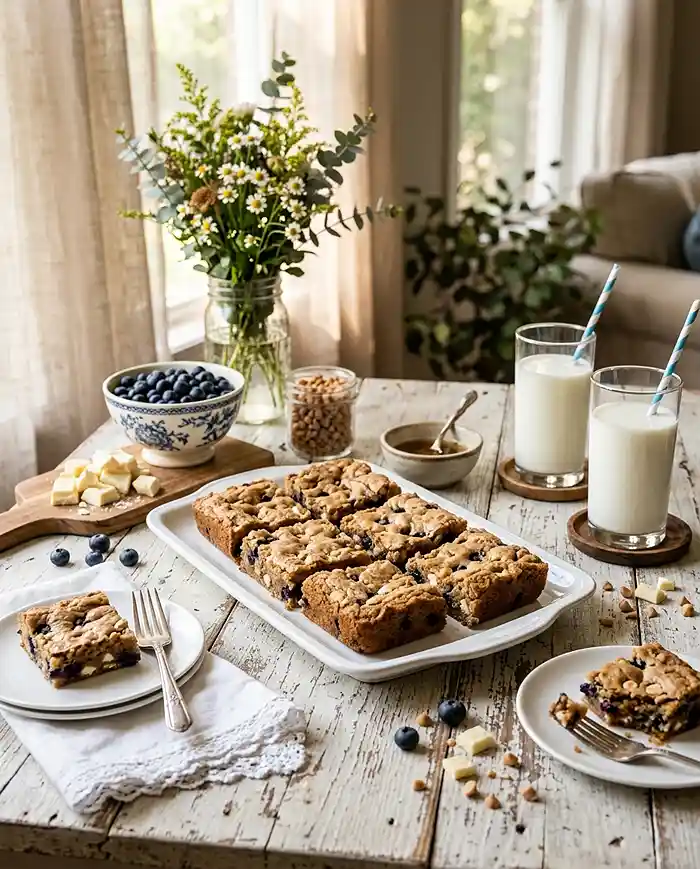
These Gluten-Free Brown Butter Blueberry Blondies are a standout addition to a Thanksgiving dessert spread, where the brown butter and toffee flavors fit right in alongside pumpkin pie and pecan bars. Stack them on a platter with a light dusting of powdered sugar for a polished, bakery-worthy presentation.
For a full dessert pairing, serve them alongside gluten-free coconut cream berry trifle cups for a berry-themed dessert table. If you’re hosting a casual summer dinner, start with gluten-free pesto turkey burger sliders and a side of gluten-free Greek chicken orzo salad, then close the meal with these blondies and a scoop of vanilla ice cream.
Go Bake a Batch This Weekend
If you’ve been wanting a gluten-free bar that tastes rich, complex, and genuinely indulgent — not like a compromise — these brown butter blueberry blondies are the ones to try. One bowl, no mixer, and about 30 minutes of baking stands between you and a pan of chewy, toffee-studded, berry-loaded squares.
I’d love to hear how yours turn out. Drop a comment below with your favorite mix-in combination or any tweaks you made, and if that crackly, golden top looks as beautiful as it tastes, pin this recipe to your gluten-free dessert board so it’s ready for your next baking session.
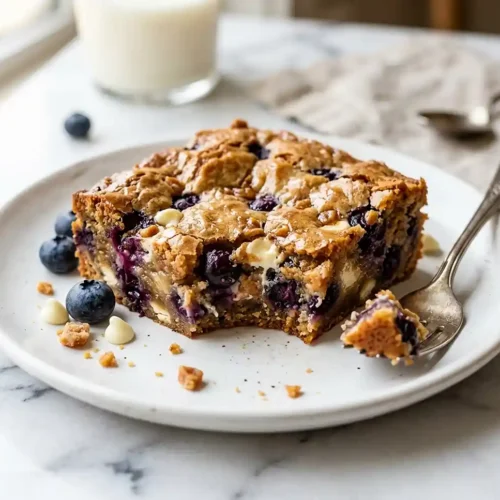
Gluten-Free Brown Butter Blueberry Blondies
Equipment
- Medium-large microwave-safe bowl
- Plastic wrap or microwave-safe plate
- Whisk
- Silicone spatula or wooden spoon
- 8-by-8-inch square baking pan
- Parchment paper or foil
- Baking spray
Ingredients
Blondie Batter
- 7 tablespoons butter salted or unsalted
- 1 cup brown sugar light or dark
- 1 large egg
- 2 teaspoons vanilla extract
- ¼ teaspoon almond extract
- ½ teaspoon kosher salt
- ¼ teaspoon baking powder
- 1 cup gluten-free 1:1 baking flour such as Bob’s Red Mill or King Arthur Measure for Measure
Mix-Ins and Toppings
- ½ cup gluten-free white chocolate chips plus extra for garnish if desired
- ½ cup gluten-free toffee bits plus extra for garnish if desired
- ⅔ cup fresh blueberries plus extra for garnish if desired
Instructions
- Place the 7 tablespoons of butter in a medium-large microwave-safe bowl and cover tightly with plastic wrap, cutting 3-4 small slits in the top for ventilation. Alternatively, cover with a microwave-safe plate.
- Cook the butter on high power in the microwave for about 4-5 minutes, checking every 30 seconds after the 4-minute mark until the butter turns a deep golden brown and smells distinctly nutty. Carefully remove from the microwave and allow the browned butter to cool for 15 minutes.
- While the butter cools, position a rack in the center of the oven and preheat to 350 degrees Fahrenheit (175 degrees Celsius). Spray an 8-by-8-inch square baking pan with baking spray, line with parchment paper or foil leaving overhang on two sides, and lightly spray again.
- Add the 1 cup brown sugar to the cooled browned butter and whisk until smooth and glossy. Add the 1 large egg, 2 teaspoons vanilla extract, and 1/4 teaspoon almond extract and whisk well until fully combined.
- Sprinkle the 1/4 teaspoon baking powder and 1/2 teaspoon kosher salt over the mixture and stir to combine. Add the 1 cup gluten-free 1:1 baking flour and stir gently with a silicone spatula or wooden spoon until just combined with no dry streaks remaining.
- Fold in the 1/2 cup gluten-free white chocolate chips and half of the 1/2 cup gluten-free toffee bits. Then gently fold in the 2/3 cup fresh blueberries, being careful not to crush them.
- Transfer the batter to the prepared pan and smooth the top evenly. Sprinkle the remaining toffee bits over the batter. Add extra blueberries and white chocolate chips on top if desired for a more loaded appearance.
- Bake for 23-28 minutes, or until the top is cracked and lightly golden brown. The center may look slightly underset — this is correct. Do not overbake. The blondies will firm up as they cool.
- Cool in the pan for at least 1 full hour before lifting out by the parchment overhang and cutting into 12 squares. For the cleanest cuts, dip a sharp knife in hot water and wipe dry between each slice.