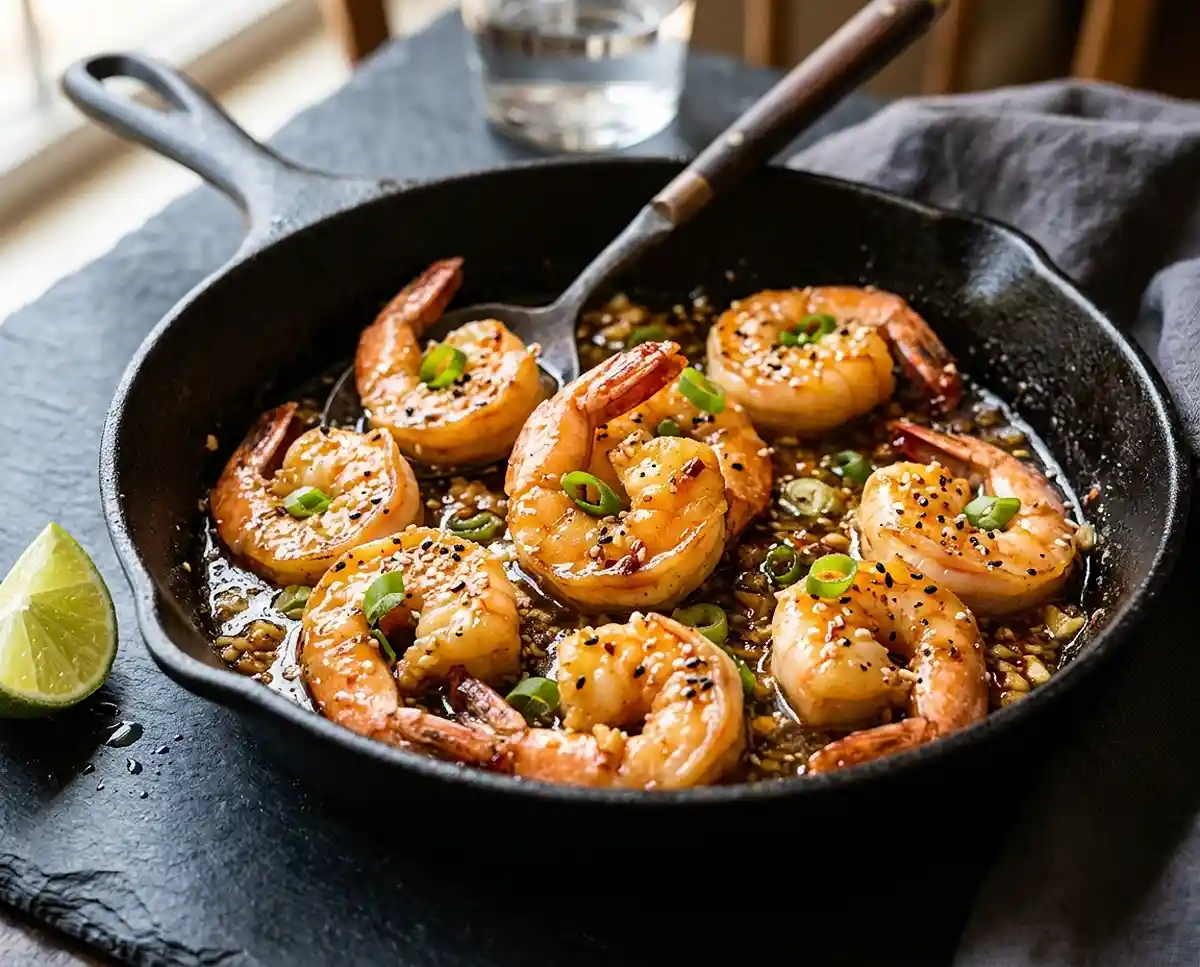
Gluten-Free Honey Garlic Shrimp Skillet
A glossy, sticky gluten-free honey garlic shrimp skillet with just five core ingredients, ready in under 15 minutes flat.
I nearly gave up on making honey garlic shrimp at home after my third batch in a row turned out rubbery and swimming in a thin, watery sauce that tasted like salty sugar water. The shrimp were overcooked, the garlic was burnt, and the honey had caramelized into a bitter crust on the bottom of my pan.
The breakthrough came when I stopped cooking all the shrimp at once. Overcrowding a skillet drops the temperature instantly, so instead of searing, the shrimp were steaming in their own liquid. The moment I started cooking them in two batches — letting each piece hit screaming-hot butter and sear properly — everything changed. That’s when my Gluten-Free Honey Garlic Shrimp Skillet finally became the sticky, glossy, slightly caramelized dinner I’d been chasing.
Table of Contents
Why You’ll Love This Gluten-Free Honey Garlic Shrimp Skillet
- Sticky-sweet, savory, and deeply garlicky: The honey and gluten-free soy sauce reduce into a glossy glaze that clings to every curve of the shrimp — like a thin coat of warm caramel with a savory backbone.
- Five core ingredients, twelve minutes: This is a true weeknight rescue meal. No marinating, no breading, no complicated prep. If you can melt butter and stir a pan, you can nail this.
- Naturally gluten-free with one simple swap: Use certified gluten-free soy sauce (tamari or coconut aminos) and the entire dish is safe without any specialty flours or binders.
- Endlessly adaptable: Serve it over rice, alongside roasted corn for a complete corn dinner recipe, in lettuce cups, or straight from the skillet with a squeeze of lime.
The Secret to a Sticky Gluten-Free Honey Garlic Shrimp Skillet
- Building the sauce first, then removing it prevents the honey from burning while the shrimp cook. Honey scorches quickly at high heat, so simmering it with garlic and soy sauce for just 1-2 minutes, then setting it aside, lets you get a concentrated glaze without any bitterness. The sauce goes back in at the very end to coat the finished shrimp.
- Cooking shrimp in two batches is the single most important technique here. According to the Serious Eats guide to cooking shrimp, overcrowding releases moisture that drops pan temperature rapidly, causing shrimp to steam instead of sear. Two batches means each shrimp gets direct contact with hot butter for a proper golden sear.
- Butter in two additions serves a dual purpose. The first half builds the sauce base and sears the first batch. The second half goes in fresh for the second batch, ensuring every shrimp gets cooked in clean, hot fat rather than leftover pan liquid.
- The C-shape curl test tells you exactly when shrimp are done. A loose C means cooked through and juicy. A tight O means overcooked and rubbery. Pull them the moment they curl into that C and turn fully pink — residual heat will finish the job.
Ingredients
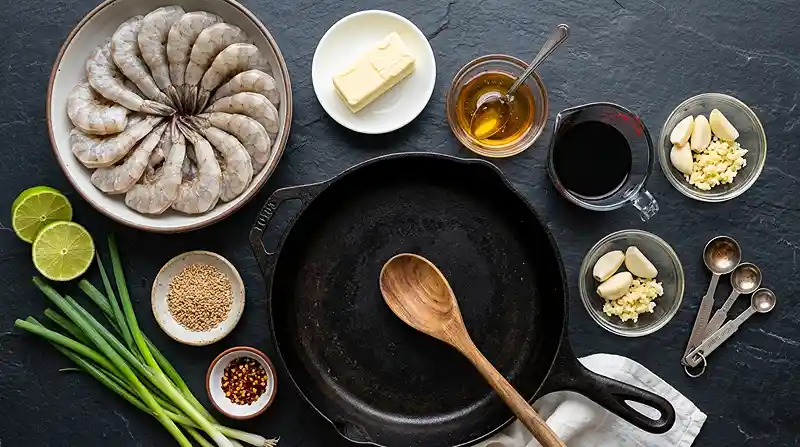
Honey Garlic Shrimp
- 4 tablespoons unsalted butter (divided into two portions)
- 4 garlic cloves, minced
- 4 tablespoons honey (for keto or low carb, use sugar-free maple syrup or sugar-free honey substitute)
- 3 tablespoons soy sauce (use a gluten-free soy sauce or tamari to keep the dish gluten-free)
- 1 1/2 pounds jumbo shrimp, deveined, shell off, tail on or off (thawed)
Optional Garnishes
- Juice of 1 lime
- 1-2 tablespoons chopped green onions
- 1-2 teaspoons sesame seeds
- 1/8 teaspoon red pepper flakes or a few drops of hot sauce
A note on the soy sauce: standard soy sauce contains wheat and is not gluten-free. For a certified safe option, use tamari (most brands are wheat-free) or coconut aminos for a soy-free alternative.
The Celiac Disease Foundation’s gluten-free food guide is a reliable resource for verifying which soy sauce brands are safe for a strict gluten-free diet.
Step-by-Step Instructions
Build the Sauce
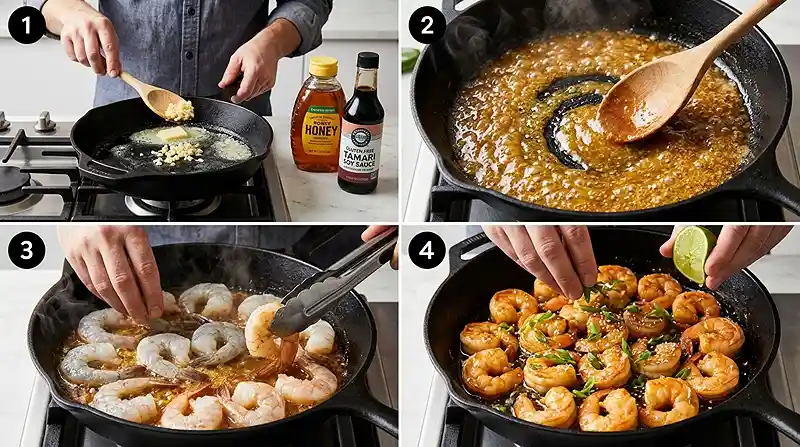
Step 1 — Melt the first portion of butter. Heat a large cast-iron skillet over medium-high heat. Add 2 tablespoons of the unsalted butter and let it melt completely until it begins to foam and the bubbling subsides.
Step 2 — Make the honey garlic sauce. Add the 4 minced garlic cloves, 3 tablespoons gluten-free soy sauce, and 4 tablespoons honey to the skillet. Swirl the pan gently and let the mixture simmer for 1-2 minutes until it thickens slightly and turns glossy.
Transfer the sauce to a small bowl and set it aside. If you like heat, stir in 1/8 teaspoon of red pepper flakes or a few drops of hot sauce now while the sauce is still warm.
Cook the Shrimp
Step 3 — Sear the first batch. With the skillet still over medium-high heat, add half of the 1 1/2 pounds of shrimp in a single layer. Cook undisturbed for about 2 minutes until the bottoms turn golden pink and develop a light sear.
Flip each shrimp and cook for an additional 1-2 minutes until they turn fully pink and curl into a loose C-shape. Transfer immediately to a clean plate.
Pro Tip: Resist the urge to move the shrimp around. Letting them sit undisturbed on the hot surface is what creates that golden, slightly caramelized edge.
Step 4 — Sear the second batch. Add the remaining 2 tablespoons of butter to the skillet and let it melt. Add the second half of the shrimp in a single layer and repeat the process — 2 minutes per side until pink and curled.
Step 5 — Combine everything. Return the first batch of shrimp to the skillet. Pour the reserved honey garlic sauce over all the shrimp and toss gently for about 30 seconds until every piece is coated in a sticky, glistening glaze.
Garnish and Serve
Step 6 — Finish and serve immediately. Squeeze the juice of 1 lime over the top if desired. Sprinkle with 1-2 tablespoons of chopped green onions and 1-2 teaspoons of sesame seeds for color and crunch. Serve the honey garlic shrimp right away while the glaze is still warm and glossy.
Make It Your Own
Swap the protein: Boneless chicken thighs cut into bite-sized pieces work beautifully in this sauce. Increase the cook time to 4-5 minutes per side and make sure the internal temperature reaches 165 degrees Fahrenheit. The honey garlic glaze clings to chicken just as well as it does to shrimp.
Make it keto or low-carb: Replace the 4 tablespoons of honey with sugar-free maple syrup or a sugar-free honey substitute. The sauce won’t caramelize quite as deeply since sugar-free alternatives lack the natural sugars that brown, but the flavor profile stays remarkably close.
Man, oh man… if you toss this gluten-free shrimp skillet over a bowl of steamed jasmine rice with a drizzle of the extra pan sauce, you’ve got yourself a restaurant-quality honey garlic shrimp dinner for a fraction of the cost and effort.
Add vegetables: Snap peas, broccolini, or thinly sliced bell peppers can be sauteed in the skillet before you start the shrimp. Cook them for 2-3 minutes until crisp-tender, remove, and add them back when you toss everything in the sauce at the end.
Use coconut aminos instead of soy sauce: Coconut aminos are slightly sweeter and lower in sodium than tamari. If you make this swap, reduce the honey by about 1 tablespoon to keep the sauce balanced. This also makes the dish soy-free for anyone with a soy allergy.
Common Problems and How to Fix Them
Problem: The shrimp are rubbery and tough. They were overcooked. Shrimp go from done to overdone in under 30 seconds at high heat. Pull them from the skillet the moment they curl into a C-shape and turn fully opaque — the residual heat finishes the cooking. A tight O-shape curl means you’ve gone too far.
Problem: The sauce is thin and watery. The most common cause is moisture from the shrimp diluting the glaze. You know… this is exactly why building the sauce first and setting it aside works so well. If the sauce still seems thin, simmer it alone in the skillet for an extra 30-60 seconds before adding the shrimp back in.
Problem: The garlic burned and tastes bitter. Garlic burns very quickly at medium-high heat, especially in a cast-iron skillet that retains heat aggressively. Keep the garlic moving by swirling the pan constantly during that first 1-2 minutes. If it starts turning dark brown, immediately add the soy sauce and honey to drop the temperature.
Problem: The shrimp stuck to the skillet. Make sure the butter is fully melted and foaming before adding the shrimp, and let each piece cook undisturbed for the full 2 minutes. Shrimp naturally release from the pan once a sear has formed. If you flip too early, the surface tears and sticks.
Storage and Meal Prep
| Method | Duration | Notes |
|---|---|---|
| Counter | Up to 2 hours | Covered; serve promptly for best texture |
| Refrigerator | 2-3 days | Airtight container; sauce may thicken |
| Freezer | Up to 1 month | Freeze in sauce; shrimp texture softens slightly |
To reheat, warm the shrimp and sauce together in a skillet over medium-low heat for 2-3 minutes, adding a splash of water to loosen the glaze. Microwaving works in a pinch — cover loosely and heat in 30-second bursts — but the skillet method keeps the shrimp from turning rubbery.
For meal prep, cook the sauce and shrimp separately, then combine just before reheating. This keeps the shrimp from absorbing too much sauce during storage and helps them maintain their texture. Leftover sauce is excellent drizzled over steamed vegetables or rice bowls.
Your Questions Answered
Can I use frozen shrimp without thawing first?
No — always thaw shrimp before cooking in this recipe. Frozen shrimp release a significant amount of water as they cook, which drops the skillet temperature and prevents searing. Thaw them in a colander under cold running water for 5-7 minutes, then pat completely dry with paper towels before cooking.
What’s the best gluten-free soy sauce for this dish?
San-J Tamari and Kikkoman Gluten-Free Soy Sauce are both widely available and reliable. Tamari has a slightly richer, deeper flavor than standard soy sauce, which actually improves this recipe. Coconut aminos work as a soy-free alternative but are sweeter, so reduce the honey by 1 tablespoon if you go that route.
How do I know when the shrimp are done?
Look for a loose C-shape curl and fully pink, opaque flesh. The sear side should have a light golden color where it contacted the hot butter. If you’re unsure, cut one shrimp in half — the center should be white and opaque with no translucent gray remaining.
Why did my sauce taste burnt and bitter?
The honey or garlic likely scorched from too-high heat. Honey caramelizes rapidly and can go from golden to burnt in seconds. Keep the heat at medium-high rather than high, and swirl the pan constantly during the 1-2 minute sauce-building step. If you smell anything acrid, pull the pan off the burner immediately.
Can I double this recipe for a larger crowd?
Yes, but cook the shrimp in three or four batches instead of two. The sauce scales perfectly — just double all ingredients. The key is still avoiding overcrowding the skillet. Use the same single-layer, undisturbed technique for each batch and you’ll get identical results at any volume.
Serving Suggestions
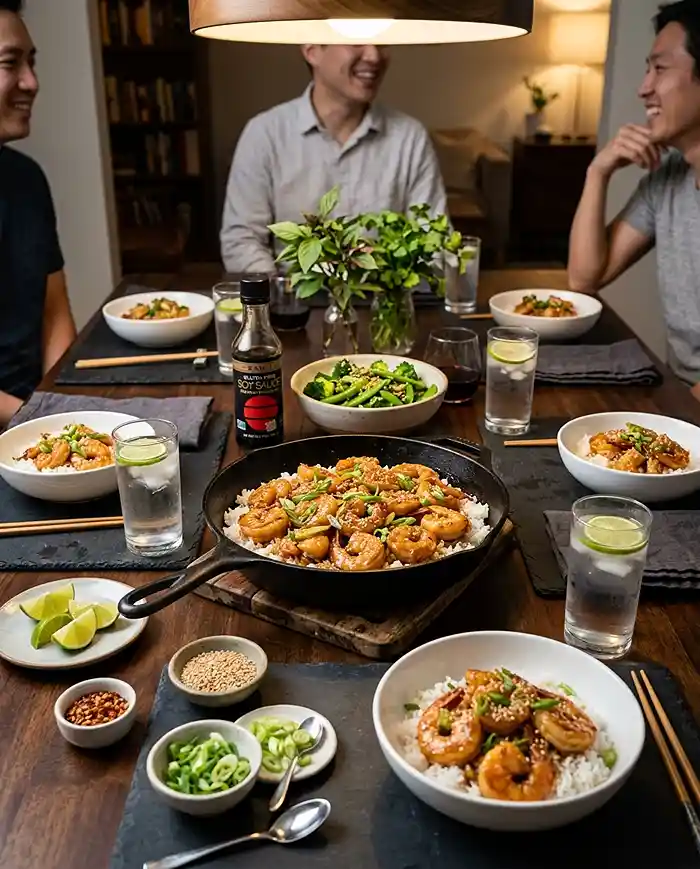
This Gluten-Free Honey Garlic Shrimp Skillet is a natural centerpiece for a Fourth of July backyard dinner when you want something quick, impressive, and light enough for warm weather. Serve it over steamed white rice, cauliflower rice, or alongside grilled corn on the cob for a complete corn dinner recipe that feels festive without hours of prep.
For a fuller spread, start with a warm batch of gluten-free hot honey goat cheese dip as an appetizer — the honey theme ties the meal together nicely.
If you’re building a lighter meal, try pairing the shrimp with sweet chili chicken lettuce wraps for variety, and finish with gluten-free blueberry lemon coconut pops as a refreshing no-fuss dessert.
Go Make This Tonight
If you’ve been craving a fast, flavorful shrimp dinner that’s genuinely gluten-free and doesn’t require a single specialty ingredient beyond a bottle of tamari, this is the recipe to try. Twelve minutes, one skillet, and you’ll have a plate of sticky, garlicky, golden shrimp that’ll make your kitchen smell incredible.
I’d love to hear how yours turns out — leave a comment below with your favorite way to serve it, and save this recipe to your Pinterest board so it’s ready the next time you need dinner in a hurry.
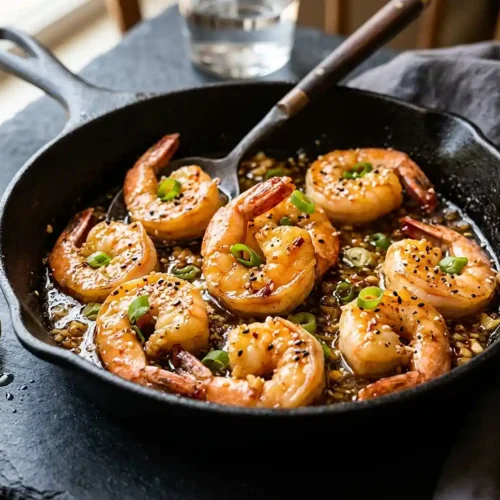
Gluten-Free Honey Garlic Shrimp Skillet
Equipment
- Large cast iron skillet
- Small bowl
- Spatula or tongs
- Plate for resting shrimp
Ingredients
Honey Garlic Shrimp
- 4 tablespoons unsalted butter divided into two portions
- 4 cloves garlic minced
- 4 tablespoons honey for keto/low carb use sugar-free maple syrup or sugar-free honey substitute
- 3 tablespoons soy sauce use a gluten-free soy sauce or tamari to keep this meal gluten-free
- 1 ½ pounds jumbo shrimp deveined, shell off, tail on or off, thawed
Optional Garnishes
- 1 lime juiced
- 1-2 tablespoons green onions chopped
- 1-2 teaspoons sesame seeds
- ⅛ teaspoon red pepper flakes or a few drops of hot sauce, optional
Instructions
- Heat a large cast-iron skillet over medium-high heat. Add 2 tablespoons of the unsalted butter and let it melt completely until it begins to foam and the bubbling subsides.
- Add the 4 minced garlic cloves, 3 tablespoons gluten-free soy sauce, and 4 tablespoons honey to the skillet. Swirl the pan gently and let the mixture simmer for 1-2 minutes until it thickens slightly and turns glossy. Transfer the sauce to a small bowl and set aside. If you enjoy spicy food, stir in 1/8 teaspoon of red pepper flakes or a few drops of hot sauce into the sauce now.
- With the skillet still over medium-high heat, add half of the 1 1/2 pounds of shrimp in a single layer. Cook undisturbed for about 2 minutes until the bottoms turn golden pink, then flip and cook for an additional 1-2 minutes until the shrimp are pink and curled into a loose C-shape. Transfer to a clean plate.
- Add the remaining 2 tablespoons of butter to the skillet and let it melt. Add the second half of the shrimp in a single layer and cook using the same method — about 2 minutes per side until pink and curled. Return the first batch of shrimp to the skillet.
- Pour the reserved honey garlic sauce over all the shrimp and toss gently for about 30 seconds until every piece is coated in a sticky, glistening glaze.
- Squeeze the juice of 1 lime over the top if desired. Sprinkle with 1-2 tablespoons of chopped green onions and 1-2 teaspoons of sesame seeds. Serve the honey garlic shrimp immediately while the glaze is still warm and glossy.