Gluten-Free Soy Cured Egg Yolk Recipe
Make gluten-free soy cured egg yolks at home with two marinade options, step-by-step instructions, and tips for the perfect jammy texture every time.
The first time I tried a soy cured egg yolk, it was on top of a bowl of gluten-free ramen at a tiny restaurant, and I spent the entire drive home trying to figure out how to make one myself. I had no idea something so striking could come together with just tamari, mirin, and patience.
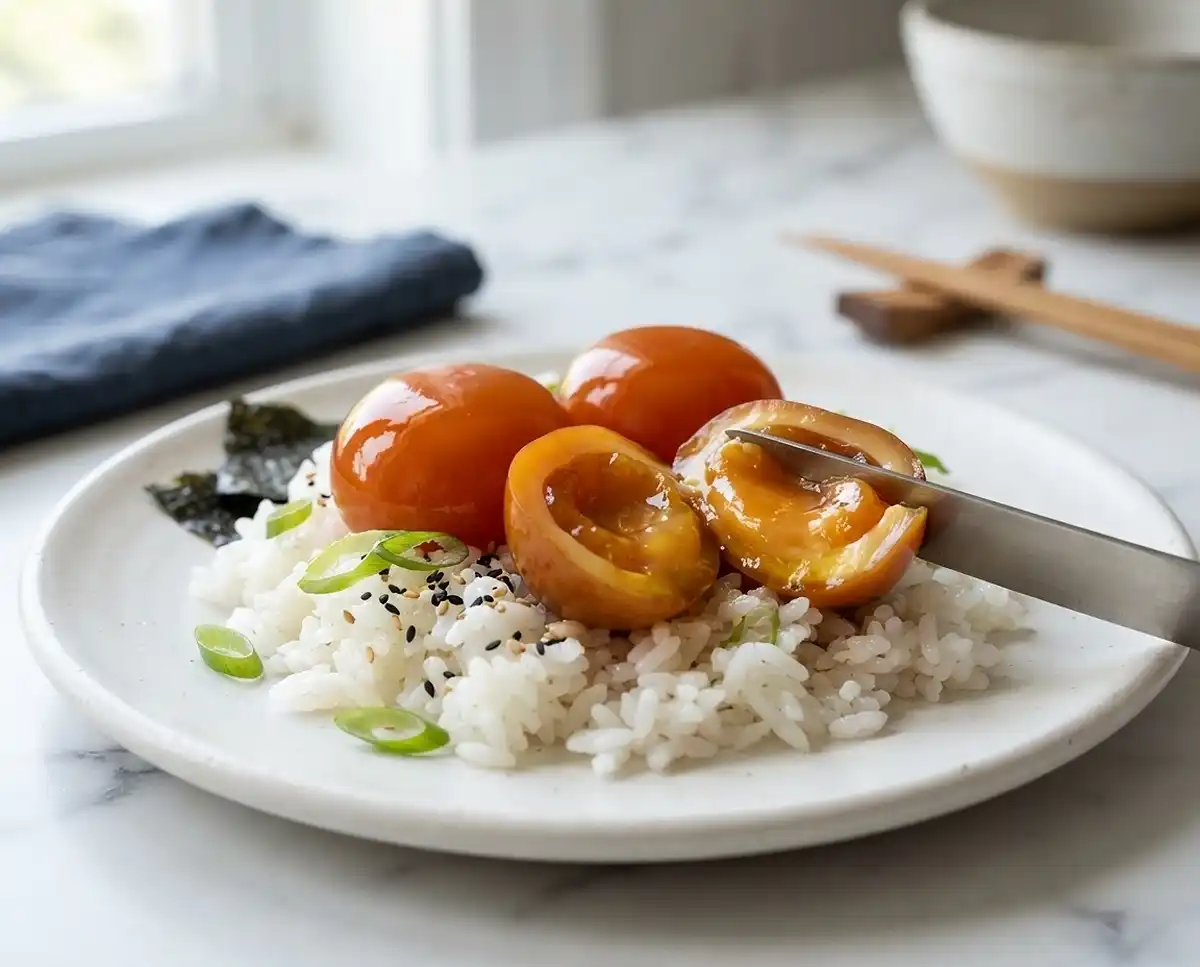
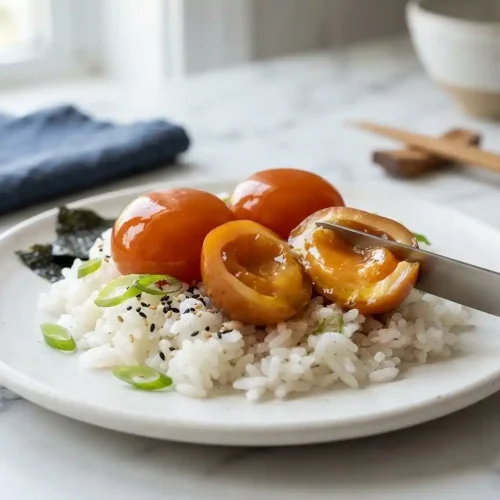
What I discovered after a few rounds of testing is that a gluten-free soy cured egg yolk recipe is genuinely one of the easiest things you can make — and one of the most impressive. The yolk absorbs the marinade slowly, turning from bright golden to a deep amber, with a texture that melts like warm caramel the moment it hits your tongue.
Well… the hardest part really is just waiting. Whether you’re going for a soft, silky center at four hours or a firmer, deeply savory yolk at twenty-four, the technique is identical — and I’m going to walk you through both versions so you can choose what works best for your meal.
Why You’ll Love This Soy Cured Egg Yolk Recipe
- Two marinade options: A quick two-ingredient simple version for weeknights, and a deeper umami version built with kombu, bonito, garlic, and onion for when you want maximum flavor complexity.
- Completely hands-off technique: Once the yolks go into the marinade, the fridge does all the work. No stirring, no monitoring, no special equipment needed.
- Naturally gluten-free when made right: Certified gluten-free tamari is a direct swap for regular soy sauce, making this safe for celiac and gluten-sensitive households without any flavor compromise.
- Infinitely versatile: Works as a topping for rice bowls, gluten-free noodles, avocado toast, salads, and roasted vegetables — or served solo as a deeply savory snack.
The Secret to Perfect Gluten-Free Soy Cured Egg Yolks
- Use pasteurized eggs: Since the yolks are never cooked through, starting with pasteurized eggs is the responsible choice for food safety — especially when serving children, pregnant guests, or anyone immunocompromised. The FDA’s authoritative egg safety guidance makes clear that pasteurized eggs eliminate the risk of Salmonella in recipes where yolks stay raw.
- Keep yolks fully submerged: Uneven marinade contact means uneven curing. The paper towel trick — laying a small piece directly over the surface of the liquid — keeps the tops of the yolks coated without needing to flip them.
- Certified gluten-free tamari is essential: Standard soy sauce contains wheat. Tamari is brewed without it, but labeling varies by brand — always look for a certified gluten-free designation to rule out cross-contamination, as noted by trusted celiac research from Beyond Celiac.
- Curing time controls texture: Four hours gives you a silky, barely-set center. Eight hours delivers a jammy, rich yolk. Up to twenty-four hours creates something firmer and intensely flavored — closer to a condiment than a topping. All three are correct; it just depends on how you plan to use them.
Table of Contents
Ingredients

Simple Gluten-Free Marinade
- ½ cup certified gluten-free tamari (or gluten-free soy sauce)
- 2 tablespoons mirin (certified gluten-free if needed)
- 8–10 pasteurized egg yolks
Extra Umami Gluten-Free Marinade
- 1 clove garlic, minced
- ¼ small onion, thinly sliced
- ½ sheet kombu (Japanese kelp) — adds natural umami depth without any additives
- ¼ cup bonito flakes — smoky, savory; omit for a vegetarian version
- ½ cup water
- ¾ cup certified gluten-free tamari
- ¼ cup mirin (certified gluten-free if needed)
- 8–10 pasteurized egg yolks
Optional Serving Ideas
- Steamed rice
- Gluten-free ramen
- Gluten-free udon
- Gluten-free toast
- Grain bowls
- Avocado toast
- Salads
- Roasted vegetables
Instructions

Step 1 — Choose Your Marinade
Decide whether you’d like to prepare the simple gluten-free marinade or the extra umami version. The simple version is ready in minutes and works beautifully for a quick weeknight bowl. The umami version takes an extra 10–15 minutes to infuse but delivers noticeably deeper flavor.
Step 2 — Build the Marinade
For the simple marinade: Whisk together ½ cup certified gluten-free tamari and 2 tablespoons mirin in a shallow container until well combined. The mixture should look glossy and uniform.
For the extra umami marinade: Combine the garlic, onion, kombu, bonito flakes, water, ¾ cup certified gluten-free tamari, and ¼ cup mirin in a container. Stir well and let the flavors infuse for 10–15 minutes before adding the yolks — this short steep pulls a remarkable amount of savory depth from the kombu and bonito.
Step 3 — Separate the Egg Yolks
Carefully separate the yolks from the whites, keeping each yolk completely intact. Crack the egg over a small bowl, transfer the yolk gently between the two shell halves, and let the white fall away. Use only fresh, pasteurized eggs for food safety.
Pro Tip: If a yolk breaks during separation, set it aside for scrambled eggs. A broken yolk in the marinade will cloud the liquid and won’t cure evenly.
Step 4 — Lower the Yolks Into the Marinade
Gently lower each yolk into the marinade one at a time, taking care not to crowd them. They should sit nestled in the liquid without touching each other. Lay a small piece of paper towel directly over the surface of the marinade so the tops of the yolks remain coated throughout the curing time.
Step 5 — Refrigerate and Cure
Cover the container tightly and refrigerate based on your preferred texture:
- 4 hours — soft, silky center; delicate and spoonable
- 8 hours — rich, jammy texture; the most versatile for bowls and noodles
- Up to 24 hours — firmer, more intensely flavored yolk; great sliced thin over rice
Step 6 — Lift, Serve, and Enjoy
Carefully lift each cured yolk from the marinade using a slotted spoon — they’ll be fragile, especially at the 4-hour mark, so move slowly. Serve immediately over warm rice, gluten-free noodles, toast, salads, or grain bowls.
Pro Tip: Don’t discard the leftover marinade. It’s deeply seasoned and works as a sauce drizzled over the same bowl you’re topping with the yolks.
Make It Your Own
You know… the simple marinade is really just a starting point. Once you’ve made it once, it’s easy to start layering in additional flavors. A teaspoon of toasted sesame oil stirred in just before adding the yolks adds a nutty warmth. A small piece of fresh ginger brings brightness. A dried chili adds a subtle background heat that builds slowly as the yolk cures.
For a vegetarian version of the extra umami marinade, leave out the bonito flakes and double the kombu. Kombu alone contributes significant glutamate — the compound responsible for umami — so the flavor won’t suffer much. You can also add a small piece of dried shiitake mushroom to the infusion for an earthy, woodsy note that replaces some of the smokiness bonito provides.
If you’re using cured egg yolks as part of a grain bowl or cured egg yolk recipe spread for entertaining, consider making both marinade versions side by side. Guests can taste the difference directly — the simple version is cleaner and brighter, while the umami version is richer and more complex. Presenting them together on a board alongside the complementary gluten-free cloud bread makes for a genuinely interesting spread.
Mirin adds a gentle sweetness that balances the salt in the tamari, but if you don’t have it, a teaspoon of honey or a small splash of rice vinegar can partially approximate that balance. The texture of the cured yolk won’t change, but the flavor profile will shift slightly toward tart or sweet depending on which you use.
Common Problems & Solutions
Problem: The yolk broke when I was lowering it into the marinade.
Use a spoon rather than pouring the yolk directly from the shell. Cradling the yolk in a large spoon first and then gently sliding it into the marinade gives you far more control. Cold yolks straight from the fridge are slightly firmer and easier to handle than ones that have come to room temperature.
Problem: The top of the yolk didn’t cure evenly — it looks pale or dry.
This means the paper towel trick wasn’t applied, or the towel dried out. The paper towel should be pressed gently down onto the marinade surface so it stays wet and keeps the tops of the yolks coated. If you check at the halfway mark and the towel looks dry, spoon a little marinade over it to re-saturate.
Problem: The yolk tastes overwhelmingly salty.
Man, oh man… this usually means the cure went too long, or the tamari-to-mirin ratio was off. Tamari varies in sodium level by brand — some are significantly saltier than others. If you’re working with a particularly salty tamari, dilute the marinade slightly with water (start with 2 tablespoons) to bring the salt level down without sacrificing the overall flavor profile.
Problem: The marinade looks cloudy after a few hours.
Some cloudiness is normal, especially with the umami marinade as the kombu and bonito release their compounds into the liquid. If the cloudiness has an off smell, discard and start fresh — but visual cloudiness alone is not a sign that anything has gone wrong.
Storage & Meal Prep
| Method | Duration | Notes |
|---|---|---|
| Counter | Not recommended | Raw yolks require refrigeration at all times |
| Fridge (in marinade) | Up to 24 hours | Remove before flavor becomes too intense |
| Fridge (removed from marinade) | 2–3 days | Store in an airtight container; cover surface with plastic wrap |
| Freezer | Not recommended | Freezing breaks the yolk’s texture irreparably |
Once the yolks reach your desired texture, lift them from the marinade and store them separately. Leaving them in the marinade beyond 24 hours will make them rubbery and aggressively salty. The reserved marinade keeps refrigerated in a sealed jar for up to one week and works as a seasoning sauce for noodles, rice, or roasted vegetables.
For meal prep purposes, cure a full batch of 8–10 yolks on a Sunday evening. By the time you’re ready for lunches and dinners through the week, you’ll have a deeply flavorful topping ready to pull from the fridge. They reheat passively — just place a yolk on top of hot food and let the surrounding heat soften it gently.
Gluten-Free Soy Cured Egg Yolk Recipe FAQs
Can I use regular eggs instead of pasteurized?
Technically yes, but pasteurized eggs are strongly recommended. Since the yolks are never brought to a temperature that kills bacteria, starting with pasteurized eggs is the safest approach — especially when serving anyone with a compromised immune system, children, or pregnant guests. Most grocery stores carry pasteurized eggs in the same refrigerated section as regular eggs.
How do I know when the cured egg yolk is ready?
The best cue is visual and tactile. At 4 hours, the yolk will look slightly darker on the outside and feel barely set when touched with a spoon. At 8 hours, it will be noticeably firmer with a jammy interior. At 24 hours, it will hold its shape when lifted. Trust the timing over appearance alone — the color will deepen continuously.
What’s the best gluten-free tamari to use?
Look for a brand that carries a certified gluten-free label, not just one that claims to be wheat-free. San-J and Kikkoman both offer certified gluten-free tamari options widely available in the US. Avoid reduced-sodium versions for this recipe — the salt level is part of what drives the curing process.
Why did my yolk turn rubbery instead of jammy?
Rubbery texture almost always means the yolk was cured too long. Beyond 24 hours, the proteins in the yolk continue to tighten, pushing past jammy into something closer to firm-cooked. Set a timer and check at your target time rather than letting them go overnight without a plan. The 8-hour mark is the sweet spot for most applications.
Can I make the umami marinade ahead of time?
Yes, and it actually improves with time. The garlic, onion, kombu, and bonito continue infusing the longer they sit in the tamari and mirin. You can build the marinade up to 48 hours in advance and refrigerate it in a sealed container. Strain out the solids before adding the egg yolks.
Serving Suggestions
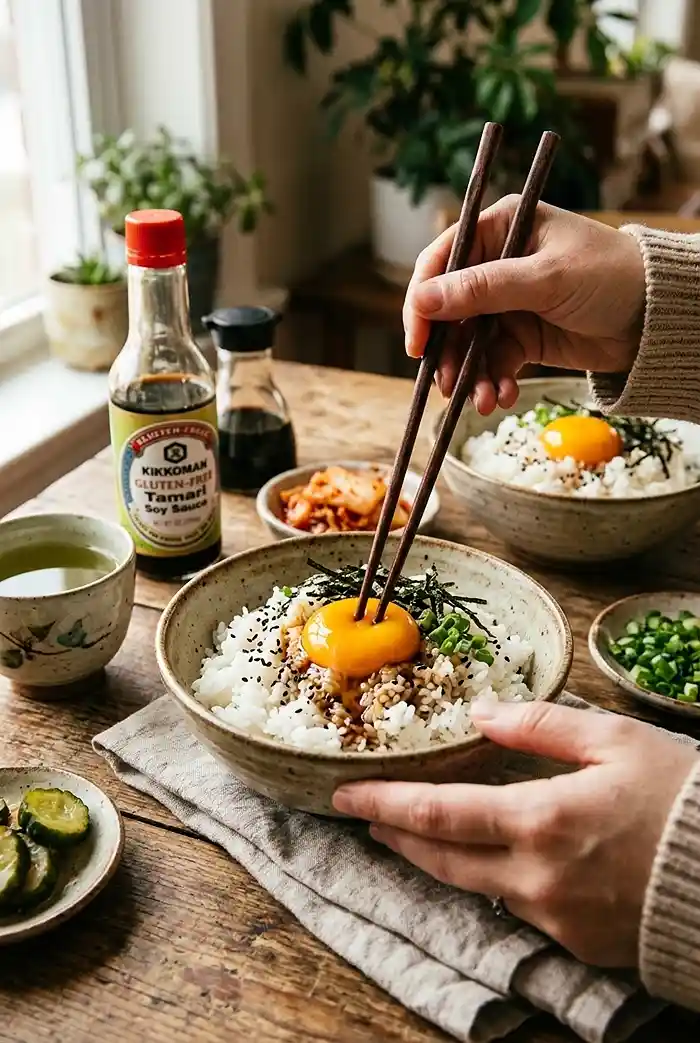
The most classic pairing is a cured egg yolk nestled into a bowl of steaming gluten-free ramen or udon, where the heat of the broth slowly softens the yolk into a sauce that coats every noodle. It’s the kind of bowl that feels genuinely restaurant-quality with almost no extra effort on your end.
For a lighter option, try serving a yolk over a grain bowl with roasted vegetables and a drizzle of the leftover marinade. This is a staple at our family’s Sunday dinners — even the pickiest eaters at the table reach for seconds when there’s a glossy, jammy yolk involved.
If you’re building a full spread, these pair naturally alongside gluten-free blackberry cheesecake oat bars for a sweet finish, or with cinnamon sugar peach snack cake if you’re planning a late summer gathering.
If you’re making these for the first time and want a simple bread base to serve them on, the gluten-free cloud bread is light enough not to compete with the yolk’s richness and takes about 25 minutes start to finish.
Try this cured egg yolk recipe this week and leave a comment below letting me know which marinade version you went with — and how long you cured them. If you landed on a flavor combination I haven’t thought of yet, I genuinely want to hear it. And if these turned out as well as I think they will, a quick share to Pinterest helps other gluten-free cooks find this recipe too.
Gluten-Free Soy Cured Egg Yolk Recipe
Equipment
- Shallow container with lid
- Mixing bowl
- Whisk
- Measuring cups and spoons
- Slotted spoon
- Paper towel
Ingredients
Simple Gluten-Free Marinade
- ½ cup certified gluten-free tamari or gluten-free soy sauce
- 2 tablespoons mirin certified gluten-free if needed
- 8-10 pasteurized egg yolks
Extra Umami Gluten-Free Marinade
- 1 clove garlic minced
- ¼ small onion thinly sliced
- ½ sheet kombu Japanese kelp
- ¼ cup bonito flakes omit for vegetarian version
- ½ cup water
- ¾ cup certified gluten-free tamari
- ¼ cup mirin certified gluten-free if needed
- 8-10 pasteurized egg yolks
Optional Serving Ideas
- steamed rice optional
- gluten-free ramen optional
- gluten-free udon optional
- gluten-free toast optional
- grain bowls optional
- avocado toast optional
- salads optional
- roasted vegetables optional
Instructions
- Choose either the simple gluten-free marinade or the extra umami version depending on your preferred flavor.
- For the simple marinade, whisk together the tamari and mirin. For the extra umami marinade, combine the garlic, onion, kombu, bonito flakes, water, tamari, and mirin, then let infuse for 10–15 minutes.
- Carefully separate the pasteurized egg yolks, keeping each yolk intact.
- Gently lower the yolks into the marinade, making sure they do not touch. Cover the surface with a small piece of paper towel to keep the yolks submerged.
- Cover and refrigerate for 4 hours for silky yolks, 8 hours for jammy yolks, or up to 24 hours for a firmer texture.
- Lift the cured yolks with a slotted spoon and serve immediately over rice, gluten-free noodles, toast, salads, or grain bowls. Reserve the marinade for use as a seasoning sauce.