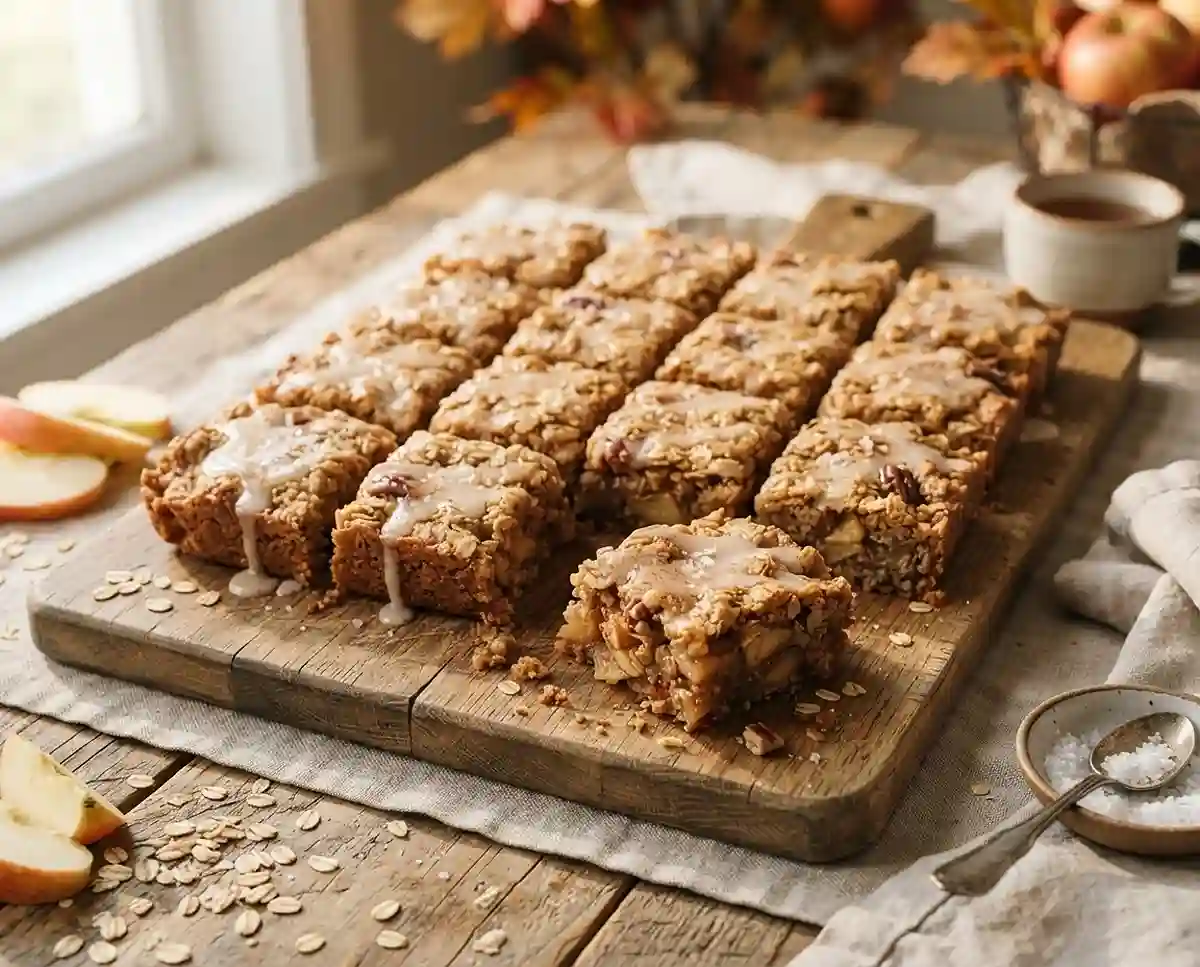
Salted Maple Apple Oat Squares
Step-by-step gluten-free salted maple apple oat squares with a rich maple glaze and flaky sea salt finish. Soft, chewy, and simple to make in one bowl.
The first time I made gluten-free oat squares for a Thanksgiving potluck, I panicked at the last minute—my usual bar recipe used regular flour, and I had a table full of guests who needed a safe option. I threw this version together with what I had: certified gluten-free oats, a bottle of pure maple syrup, and two apples from the counter. They were gone in under ten minutes.
These gluten-free salted maple apple oat squares have been on repeat in my kitchen every fall since. The combination of warm cinnamon, sweet-tart apples, and that hit of flaky sea salt over the maple glaze is honestly one of the best things I’ve baked in years.
What makes a gluten-free bar actually hold together without turning crumbly or gummy? It comes down to the right flour blend, the right bake time, and letting them cool completely before you cut. We’ll cover all of it.
Why You’ll Love This Recipe
- Texture that holds: These squares press firm, bake golden, and slice clean—no crumbling, no gummy center.
- One-bowl mixing: Minimal cleanup, beginner-friendly, and ready in about 45 minutes start to finish.
- Naturally gluten-free: Built around certified gluten-free oats and GF all-purpose flour—no specialty swaps needed.
- Easily dairy-free: Swap the butter for vegan butter and use oat milk in the glaze. Done.
The Secret to Perfect Gluten-Free Salted Maple Apple Oat Squares
- Certified GF oats matter: Regular oats are often cross-contaminated. Certified gluten-free rolled oats give you the structure and chew without the risk.
- Press firmly into the pan: Gluten-free batters don’t bind the same way. Pressing the mixture into an even, compact layer before baking is what keeps these squares from falling apart when sliced.
- Finely dice the apples: Large apple chunks release too much moisture and can make the center soggy. Finely diced pieces distribute evenly and bake into the bar instead of sitting on top.
- Cool completely before glazing and cutting: The interior continues to set as it cools. Cutting too soon is the number one reason gluten-free bars crumble. Give it the full cool time—it’s worth it.
Table of Contents
Ingredients
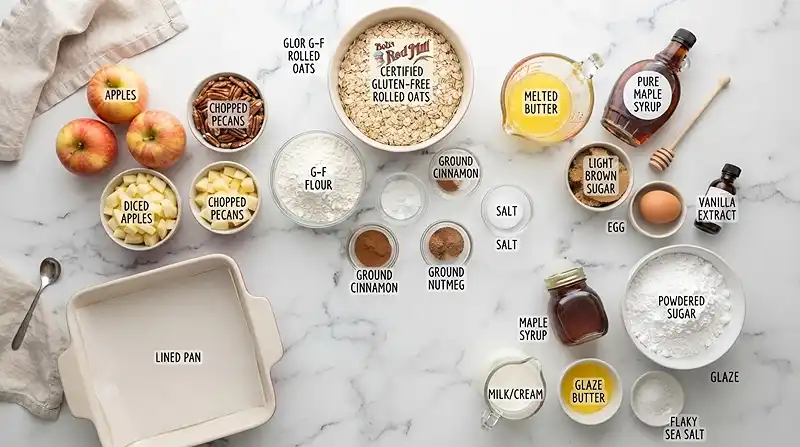
Apple Oat Squares
| Ingredient | Amount | Notes |
|---|---|---|
| Certified gluten-free rolled oats | 2 cups | Must be certified GF—not regular oats |
| Certified gluten-free all-purpose flour | 1 cup | A blend with xanthan gum works best |
| Baking powder | 1 teaspoon | |
| Ground cinnamon | 1 teaspoon | |
| Ground nutmeg | ¼ teaspoon | |
| Salt | ½ teaspoon | |
| Unsalted butter, melted | ½ cup | Or vegan butter for dairy-free |
| Pure maple syrup | ½ cup | Use 100% pure, not pancake syrup |
| Packed light brown sugar | ⅓ cup | |
| Large egg | 1 | |
| Vanilla extract | 1 teaspoon | |
| Peeled and finely diced apples | 1½ cups | Honeycrisp or Fuji hold up well |
| Chopped pecans or walnuts | ½ cup | Optional—skip for nut-free |
Salted Maple Glaze
| Ingredient | Amount | Notes |
|---|---|---|
| Powdered sugar | ¾ cup | |
| Pure maple syrup | 2 tablespoons | |
| Milk or cream | 1 tablespoon | Or oat milk for dairy-free |
| Melted butter | 1 tablespoon | |
| Vanilla extract | ¼ teaspoon | |
| Flaky sea salt | For finishing | Maldon or similar—don’t skip this |
Instructions
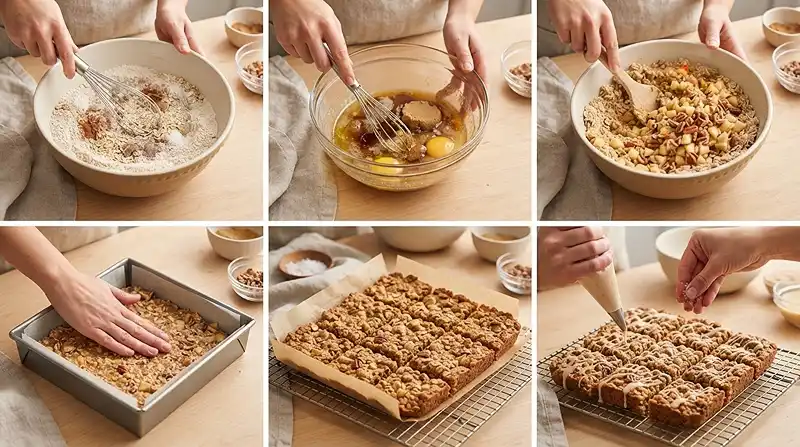
- Preheat the oven to 350°F (175°C). Line an 8×8-inch baking pan with parchment paper, leaving some overhang on the sides for easy removal. This step makes lifting the finished slab out clean and effortless.
- Mix the dry ingredients. In a large bowl, whisk together the certified gluten-free oats, gluten-free all-purpose flour, baking powder, cinnamon, nutmeg, and salt until evenly combined.
- Mix the wet ingredients. In a separate bowl, whisk together the melted butter, maple syrup, brown sugar, egg, and vanilla until the mixture is smooth and glossy.
- Combine wet and dry. Pour the wet mixture into the dry ingredients and stir until just combined—don’t overmix. You want everything moistened with no dry pockets.
- Fold in the apples and nuts. Fold in the diced apples and chopped pecans or walnuts, if using. The mixture will be thick and press-able, not pourable—that’s exactly right.
- Press into the pan. Transfer the mixture to the prepared pan and press it firmly into an even layer using the back of a spatula or dampened fingers. Even pressure = even baking.
- Bake for 30–35 minutes. Bake until the edges are golden brown and the center is set and no longer jiggles. Your kitchen should smell like a cider mill at this point. Pro Tip: Start checking at 28 minutes. Every oven runs differently, and overbaking will dry these out.
- Cool in the pan for 20 minutes. Let the oat bake rest in the pan before attempting to move it. Rushing this step is the most common cause of breakage.
- Transfer and cool completely. Use the parchment paper overhang to lift the slab onto a wire rack. Cool completely before glazing—this is non-negotiable for clean slices.
- Make the glaze. Whisk together the powdered sugar, maple syrup, milk, melted butter, and vanilla until smooth and drizzleable. Add a tiny splash more milk if the glaze seems too thick.
- Glaze and finish. Drizzle the maple glaze over the cooled oat squares, then immediately finish with a generous sprinkle of flaky sea salt. The salt hitting that sweet glaze is like the first cool breeze of a September morning—brisk, a little surprising, and exactly right.
- Set and slice. Let the glaze set for several minutes, then cut into 16 squares and serve.
Make It Your Own
Well… one of the best things about these gluten-free oat squares is how flexible they are once you understand the base recipe. The structure comes from the oats, the flour, and the egg—everything else is fair game to swap.
Dairy-free version: Replace the butter with your favorite vegan butter (I use Earth Balance with great results) and swap the milk in the glaze for oat milk or almond milk. The texture stays just as chewy and the glaze still sets beautifully.
Nut-free option: Simply leave out the pecans or walnuts. You can add ¼ cup of sunflower seeds or pumpkin seeds instead for a little crunch without the allergy concern. These work well for school lunches and bake sales where nuts aren’t welcome.
Different fruit: Pears are a natural swap for the apples in this salted maple apple bars recipe and work almost identically—just dice them finely the same way. Diced dried cranberries or raisins (about ½ cup) also layer in nicely for a more concentrated fruit flavor.
Brown butter variation: If you have an extra five minutes, brown the butter before melting it into the batter. The nutty, caramel aroma it adds to these fall transition baking recipes is worth every second. Watch it closely—it goes from golden to burned fast.
Spice it up: Add ¼ teaspoon of ground cardamom or a pinch of cloves alongside the cinnamon and nutmeg. This is especially nice if you’re making these for a holiday cookie tray or a cozy autumn gathering.
Common Problems & Solutions
Man, oh man… gluten-free baking can feel unforgiving when something goes sideways. Here are the issues I’ve run into (and fixed) so you don’t have to learn the hard way.
Problem: Squares crumble when sliced. The most common cause is cutting too soon. These bars need to cool fully—not just until warm—before the structure sets. If you’re in a hurry, pop the whole slab (on the wire rack) into the fridge for 20 minutes after it reaches room temperature. Slice then.
Problem: Gummy or undercooked center. This usually means the apples released too much liquid, or the bake time was cut short. Dice your apples very finely so they integrate into the batter rather than sitting in wet pockets. And always bake until the center feels firm to a gentle press—not just until the edges look done.
Problem: Dry, crumbly texture throughout. Overbaking is the culprit. Gluten-free flour blends can dry out faster than wheat flour. Pull these out at the lower end of the time range (30 minutes) and test with a light finger press at the center. If it springs back, it’s done.
Problem: Glaze is too thick or grainy. Add milk one teaspoon at a time and whisk well between additions. Grainy glaze usually means the powdered sugar wasn’t fully incorporated—keep whisking. Sifting the powdered sugar first prevents lumps entirely. According to the Celiac Disease Foundation’s guidance on oats, always verify your oats carry a certified GF label—unlabeled oats remain one of the most common sources of accidental gluten exposure.
Storage & Meal Prep
| Method | Duration | Notes |
|---|---|---|
| Counter | 2–3 days | Airtight container, single layer |
| Fridge | 5–7 days | Bring to room temperature before serving |
| Freezer | 2–3 months | Wrap individually, freeze before glazing |
For the cleanest freezer results, freeze the squares unglazed and individually wrapped in plastic wrap, then placed in a zip bag. Glaze them after thawing at room temperature for about an hour.
Leftover squares make a solid grab-and-go breakfast. I keep a few in the fridge through the week alongside other gluten-free dairy-free breakfast ideas for easy weekday mornings.
Salted Maple Apple Oat Squares FAQs
Can I use quick oats instead of rolled oats?
Quick oats will work in a pinch, but rolled oats are strongly preferred. Quick oats absorb more liquid and produce a softer, denser texture that may not hold its shape as cleanly. Rolled oats give you that hearty, slightly chewy bite that defines this recipe. Either way, make sure they’re certified gluten-free.
How do I keep gluten-free oat squares from falling apart?
Press the batter firmly and evenly into the pan before baking, and cool completely—at least one hour at room temperature—before slicing. These are the two most important steps. A bench scraper or sharp chef’s knife also makes cleaner cuts than a regular table knife.
What’s the best apple to use in this recipe?
Honeycrisp and Fuji are the top picks because they hold their structure during baking and offer a balanced sweet-tart flavor. Granny Smith works well if you want a more tart contrast against the maple. Avoid very soft apples like McIntosh—they release too much liquid and can make the center soggy.
Can I make these oat squares without eggs?
Yes. Substitute the egg with one flax egg: mix 1 tablespoon of ground flaxseed with 3 tablespoons of water and let it sit for five minutes until gel-like. The bars will be slightly denser but still hold together well. This makes the recipe fully vegan when combined with the dairy-free substitutions.
Why did my glaze not set properly?
Most likely the bars were still warm when you glazed them. Always glaze over completely cooled bars. If the glaze stays tacky after 15 minutes, add a bit more powdered sugar to thicken it, or refrigerate the finished squares for 10 minutes to help it firm up.
Serving Suggestions
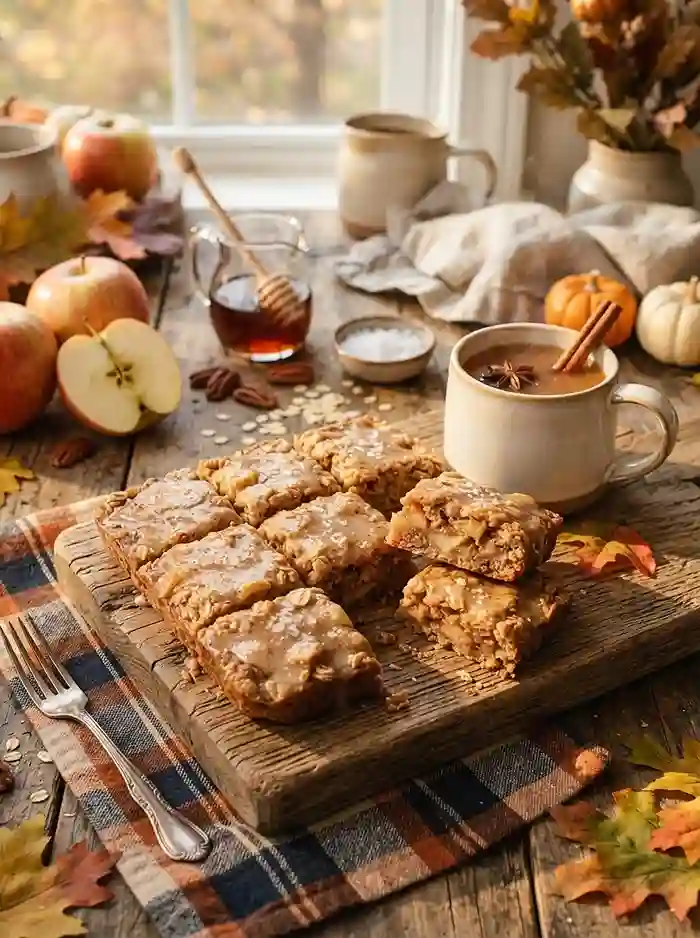
These squares are at home on a Thanksgiving dessert table right alongside pie—they’re easier to transport, cut cleanly, and give guests a gluten-free option that doesn’t feel like an afterthought. You know… the best holiday baking is the kind that everyone can eat without asking.
Serve them at room temperature with a cup of strong coffee or a spiced chai latte. They also pair well as part of a fuller fall brunch spread alongside these gluten-free jalapeño cornbread waffle bites for a savory-sweet balance your guests will love.
For a more complete meal, pair the squares as a dessert after a solid lunch like these Greek chicken hummus lunch bowls—protein-packed, satisfying, and a great contrast to a sweet finish.
If you want to make these a little more dessert-forward, serve a square warm (about 15 seconds in the microwave) with a small scoop of vanilla ice cream. The maple glaze softens just enough and the flaky salt cuts right through. It’s a simple move that feels special every time.
According to Healthline’s gluten-free oat nutrition overview, certified gluten-free oats are a solid source of fiber and beta-glucan—so these squares carry real nutritional value beyond just being a treat.
If you make these, I’d love to hear how they turned out. Leave a star rating and a comment below—especially if you tried a fun variation. And if you’re sharing to Pinterest, a photo of that maple glaze drizzle goes a long way.
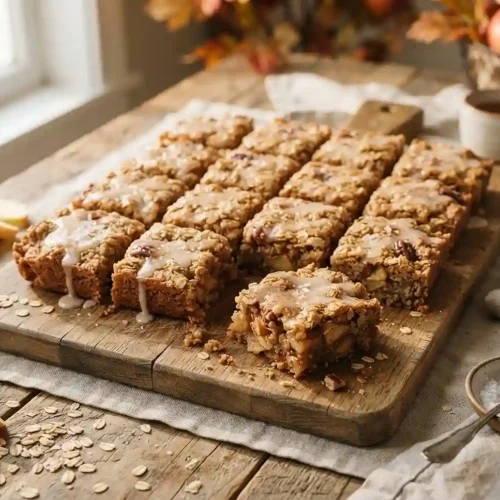
Gluten-Free Salted Maple Apple Oat Squares
Equipment
- 8×8-inch baking pan
- Parchment paper
- Large mixing bowl
- Whisk
- Spatula
- Wire rack
Ingredients
Apple Oat Squares
- 2 cups Certified gluten-free rolled oats Must be certified GF, not regular oats
- 1 cup Certified gluten-free all-purpose flour A blend with xanthan gum works best
- 1 teaspoon Baking powder
- 1 teaspoon Ground cinnamon
- ¼ teaspoon Ground nutmeg
- ½ teaspoon Salt
- ½ cup Unsalted butter, melted Or vegan butter for dairy-free
- ½ cup Pure maple syrup Use 100% pure, not pancake syrup
- ⅓ cup Packed light brown sugar
- 1 Large egg
- 1 teaspoon Vanilla extract
- 1½ cups Peeled and finely diced apples Honeycrisp or Fuji hold up well
- ½ cup Chopped pecans or walnuts Optional; skip for nut-free
Salted Maple Glaze
- ¾ cup Powdered sugar
- 2 tablespoons Pure maple syrup
- 1 tablespoon Milk or cream Or oat milk for dairy-free
- 1 tablespoon Melted butter
- ¼ teaspoon Vanilla extract
- Flaky sea salt For finishing; Maldon or similar
Instructions
- Preheat the oven to 350°F (175°C). Line an 8×8-inch baking pan with parchment paper, leaving some overhang on the sides for easy removal.
- In a large bowl, whisk together the certified gluten-free oats, gluten-free all-purpose flour, baking powder, cinnamon, nutmeg, and salt until evenly combined.
- In a separate bowl, whisk together the melted butter, maple syrup, brown sugar, egg, and vanilla until smooth and glossy.
- Pour the wet mixture into the dry ingredients and stir until just combined. Do not overmix; make sure there are no dry pockets.
- Fold in the finely diced apples and chopped pecans or walnuts, if using. The mixture should be thick and pressable rather than pourable.
- Transfer the mixture to the prepared pan and press it firmly into an even layer using the back of a spatula or dampened fingers.
- Bake for 30–35 minutes, until the edges are golden brown and the center is set and no longer jiggles. Start checking at 28 minutes to avoid overbaking.
- Let the oat bake cool in the pan for 20 minutes before attempting to move it.
- Use the parchment paper overhang to lift the slab onto a wire rack and cool completely before glazing.
- Whisk together the powdered sugar, maple syrup, milk, melted butter, and vanilla until smooth and drizzleable. Add a tiny splash more milk if needed.
- Drizzle the maple glaze over the cooled oat squares and immediately sprinkle generously with flaky sea salt.
- Let the glaze set for several minutes, then cut into 16 squares and serve.