Gluten-Free Water Kefir Recipe
Learn to make a gluten-free water kefir recipe at home with simple steps, real ingredients, and tips for perfect fizz every single time.
The first time I made water kefir, I forgot to burp the jar for two full days. Man, oh man, I heard that lid pop from the next room and found fizzy pineapple water dripping down my pantry shelf. That mess taught me more about this gluten-free water kefir recipe than any tutorial ever could.
If you’ve been eyeing those bottles of kefir at the grocery store and wondering if you could make something similar at home, you absolutely can. Have you ever wanted a probiotic drink you actually trust the ingredients in?
This gluten-free water kefir recipe uses just a handful of pantry staples, live kefir grains, and a little patience. Well, patience and a jar that doesn’t leak, but we’ll get to that.
Table of Contents
Why You’ll Love This Gluten-Free Water Kefir
This isn’t a fussy ferment. It’s forgiving, family-friendly, and genuinely fun to watch happen on your counter.
- Light, tangy flavor that’s nowhere near as sour as kombucha, so it’s an easy sell for kids and skeptical spouses
- Beginner-friendly process with just two fermentation stages and no special equipment required
- Naturally dairy-free and gluten-free, so it fits celiac, lactose-intolerant, and dairy-free households alike
- Works best as a make-ahead weekly ritual, since the grains keep producing batch after batch
The Secret to Perfect Gluten-Free Water Kefir Recipe
Good water kefir comes down to feeding the grains properly and giving them time to actually do their job. Here’s what makes the difference between flat, cloudy water and a lively, naturally fizzy drink.
- Using organic cane or coconut sugar feeds the grains minerals that refined white sugar strips away
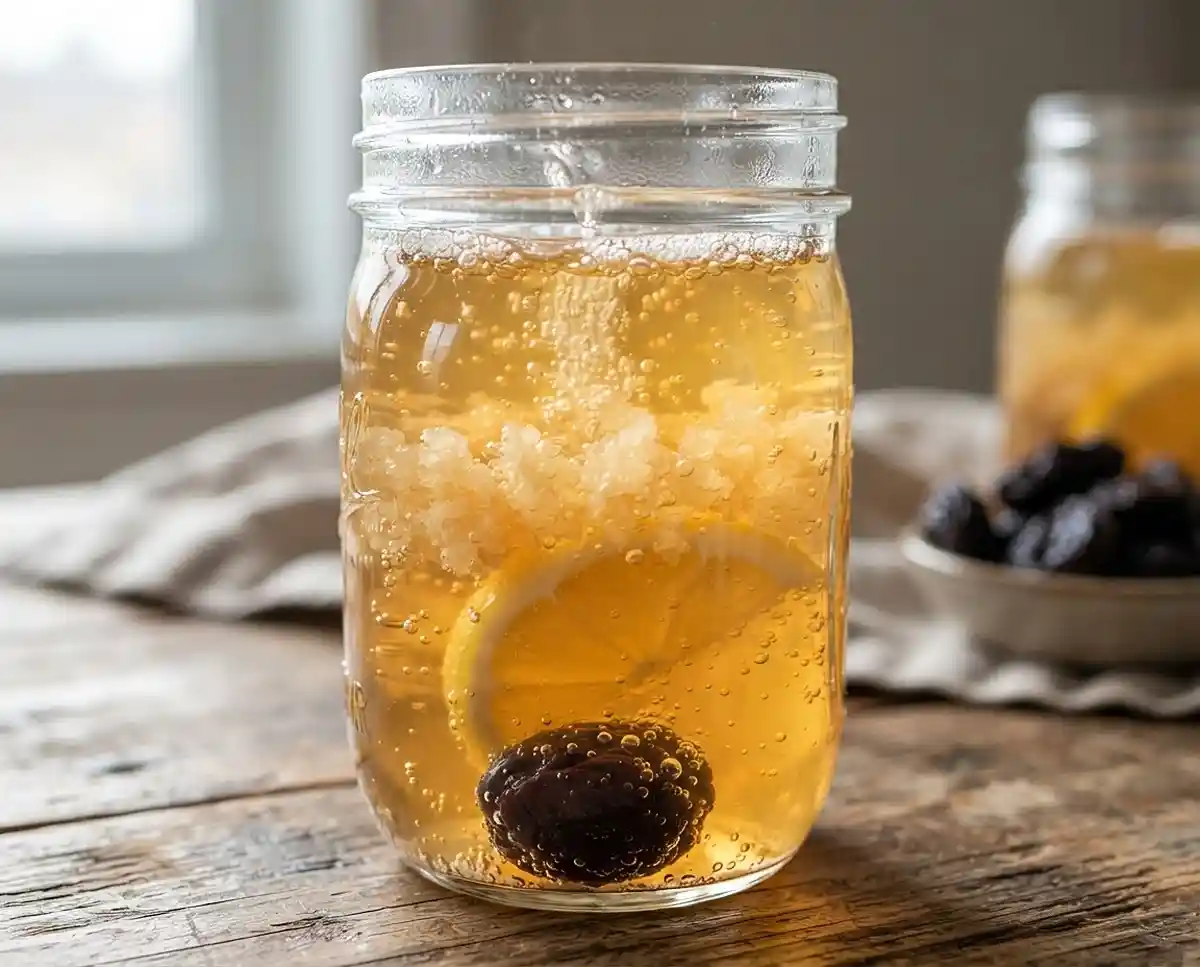
- Adding a prune or dried fruit introduces extra minerals that keep the grains strong over repeated batches
- A thin cloth cover, not a tight lid, lets the primary ferment breathe while keeping fruit flies out
- Sealing tightly only during the second ferment is what builds the natural carbonation
Ingredients
Primary Ferment (makes 8 cups)
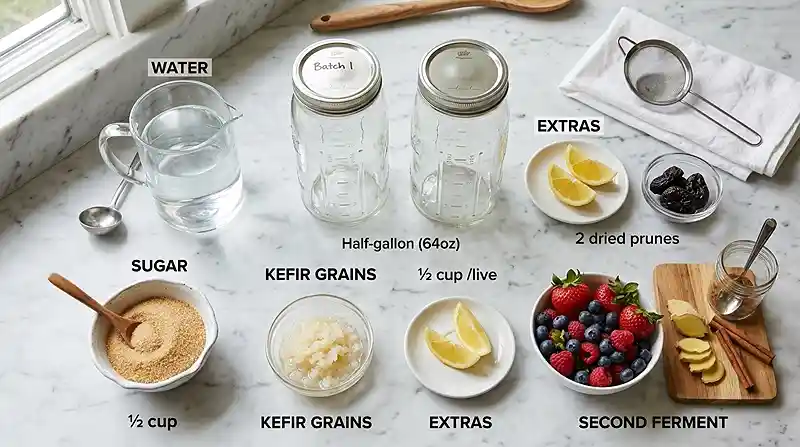
- 1/2 cup live water kefir grains, must be alive and active (1/4 cup per jar)
- 8 cups tap or well water, cool, not hot, divided between two jars
- 1/2 cup sugar, divided, organic cane, coconut, or a mixture
- 2 wedges lemon, optional, adds brightness (1/4 wedge per jar)
- 2 prunes or dried fruit, optional, dates work too (1 per jar)
- 1/2 cup reserved kefir water, optional (1/4 cup per jar), skip for your first-ever batch
Second Ferment (Flavoring)
- 1 to 2 cups fresh fruit, berries, peaches, mango, pineapple, plums, apples, pears, or grapes, or 1 cup 100% fruit juice in winter
- Fresh ginger slices or a cinnamon stick, optional, for extra warmth
Instructions
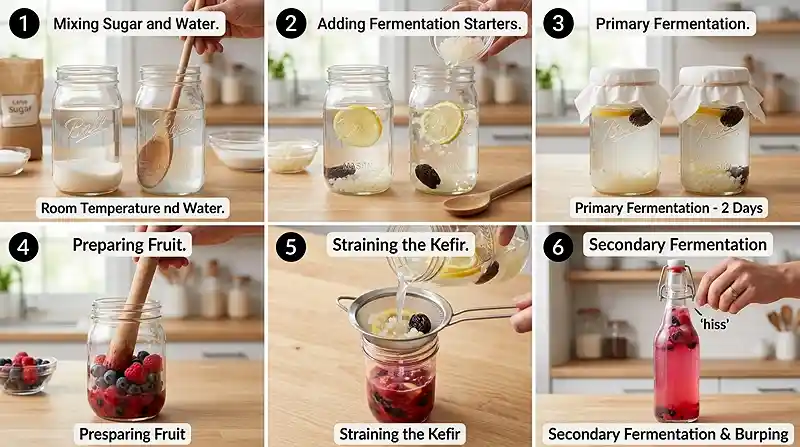
1. Set up your jars. Fill two half-gallon mason jars with 4 cups of cool tap water each. Add 1/4 cup of sugar to each jar and stir until it’s mostly dissolved. You can also mix the full 1/2 cup of sugar first and then divide it between the jars.
2. Add the grains and extras. Add 1/4 cup of kefir grains to each jar. If this isn’t your first batch, add 1/4 cup of reserved kefir water to each jar to kickstart fermentation, skipping this for your very first batch. Drop in 1/4 of a lemon wedge and 1 prune per jar; these feed the grains, with the prune providing extra minerals and the lemon keeping things balanced.
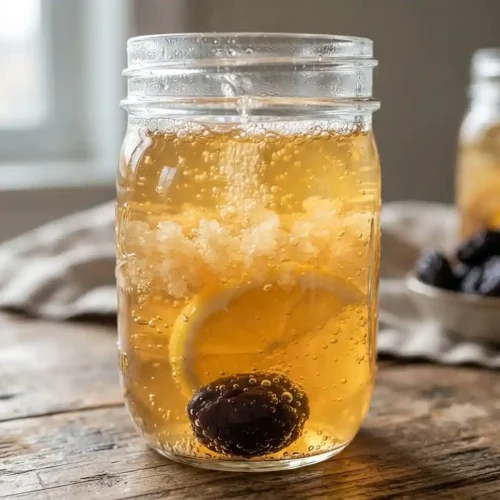
3. Primary fermentation, 2 to 4 days. Cover both jars with a thin kitchen cloth and leave them on the counter. Two days is usually enough in a warm kitchen; plan for 3 to 4 days if it’s cold. Taste before moving on, the water should be only slightly sweet with a light tang, like a gentle fizzy lemonade without the sweetness.
Pro tip: if it’s still very sweet, give it more time. The grains haven’t finished eating through the sugar yet.
4. Second ferment with fruit. In a third clean jar, add 1 to 1 1/2 cups of fresh, ripe fruit and muddle it a little to release the juices. Add a few thin slices of fresh ginger or a cinnamon stick for extra warmth if you like. In winter, 1 cup of 100% fruit juice works beautifully as a stand-in.
5. Strain and seal. Strain both jars of fermented kefir water into the fruit jar, filtering out the grains and setting them aside. Fill the jar to about 1/2 inch from the top, then seal it tightly with a lid.
6. Build the fizz, 24 hours. Leave the sealed fruit jar on the counter for 24 hours to carbonate. Burp the lid every 8 to 12 hours by cracking it open briefly to release pressure, then sealing it back. Don’t skip this step; an un-burped metal lid can bend or blast open, ask me how I know.
7. Refrigerate and enjoy. When the fruit is floating near the top, it’s ready. Burp it one more time, then refrigerate with the lid tight. Once cold, taste it and strain out the fruit before serving, or simply strain as you pour to let the fruit keep infusing.
8. Store and reuse the grains. Put the strained grains in a smaller jar with the leftover kefir water so they stay wet and fed. For weekly batches, keep them in the fridge and feed them a tablespoon of sugar each week. To grow more grains for sharing, keep them at room temperature and feed every couple of days.
Make It Your Own
Swap the fruit based on the season, and this recipe never gets boring. Summer berries give a bright pink color, while winter pear and cinnamon feels cozy and warm.
You know, if you’re wondering how to make kefir at home without dairy at all, this water-based version is your answer. It skips milk entirely, which makes it a great fit if you’re also exploring gluten-free, dairy-conscious recipes for the rest of your week.
Ginger lovers can double the ginger slices for a spicier kick, and it pairs surprisingly well with citrus flavors too. Just don’t overdo dried spices in the second ferment, since strong oils can slow the grains down over time.
If you want to understand what is kefir milk versus water kefir before you commit to either, know that milk kefir uses dairy-based grains and a different feeding process entirely. The two grain types aren’t interchangeable, so don’t try to swap them into this recipe.
Common Problems & Solutions
Problem: My kefir isn’t fizzy after the second ferment. Solution: seal the jar more tightly and give it a few extra hours. Weak carbonation almost always means the lid isn’t sealing completely, or the kitchen is too cold for the grains to work quickly.
Problem: The grains look shrunken or slimy. Solution: rinse them gently in dechlorinated water and start a fresh batch with a new prune. Well, tap water with chlorine can stress the grains over time, so filtered water helps them recover.
Problem: My finished kefir tastes overly yeasty or like alcohol. Solution: shorten your primary fermentation time and refrigerate sooner next batch. This usually means the ferment ran a day or two longer than the grains needed.
Storage & Meal Prep
| Method | Duration | Notes |
|---|---|---|
| Counter | 2-3 days | Airtight container, second ferment only |
| Fridge | 5-7 days | Bring to room temp before drinking for best fizz |
| Freezer | 2-3 months | Wrap individually, texture changes slightly on thaw |
Reheating isn’t part of this one since kefir is meant to be served cold or at room temperature. Leftover strained fruit doesn’t go to waste either; toss it into a smoothie or fold it into muffin batter for a probiotic-boosted breakfast.
Gluten-Free Water Kefir Recipe FAQs
What is the best gluten-free probiotic besides water kefir?
Fermented vegetables like sauerkraut and kimchi, along with plain milk kefir made from gluten-free sources, are also great naturally gluten-free probiotic options.
Can I use bottled lemon juice instead of fresh lemon wedges?
Fresh lemon works best since bottled juice often contains preservatives that can slow down or harm the kefir grains. Stick with a fresh wedge for the healthiest ferment.
Why did my second ferment overflow when I opened it?
This usually means the second ferment ran longer than 24 hours or the kitchen was warm, building up excess pressure. Burp the jar more frequently next time and refrigerate as soon as the fruit floats.
Can I make this recipe with less sugar?
The sugar feeds the grains during fermentation and most of it gets consumed, so reducing it too much can starve the grains. Stick to the amounts listed for the healthiest, most active culture.
How do I know when my water kefir grains need more grains added?
If fermentation is taking much longer than 4 days, your grain-to-water ratio may be too low. Increasing the grains slightly or reducing the water can speed things back up.
Serving Suggestions

Pour this over ice for a refreshing summer drink, or serve it in small glasses at your next Fourth of July cookout as a fun, kid-friendly mocktail. It also makes a lovely addition to a brunch spread alongside something sweet, like a slice of lemon blueberry snack cake.
For a heartier gathering, pair a pitcher of this kefir with a warm BBQ chicken rice bake for a balanced, gut-friendly meal the whole table will enjoy.
Give This Gluten-Free Water Kefir Recipe a Try
Grab your grains, pick a fruit you love, and give this one a shot this week. I’d love to hear how your first batch turns out, so drop a comment below with your flavor combo or pin this recipe to save it for later.
Gluten-Free Water Kefir Recipe: Easy Home Ferment
Equipment
- Half-gallon mason jars
- Food-safe fermentation jar
- Kitchen cloth
- Measuring cups
- Measuring spoons
- Wooden spoon
- Fine mesh strainer
- Tight-fitting jar lid
Ingredients
Primary Ferment
- ½ cup live water kefir grains Must be alive and active; 1/4 cup per jar
- 8 cups tap or well water Cool, not hot; divided between two jars
- ½ cup sugar Divided; organic cane, coconut, or a mixture
- 2 wedges lemon Optional; use 1/4 wedge per jar
- 2 prunes dried fruit Optional; dates can be used instead; 1 per jar
- ½ cup reserved kefir water Optional; 1/4 cup per jar; skip for your first-ever batch
Second Ferment (Flavoring)
- 1 to 2 cups fresh fruit Berries, peaches, mango, pineapple, plums, apples, pears, or grapes; or use 1 cup 100% fruit juice in winter
- fresh ginger slices or cinnamon stick Optional; for extra warmth
Instructions
- 1. Set up your jars. Fill two half-gallon mason jars with 4 cups of cool tap water each. Add 1/4 cup of sugar to each jar and stir until it’s mostly dissolved. You can also mix the full 1/2 cup of sugar first and then divide it between the jars.
- 2. Add the grains and extras. Add 1/4 cup of kefir grains to each jar. If this isn’t your first batch, add 1/4 cup of reserved kefir water to each jar to kickstart fermentation, skipping this for your very first batch. Drop in 1/4 of a lemon wedge and 1 prune per jar.
- 3. Primary fermentation, 2 to 4 days. Cover both jars with a thin kitchen cloth and leave them on the counter. Two days is usually enough in a warm kitchen; plan for 3 to 4 days if it’s cold. Taste before moving on; the water should be only slightly sweet with a light tang.
- 4. Second ferment with fruit. In a third clean jar, add 1 to 1 1/2 cups of fresh, ripe fruit and muddle it a little to release the juices. Add a few thin slices of fresh ginger or a cinnamon stick if desired. In winter, 1 cup of 100% fruit juice works as a substitute.
- 5. Strain and seal. Strain both jars of fermented kefir water into the fruit jar, filtering out the grains and setting them aside. Fill the jar to about 1/2 inch from the top, then seal it tightly with a lid.
- 6. Build the fizz, 24 hours. Leave the sealed fruit jar on the counter for 24 hours to carbonate. Burp the lid every 8 to 12 hours by cracking it open briefly to release pressure, then sealing it back.
- 7. Refrigerate and enjoy. When the fruit is floating near the top, it’s ready. Burp it one more time, then refrigerate with the lid tight. Once cold, strain out the fruit before serving, or strain as you pour.
- 8. Store and reuse the grains. Put the strained grains in a smaller jar with the leftover kefir water so they stay wet and fed. For weekly batches, keep them in the fridge and feed them a tablespoon of sugar each week. To grow more grains, keep them at room temperature and feed every couple of days.