Lemon Blueberry Snack Cake Muffins
Learn how to make gluten-free lemon blueberry snack cake muffins with a simple step-by-step method, tender crumb, and bright lemon glaze. Ready in under an hour.
The first time I made gluten-free lemon blueberry snack cake muffins, I pulled them out of the oven expecting the same sandy, crumbly mess I’d gotten with half my early gluten-free bakes. Instead, I got a soft, tender muffin that actually held together when I bit into it.
Well, that one small win changed how I approached gluten-free baking entirely. It taught me that the resting step and the right flour blend matter way more than people give them credit for.
Have you ever wondered why some gluten-free muffins turn out gritty while others come out soft and bakery-worthy? It usually comes down to a few small techniques, and I’m walking you through every one of them here.
Table of Contents
Why You’ll Love This Lemon Blueberry Snack Cake Muffins
- Soft, tender crumb with a bright lemon flavor that doesn’t overpower the blueberries
- Beginner-friendly: one bowl for wet ingredients, one for dry, and a gentle fold
- Freezer-friendly, so they work great for meal prep or busy mornings
- Perfect for brunch, potlucks, or an easy grab-and-go breakfast
The Secret to Perfect Gluten-Free Lemon Blueberry Snack Cake Muffins
Rubbing the lemon zest into the sugar releases the citrus oils before the batter is even mixed. This one small step is why these muffins taste like lemon all the way through, not just on the surface.
Letting the batter rest before baking gives the gluten-free flour time to fully absorb the liquid. According to Beyond Celiac’s gluten-free baking guidance, this resting step is one of the most reliable ways to avoid the gritty texture that gluten-free flours are known for.
Tossing the blueberries in flour before folding them in keeps them suspended in the batter instead of sinking to the bottom. It’s a small trick, but it makes a real difference in how the muffins look once they’re baked.
Using a flour blend that already contains xanthan gum means you don’t need to add a separate binder. The National Celiac Association’s explanation of xanthan gum is a helpful read if you want to understand why this ingredient matters so much in gluten-free baking.
Ingredients
Muffins
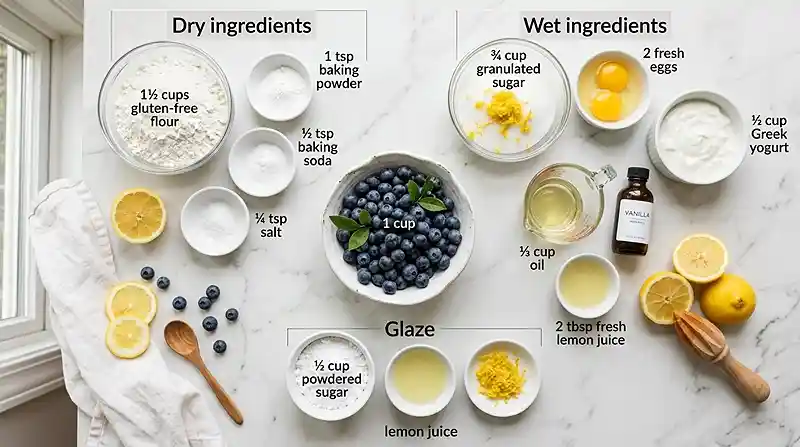
- 1½ cups gluten-free all-purpose flour blend with xanthan gum
- 1 tsp baking powder
- ½ tsp baking soda
- ¼ tsp salt
- ¾ cup granulated sugar
- 1 tbsp finely grated lemon zest
- 2 large eggs, room temperature
- ½ cup plain Greek yogurt
- ⅓ cup vegetable or avocado oil
- 2 tbsp fresh lemon juice
- 1 tsp vanilla extract
- 1 cup fresh blueberries
Lemon Glaze
- ½ cup powdered sugar
- 1–2 tbsp fresh lemon juice
- ½ tsp finely grated lemon zest
Instructions
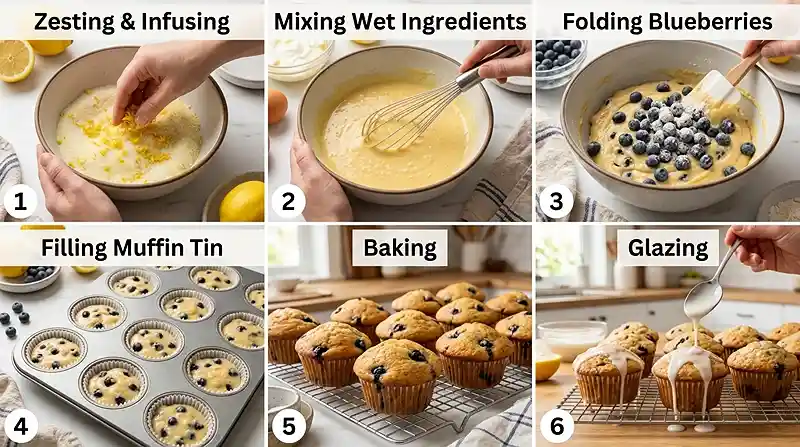
1. Preheat the oven to 375°F (190°C). Line a 12-cup muffin pan with paper liners.
2. In a large bowl, rub the lemon zest into the sugar with your fingertips for about 30 seconds. This helps release the lemon oils and intensifies the flavor.
3. Whisk in the eggs, Greek yogurt, oil, lemon juice, and vanilla until smooth and slightly ribbony.
4. In a separate bowl, whisk together the gluten-free flour, baking powder, baking soda, and salt.
5. Add the dry ingredients to the wet ingredients and gently fold just until combined. Do not overmix, or the muffins can turn dense.
6. Toss the blueberries with 1 teaspoon of the flour mixture, then gently fold them into the batter.
Pro Tip: Man, oh man, don’t skip the resting step below. It’s the single biggest difference-maker in this whole recipe.
7. Let the batter rest for 10–15 minutes while the oven finishes heating. Gluten-free batters commonly benefit from this short resting period.
8. Divide the batter evenly among the muffin cups, filling each about ¾ full.
9. Bake for 18–22 minutes, or until the tops are lightly golden with a faint nutty aroma, and a toothpick inserted into the center comes out clean or with a few moist crumbs.
10. Cool in the pan for 5 minutes, then transfer to a wire rack and cool completely.
11. For the glaze, whisk the powdered sugar, lemon juice, and lemon zest until smooth and pourable.
12. Drizzle the lemon glaze over the cooled muffins and let it set for a few minutes before serving. Once set, the glaze forms a thin, glossy shell that’s as delicate as a sugar cookie’s edge.
Make It Your Own
You can swap the blueberries for raspberries or diced strawberries if that’s what you have on hand. The lemon flavor pairs well with most berries, so this is an easy substitution.
For a dairy-free version, swap the Greek yogurt for a plain coconut or oat milk yogurt. The texture stays similar since both versions provide the moisture and slight tang the batter needs.
You know, if you want a stronger lemon flavor, add an extra teaspoon of zest to the batter. It won’t change the texture, just the intensity of the citrus.
Swapping the granulated sugar for coconut sugar works in a pinch, though it will give the muffins a slightly deeper, caramel-like color and flavor.
Common Problems & Solutions
Problem: Muffins turned out gummy in the center. Solution: Bake a few minutes longer next time. Gluten-free batters often need extra time for the center to fully set, even when the edges look done.
Problem: Muffins are dry or crumbly. Solution: Double-check your flour measurement, since too much flour is the most common cause. Spoon the flour into the measuring cup and level it off instead of scooping directly from the bag.
Problem: Blueberries sank to the bottom. Solution: Make sure you toss them in flour before folding them into the batter. Well, this coating helps the berries grip the batter instead of dropping straight down as they bake.
Problem: Batter tastes gritty even after resting. Solution: Extend the resting time to 20 minutes and check that your flour blend contains fine rice flour rather than coarse. Some blends simply need more time to fully hydrate.
Storage & Meal Prep
| Method | Duration | Notes |
|---|---|---|
| Counter | 2-3 days | Airtight container |
| Fridge | 5-7 days | Bring to room temp |
| Freezer | 2-3 months | Wrap individually |
To reheat, microwave a muffin for about 15 seconds or warm it in a 300°F oven for 5 minutes. If you have extra glaze, save it separately and drizzle it fresh after reheating so it doesn’t turn cloudy.
Leftover muffins that go a bit stale still work well crumbled over yogurt or turned into a quick trifle with whipped cream and extra berries.
Your Questions Answered
Can I make these muffins ahead of time?
Yes, you can bake them up to two days ahead and store them at room temperature in an airtight container. Add the glaze the day you plan to serve them for the best texture.
What’s the best gluten-free flour blend for this recipe?
Look for a 1-to-1 blend that already contains xanthan gum, since that keeps the crumb tender without extra add-ins.
Why did my muffins turn out dense?
Overmixing the batter is the most common cause. Stir just until the dry ingredients disappear and let small lumps remain.
Can I freeze these muffins with the glaze already on?
It’s better to freeze them unglazed and add the glaze after thawing, since freezing can make the glaze turn slightly grainy.
Can I use frozen blueberries instead of fresh?
Yes, just toss them in flour while still frozen and fold them in gently, adding one to two extra minutes to the bake time.
Serving Suggestions
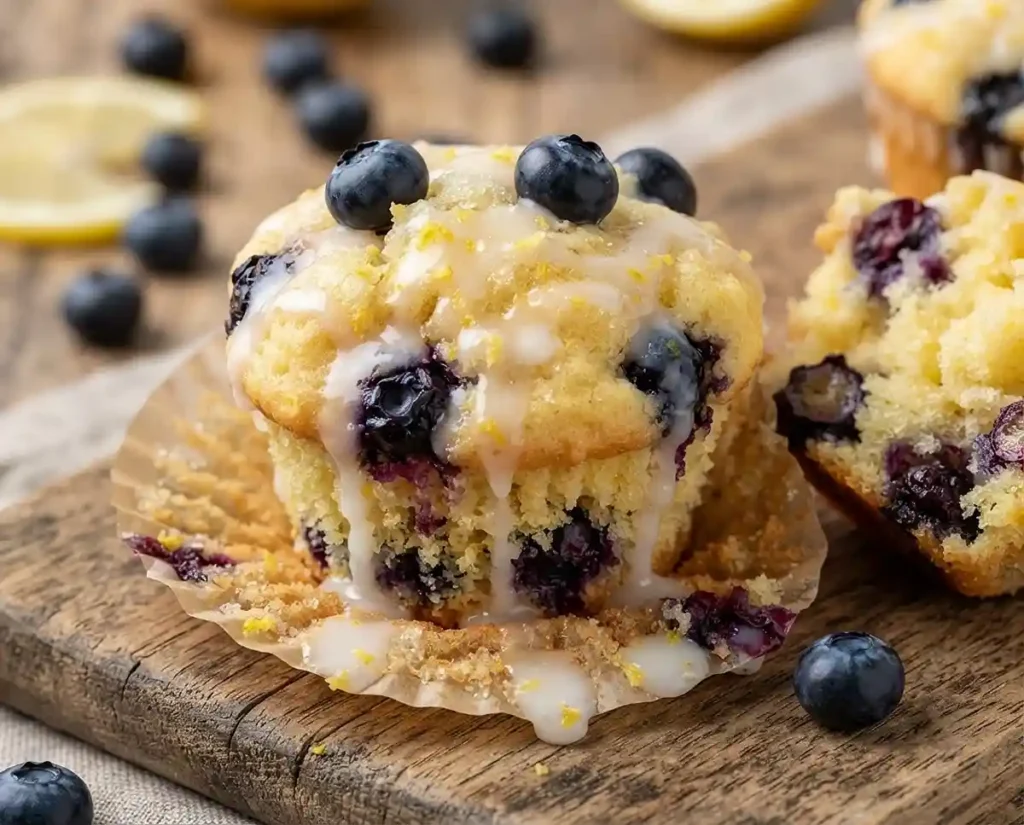
These muffins are perfect for a spring brunch table, and they make a lovely addition to an Easter morning spread alongside fresh fruit and coffee. Pair them with a savory dish like this gluten-free veal parmesan sandwich for a fuller brunch menu.
If you’re building out a bigger spread, this gluten-free lemongrass risotto brings a similar bright, citrus-forward flavor that complements the muffins nicely.
Give These a Try
I’d love to hear how these turn out in your kitchen, so leave a comment below with any tweaks you made. If you snap a photo, pin it so other gluten-free bakers can find their way here too.
Easy Gluten-Free Air Fryer Fish Sandwich
Equipment
- Air fryer
- Shallow bowl
- Small bowl
- Food-safe bag
- Whisk
- Instant-read thermometer
Ingredients
For the Fish
- 4 cod fillets or flounder fillets Similar in thickness for even cooking
- 1 cup buttermilk
- ¾ cup 1:1 certified gluten-free flour blend
- ¾ cup certified gluten-free panko breadcrumbs
- 1 teaspoon gluten-free Old Bay seasoning
- ½ teaspoon paprika
- ½ teaspoon garlic powder
- 1 teaspoon salt Plus a pinch of coarse salt for finishing
- 1 teaspoon black pepper
- cooking spray or avocado oil
For the Tartar Sauce
- ½ cup mayonnaise Gluten-free
- ¼ cup sweet relish Gluten-free
- 1 clove garlic Minced
- 1 tablespoon freshly squeezed lemon juice
- 1 teaspoon gluten-free Dijon mustard
- ½ teaspoon black pepper
- ½ teaspoon salt
For the Buns and Toppings
- 4 certified gluten-free burger buns
- 1 cup shredded iceberg lettuce or gluten-free coleslaw
- 4 slices cheddar or American cheese Gluten-free
Instructions
- Make the tartar sauce: whisk together the mayonnaise, sweet relish, garlic, lemon juice, Dijon mustard, black pepper, and salt until smooth. Cover and refrigerate while you prepare the fish.
- Marinate the fish: pat the fillets dry, then place them in a shallow bowl or food-safe bag and pour the buttermilk over them. Make sure each fillet is well coated, then refrigerate for 20-30 minutes.
- Prepare the gluten-free coating: in a shallow bowl, whisk together the gluten-free flour, gluten-free panko, Old Bay seasoning, paprika, garlic powder, salt, and black pepper.
- Coat the fish: remove each fillet from the buttermilk and let the excess drip off. Press it firmly into the coating until completely covered. For a thicker crust, repeat the coating process a second time.
- Air fry: preheat the air fryer to 400°F (200°C). Spray the basket generously with cooking spray or lightly brush with oil, then arrange the fish in a single layer without overcrowding.
- Spray the tops of the fish until the coating is lightly saturated. Air fry for 12-14 minutes, flipping halfway through and spraying again after flipping.
- The fish is ready when the coating turns golden and crispy with a nutty aroma, and the thickest part reaches 145°F (63°C) internally.
- Add the cheese: during the final minute of cooking, place a slice of cheddar or American cheese on each fillet. Close the air fryer and cook until the cheese melts and turns glossy.
- Assemble: toast the gluten-free buns if desired. Layer shredded lettuce on the bottom bun, followed by the crispy cheesy fish fillet, then spoon on a generous amount of tartar sauce.
- Add the top bun and serve immediately while the crust is at its crispiest.