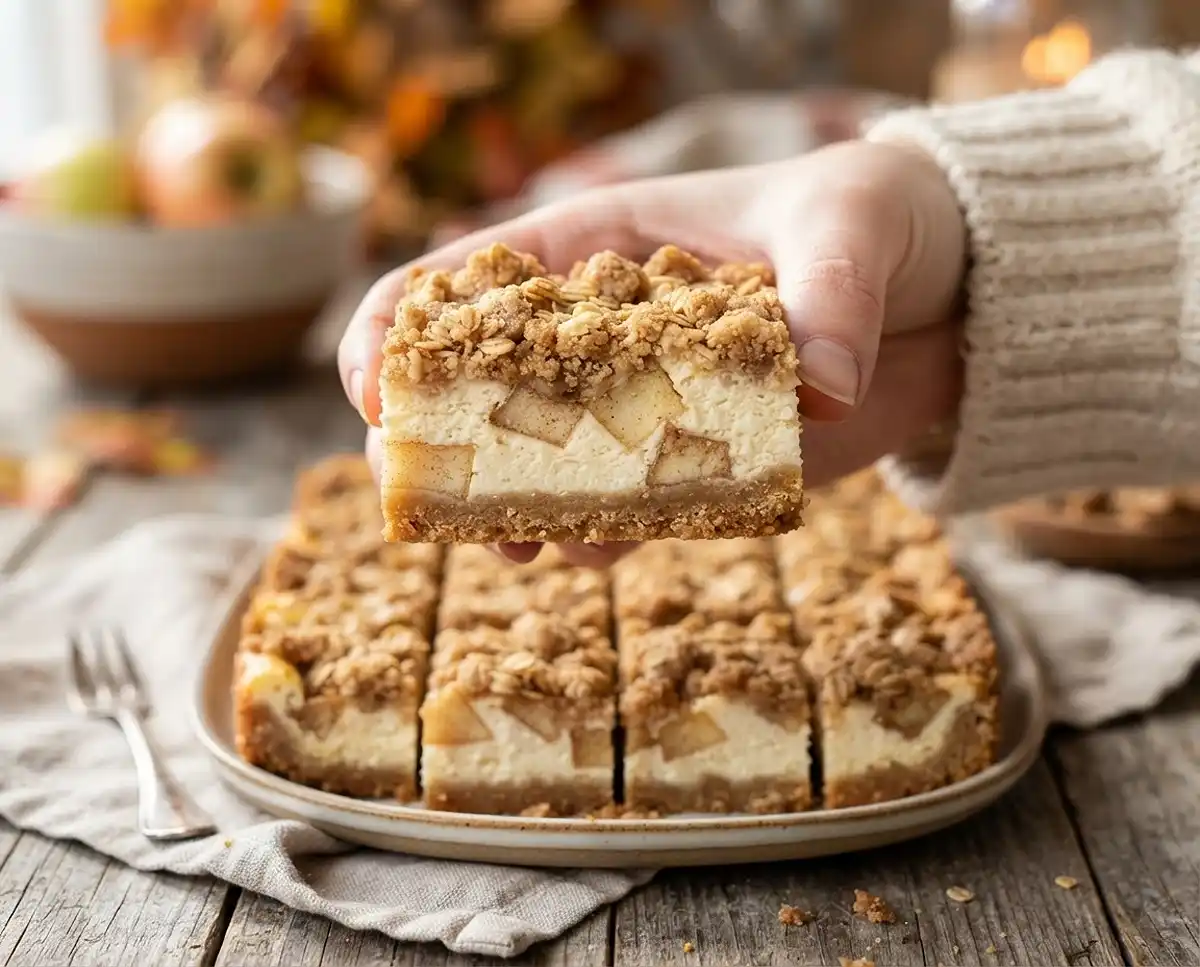
Apple Crisp Cheesecake Bars
Step-by-step gluten-free apple crisp cheesecake bars with a buttery crust, creamy filling, cinnamon apples, and oat crumble topping. Makes 16 bars.
The first time I layered a cheesecake filling over a gluten-free shortbread crust and topped it with cinnamon apples and oat crumble, I burned the whole thing by setting my oven too high. My family still ate every crumbly, slightly-scorched bite—and that moment told me this recipe had serious potential.
These gluten-free apple crisp cheesecake bars have become my go-to bake when the air turns cool and the first Granny Smiths appear at the farmers market. Four layers of texture in one pan: buttery crust, silky cheesecake, tart cinnamon apples, and a golden crisp topping.
What’s not to love about a dessert that does all of that without a single drop of gluten? Well… let me walk you through every layer so yours comes out picture-perfect on the first try.
Why You’ll Love These Gluten-Free Apple Crisp Cheesecake Bars
- Layered texture: Crisp buttery crust meets creamy cheesecake, tender spiced apples, and a crunchy oat topping—all in one bar.
- Beginner-friendly: No water bath, no springform pan, and no special techniques—just a 9×13 pan and basic mixing skills.
- Naturally adaptable: Easy to make dairy-free with a few swaps, and the apple layer works with whatever variety you have on hand.
- Make-ahead magic: These bars actually taste better the next day after a night in the fridge—perfect for holiday prep.
The Secret to Perfect Gluten-Free Apple Crisp Cheesecake Bars
Gluten-free baking has a reputation for falling apart or turning gummy, but this recipe sidesteps both problems with a few deliberate techniques.
- Pre-bake the crust: Baking the shortbread base before adding the cheesecake layer sets the structure so it never turns soggy under all that filling.
- Room-temperature cream cheese: Cold cream cheese creates lumps that never fully smooth out. Give yours a full hour on the counter before you start beating.
- Add eggs one at a time: This allows each egg to fully emulsify into the batter, giving you that silky, crack-resistant cheesecake layer.
- The slight jiggle test: Pull the bars when the center still wobbles gently—it firms up during the mandatory 2-hour refrigeration and stays creamy rather than rubbery.
Table of Contents
Ingredients
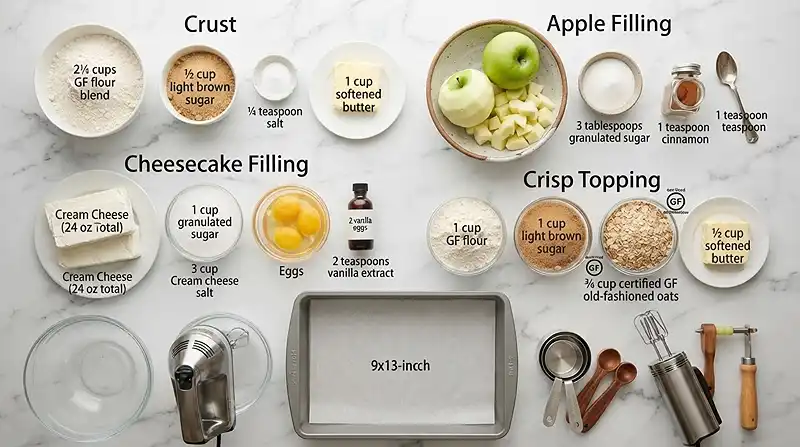
Crust
- 2 1/4 cups gluten-free all-purpose flour blend
- 1/2 cup light brown sugar
- 1/4 tsp salt
- 1 cup unsalted butter, softened
Cheesecake Layer
- 24 oz cream cheese, softened
- 1 cup granulated sugar
- 3 large eggs, room temperature
- 2 tsp vanilla extract
Apple Layer
- 3–4 Granny Smith apples, peeled and finely chopped
- 3 tbsp granulated sugar
- 1 tsp ground cinnamon
Crisp Topping
- 1 cup gluten-free all-purpose flour blend
- 1 cup light brown sugar
- 3/4 cup certified gluten-free old-fashioned oats
- 1/2 cup unsalted butter, softened
A note on the oats: Regular oats are often cross-contaminated with wheat during processing. Always reach for oats that are specifically certified gluten-free. Research published by the gluten-free nutrition experts at Gluten-Free & More confirms that only certified oats meeting FDA standards are reliably safe for those with celiac disease or gluten sensitivity.
Instructions
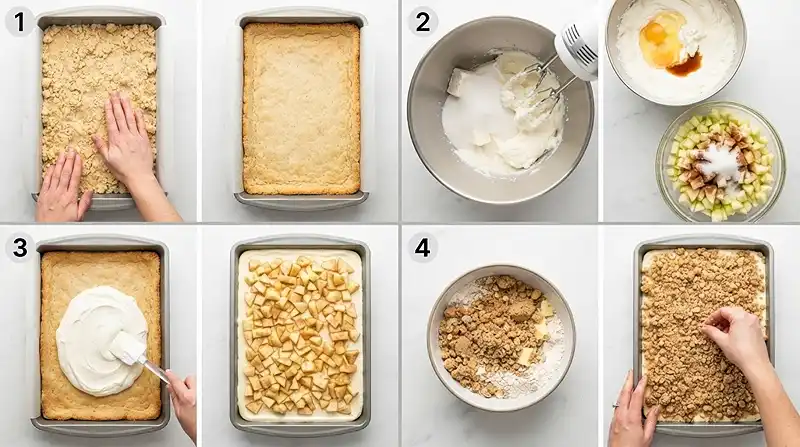
- Preheat and prep. Preheat your oven to 350°F. Line a 9×13-inch baking pan with parchment paper, leaving some overhang on the sides for easy removal after baking.
- Make the crust. Mix the gluten-free flour, brown sugar, and salt in a medium bowl. Cut in the softened butter with a fork or your fingertips until a soft, crumbly dough forms. The texture should feel like damp sand that clumps when pressed.
- Pre-bake the crust. Press the crust mixture evenly into the bottom of the prepared pan. Bake for 15–20 minutes, or until the edges are lightly golden. You’ll catch a faint buttery, toasted aroma when it’s ready.
- Prepare the cheesecake layer. Beat the softened cream cheese and granulated sugar until completely smooth and creamy—no lumps. Add the eggs one at a time, mixing well after each addition, then mix in the vanilla.
- Season the apples. In a separate bowl, combine the chopped apples, granulated sugar, and cinnamon. Toss until every piece is evenly coated and the apples glisten with spice.
- Make the crisp topping. Combine the gluten-free flour, brown sugar, certified gluten-free oats, and softened butter. Mix with a fork or your fingertips until coarse crumbs form—think pebbles, not powder.
- Layer everything. Pour the cheesecake mixture evenly over the warm baked crust. Spread the cinnamon apples evenly over the cheesecake layer, then sprinkle the crumb topping over the apples in an even layer.
- Bake. Bake for 45–50 minutes, or until the topping is golden brown and the center is mostly set with only a slight jiggle—like firm Jell-O, not liquid. The edges should look fully set and pull slightly from the pan sides.
- Cool and chill. Allow the bars to cool completely at room temperature, then refrigerate for at least 2 hours before slicing. Cutting too soon results in messy, sliding layers.
- Slice and serve. Cut into 16 bars and serve chilled. Use a sharp knife wiped clean between cuts for the cleanest edges.
Make It Your Own
You know… one of my favorite things about bar desserts is how easily they take on a new personality with small swaps. Here are the ones I’ve personally tested and trust.
Apple variety swap: Granny Smith apples hold their shape during baking and provide tartness that balances the sweet cheesecake. Honeycrisp works beautifully if you prefer a milder, slightly sweeter apple layer—just chop them a little smaller so they soften properly.
Dairy-free version: Replace the cream cheese with a full-fat dairy-free cream cheese alternative and swap the butter with vegan butter. The texture won’t be quite as dense, but the bars still set up and slice cleanly. For more dairy-free dessert inspiration, check out this gluten-free dairy-free pineapple peach whip for another crowd-pleasing option.
Spice variations: Add 1/4 tsp ground cardamom or a pinch of allspice to the apple layer for a warmer, more complex fall flavor. Both pair beautifully with the vanilla cheesecake base without overwhelming it.
Nut topping: Fold 1/3 cup chopped pecans or walnuts into the crisp topping before sprinkling. They add crunch and a slightly nutty richness—just make sure they’re processed in a dedicated nut-free facility if you’re managing tree nut allergies.
Man, oh man… if you love a fruit-and-crumble pairing in bar form, you’ll also want to explore these gluten-free blueberry muffin cookie bars—a sister recipe that’s just as easy to pull together.
Common Problems & Solutions
Problem: The cheesecake layer cracked on top.
Solution: Your oven likely ran too hot, or the bars were overbaked. Cheesecake cracks when the proteins tighten too fast. Pull the pan when the center still has a slight jiggle and let carryover heat finish the job during the cool-down. Cracks don’t affect flavor—but they do disappear under the apple and crumble layers anyway.
Problem: The crust is crumbling and won’t hold together when sliced.
Solution: The bars need more chill time. Gluten-free shortbread crusts firm up significantly during refrigeration. If yours crumbles when you cut it, give the whole pan another hour in the fridge before trying again. A warm knife blade can also help—run it under hot water, dry it, and slice.
Problem: The crisp topping isn’t crunchy enough.
Solution: Your butter was likely too soft or melted, which makes the topping clump rather than crumble. Softened-but-cool butter creates those distinct pebble-sized crumbs that bake up crispy. If the topping looks too wet before baking, pop it in the freezer for 10 minutes before layering it on.
Problem: The apple layer is watery.
Solution: Toss the apples in the sugar-cinnamon mixture right before layering—not in advance. Sugar draws moisture from the apples through osmosis. If they sit in the bowl for 30 minutes, they’ll release juice that can make the cheesecake layer weep. Prep the apple layer last, right before you’re ready to assemble.
Well… even imperfect bars disappear fast. Every batch teaches you something, and the next one gets better.
Storage & Meal Prep
| Method | Duration | Notes |
|---|---|---|
| Counter | 2–3 hours max | Cheesecake bars should not sit at room temperature longer than 2 hours |
| Fridge | 5–7 days | Store in an airtight container; the flavors deepen by day two |
| Freezer | 2–3 months | Wrap each bar individually in plastic wrap, then place in a zip-top bag |
To serve frozen bars, transfer them to the fridge the night before and let them thaw slowly—this keeps the texture creamy rather than grainy. Avoid microwaving, which can cause the cheesecake layer to weep and the crust to turn rubbery.
These bars are an ideal make-ahead dessert. Bake them the night before your gathering, refrigerate overnight, and slice just before serving for the cleanest cuts and the best texture.
Apple Crisp Cheesecake Bars FAQs
Can I use a different gluten-free flour blend for this recipe?
Yes, any certified gluten-free all-purpose flour blend works here. Look for a blend that includes xanthan gum already mixed in—this helps bind the crust and crisp topping. Bob’s Red Mill 1-to-1 and King Arthur Measure for Measure are both reliable choices that I’ve tested in this recipe with consistent results.
How do I know when the bars are done baking?
The bars are done when the crisp topping is deep golden brown and the center has only a slight jiggle—not a liquid wave, more like a gentle wobble. The edges will look fully set and may pull slightly away from the parchment. Overbaking tightens the cheesecake and can cause cracking, so trust the jiggle test over the timer.
Can I make these bars ahead of time for Thanksgiving?
Absolutely. These bars are actually better the next day once the flavors have melded in the fridge. Bake them the day before, cool completely, cover tightly, and refrigerate overnight. Slice just before serving for the cleanest presentation. They’re one of the easiest make-ahead gluten-free desserts you can bring to a holiday table.
Why did my apple layer release a lot of liquid during baking?
This happens when the apples sit in the sugar-cinnamon mixture too long before being added to the pan. Sugar draws out moisture through osmosis. Toss the apples in the sugar and cinnamon right before you’re ready to layer them, not at the start of your prep. Granny Smith apples also tend to release less liquid than softer varieties, which is one reason they’re the first choice here.
What’s the best way to get clean slices?
Chill the bars for at least 2 full hours before cutting—longer is better. Use a sharp chef’s knife and wipe the blade clean between each cut. Running the knife briefly under hot water and drying it before each slice also helps the blade glide through the cheesecake layer without dragging.
Serving Suggestions
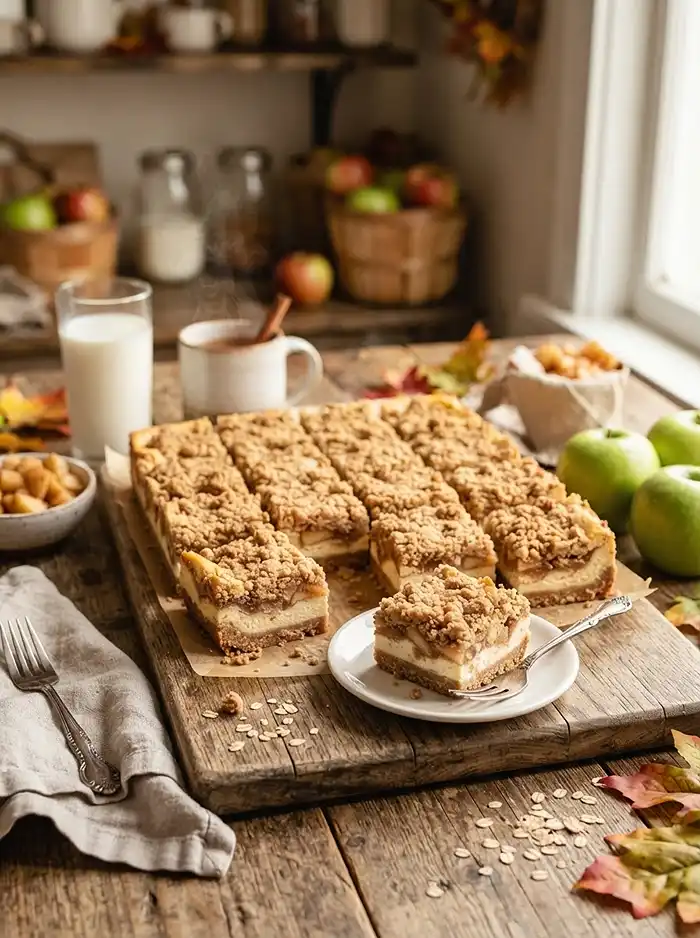
Serve these bars chilled straight from the fridge, or let them sit at room temperature for 10 minutes for a slightly softer bite—somewhere between a cold cheesecake and a warm apple crisp in texture.
A small scoop of vanilla ice cream or a dollop of lightly sweetened whipped cream on top turns each bar into a full dessert plate. These are stunning on a Thanksgiving dessert board alongside other make-ahead sweets—the cold bars hold their shape far better than pie at a buffet-style gathering.
For a complete fall spread, pair with this gluten-free brisket spritz recipe for a savory-sweet combination that works beautifully for autumn entertaining or a Sunday family dinner.
If you try this recipe, I’d love to hear how it went in the comments below. Did you swap the apples, add nuts, or go dairy-free? Share your version—your modifications might be exactly what another reader needs to make this recipe work for their family.
And if these bars earned a spot on your fall baking rotation, saving them to Pinterest helps other gluten-free bakers find them too. Thank you for baking alongside me.
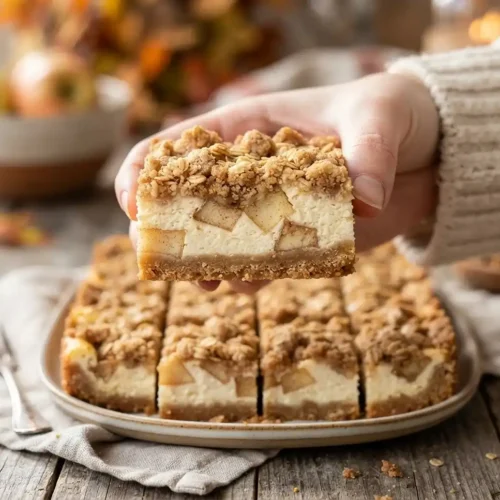
Gluten-Free Apple Crisp Cheesecake Bars
Equipment
- 9×13 inch baking pan
- Parchment paper
- Mixing bowls
- Electric mixer
- Fork
- Sharp knife
Ingredients
Crust
- 2 ¼ cups gluten-free all-purpose flour blend Preferably a blend containing xanthan gum
- ½ cup light brown sugar
- ¼ tsp salt
- 1 cup unsalted butter Softened
Cheesecake Layer
- 24 oz cream cheese Softened
- 1 cup granulated sugar
- 3 large eggs Room temperature
- 2 tsp vanilla extract
Apple Layer
- 3-4 Granny Smith apples Peeled and finely chopped
- 3 tbsp granulated sugar
- 1 tsp ground cinnamon
Crisp Topping
- 1 cup gluten-free all-purpose flour blend Preferably a blend containing xanthan gum
- 1 cup light brown sugar
- ¾ cup old-fashioned oats Certified gluten-free
- ½ cup unsalted butter Softened
Instructions
- Preheat the oven to 350°F. Line a 9×13-inch baking pan with parchment paper, leaving some overhang on the sides for easy removal.
- Mix the gluten-free flour, brown sugar, and salt in a medium bowl. Cut in the softened butter with a fork or your fingertips until a soft, crumbly dough forms.
- Press the crust mixture evenly into the bottom of the prepared pan. Bake for 15–20 minutes, or until the edges are lightly golden.
- Beat the softened cream cheese and granulated sugar until completely smooth. Add the eggs one at a time, mixing well after each addition, then mix in the vanilla.
- Combine the chopped apples, granulated sugar, and cinnamon in a separate bowl. Toss until the apples are evenly coated.
- Combine the gluten-free flour, brown sugar, certified gluten-free oats, and softened butter. Mix with a fork or your fingertips until coarse crumbs form.
- Pour the cheesecake mixture evenly over the warm baked crust. Spread the cinnamon apples evenly over the cheesecake layer, then sprinkle the crumb topping over the apples.
- Bake for 45–50 minutes, or until the topping is golden brown and the center is mostly set with only a slight jiggle. The edges should look fully set.
- Allow the bars to cool completely at room temperature, then refrigerate for at least 2 hours before slicing.
- Cut into 16 bars and serve chilled. For clean slices, use a sharp knife and wipe the blade clean between cuts.