Gluten-Free Vanilla Meringue Cake Recipe
Make this gluten-free vanilla meringue cake with fluffy layers, whipped cream filling, and toasted Swiss meringue. Step-by-step recipe with expert tips.
The first time I made a vanilla meringue cake for a gluten-free friend’s birthday, I made the rookie mistake of greasing the sides of the tin. The batter slid right down and came out dense as a doorstop. I was mortified. That failure taught me more about gluten-free cake science than any cookbook ever did.
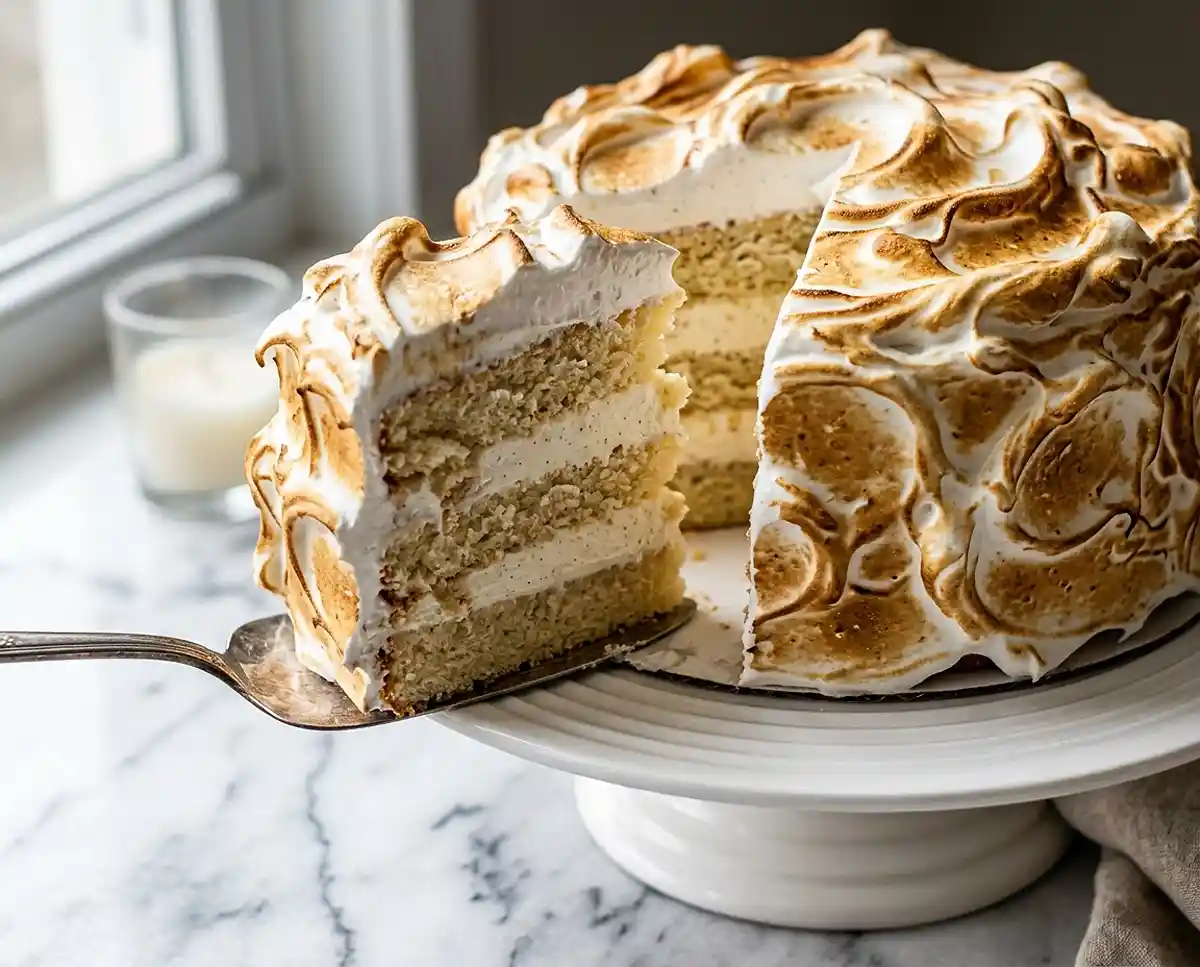
This gluten-free vanilla meringue cake recipe is the one I’ve made dozens of times since — four cloud-light layers, a billowy whipped cream filling, and a torched Swiss meringue that looks like it came from a patisserie. Is it the kind of showstopper that makes people stop mid-conversation and stare? Yes. Absolutely yes.
Table of Contents
Why You’ll Love This Gluten-Free Vanilla Meringue Cake
- Naturally gluten-free structure — whipped egg whites do the heavy lifting, so the cake rises beautifully without relying on gluten.
- Four generous layers filled with lightly sweetened whipped cream — rich but not cloying.
- Beginner-friendly steps broken into manageable stages so nothing feels rushed or overwhelming.
- Showstopping finish — the torched Swiss meringue exterior is perfect for birthdays, Easter, or any celebration that deserves a wow moment.
The Secret to Perfect Gluten-Free Vanilla Meringue Cake
- Don’t grease the tin sides. Ungreased sides let the batter grip and climb as it bakes, giving you a taller, more even rise. This is non-negotiable.
- Use certified gluten-free 1:1 cake flour with xanthan gum. Xanthan gum mimics gluten’s binding role, preventing the layers from crumbling when you slice and stack them.
- Fold, don’t stir. Deflating those egg whites even slightly collapses the air you’ve worked hard to build. Use a wide spatula and slow, deliberate strokes.
- Chill before meringue-ing. A cold, firm cake is much easier to coat cleanly. Don’t skip the one-hour rest in the tin — it holds everything together.
Ingredients
For the Cake Layers
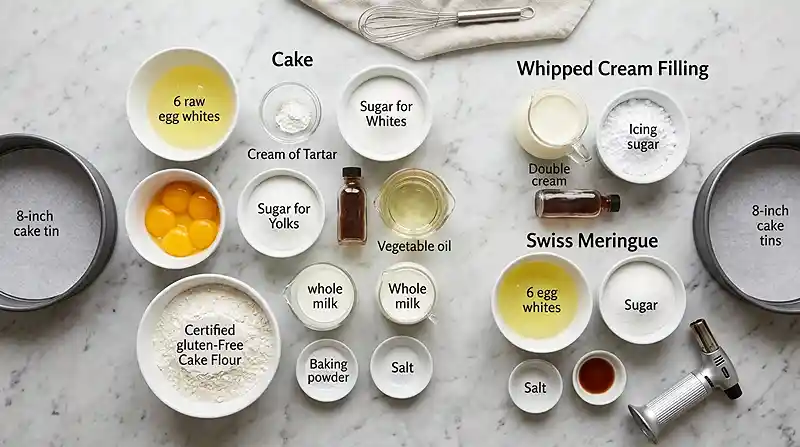
| Ingredient | Amount | Notes |
|---|---|---|
| Egg whites, room temperature | 6 large | Room temp whips faster and holds more volume |
| Cream of tartar | ½ tsp | Stabilizes the whites |
| Granulated sugar (for whites) | 125 g | Add gradually while whipping |
| Egg yolks, room temperature | 6 large | From the same eggs |
| Granulated sugar (for yolks) | 125 g | Whipped until pale and puffed |
| Vanilla extract, gluten-free | 1 tbsp | Check label for gluten-free certification |
| Vegetable oil | 80 ml | Keeps layers moist |
| Whole milk | 100 ml | Full-fat for best texture |
| Certified gluten-free 1:1 cake flour blend | 200 g | Must contain xanthan gum |
| Baking powder, certified gluten-free | 1 tsp | Check label carefully |
| Salt | ¼ tsp |
For the Whipped Cream Filling
| Ingredient | Amount | Notes |
|---|---|---|
| Double cream (heavy cream) | 1 litre | Use high-fat content for stable peaks |
| Icing sugar | 200 g | Sifted |
| Vanilla extract, gluten-free | 1 tbsp |
For the Swiss Meringue
| Ingredient | Amount | Notes |
|---|---|---|
| Egg whites | 6 large | No trace of yolk |
| Granulated sugar | 300 g | |
| Salt | ¼ tsp | |
| Vanilla extract, gluten-free | 2 tsp | Added after whipping |
Optional Variations
- Fresh berries — layer between cake and whipped cream
- 1 tsp gluten-free almond extract — substitute for vanilla in the meringue
- Zest of 1 lemon or orange — add to the cake batter and whipped cream
Instructions
- Preheat and prep. Preheat your oven to 180°C. Line only the bottoms of two 8-inch cake tins with baking paper circles. Do not grease the sides — the batter needs to grip the tin to rise properly.
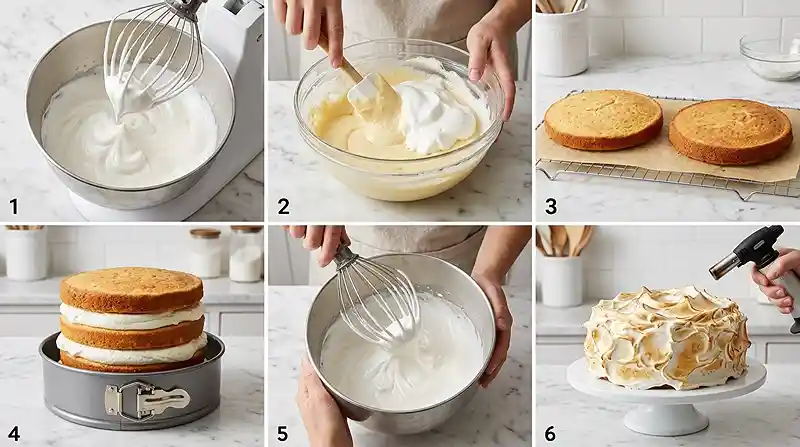
- Whip the egg whites. In a large, impeccably clean bowl, whip 6 egg whites with the cream of tartar until foamy. Gradually add 125 g of granulated sugar while whipping, then continue until stiff, glossy peaks form. Set aside — you’ll fold these in shortly.
- Whip the yolk base. In a separate large bowl, whip the 6 egg yolks, the remaining 125 g of granulated sugar, and 1 tablespoon of vanilla extract for about 2 minutes. You’re looking for a mixture that’s lighter in colour and slightly puffed — a good sign the sugar is dissolving into the yolks.
- Add the wet and dry ingredients. Whisk in the vegetable oil and milk until smooth. Add the certified gluten-free cake flour, baking powder, and salt, mixing only until a smooth batter forms. Overmixing at this stage makes the crumb tough, so stop as soon as you see no dry streaks.
- Fold in the egg whites. Gently fold half of the whipped egg whites into the yolk batter to lighten it, then fold in the remainder until no white streaks remain. Use slow, sweeping strokes — this is where texture is made or lost. Divide the batter evenly between the prepared tins.
- Bake and invert. Bake for 35 to 40 minutes, until a toothpick inserted into the centre comes out clean and the tops are golden. Immediately invert the cakes, still in their tins, onto a wire rack. This prevents the layers from sinking as they cool. Leave until completely cool before unmoulding.
- Make the whipped cream filling. Whip the double cream, icing sugar, and 1 tablespoon of vanilla extract in a chilled bowl until firm peaks form. A chilled bowl helps the cream whip faster and hold its shape longer. Stop whipping the moment it holds — overwhipped cream turns grainy and butter-like.
- Level and assemble. Remove the cooled cakes from their tins and level any domed tops with a serrated knife. Slice each cake horizontally to create 4 layers total. Place the first layer in an 8-inch springform tin, spread with one-third of the whipped cream, and repeat with the next two layers. Finish with the fourth cake layer on top.
- Chill. Refrigerate the assembled cake for at least 1 hour to firm up. This step is what allows you to remove it from the tin cleanly and coat it in meringue without the layers shifting.
- Make the Swiss meringue. Bring a saucepan of water to a gentle simmer. Combine the egg whites, 300 g of granulated sugar, and salt in a heatproof bowl set over the water, making sure the bowl doesn’t touch the surface. Stir continuously until the sugar is fully dissolved and the mixture reaches about 71°C — this pasteurises the eggs and creates a stable base.
- Whip the meringue. Transfer the warm mixture to a stand mixer and whip on high until stiff, glossy peaks form. Add 2 teaspoons of vanilla extract and mix briefly to combine. The meringue should be thick enough to hold dramatic swoops and peaks.
- Coat and torch. Remove the chilled cake from the tin and place it on a cake board or serving plate. Cover the top and sides generously with Swiss meringue, using a spatula to create swoops and peaks. Toast the meringue with a kitchen blowtorch until golden in spots. Serve cold or let stand at room temperature for 15 to 20 minutes before slicing.
Make It Your Own
Well… one of the most rewarding things about this cake is how easily it adapts to different occasions and preferences. The base recipe is naturally dairy-free-friendly if you swap the double cream for a high-fat coconut cream — just chill the can overnight and whip the solid part. The texture is slightly denser but still holds beautifully between the layers.
For a citrus version, add the zest of one lemon or orange to both the cake batter and the whipped cream filling. The brightness cuts through the richness of the cream in the most satisfying way. This variation is a favourite at spring gatherings and Easter tables.
Swapping the vanilla in the meringue for 1 teaspoon of gluten-free almond extract gives the exterior a subtly nutty, marzipan-like note that pairs especially well with fresh raspberries layered inside. Just make sure any extract you use carries a certified gluten-free label — hidden gluten in flavourings is a real concern, and the guidance from Beyond Celiac on gluten-free extracts and flavourings is worth bookmarking.
For a berry version, layer fresh strawberries, raspberries, or a mix of both between the cake and cream. Scatter them over each cream layer before adding the next cake round. The fruit adds colour, freshness, and a gentle tartness that makes every slice a little more exciting.
Common Problems & Solutions
Problem: The cake layers came out dense and didn’t rise properly. This almost always happens when the egg whites were overfolded or the tin sides were greased. Greased sides prevent the batter from gripping and climbing, so always leave the sides bare. Fold gently and stop the moment no white streaks remain.
Problem: The whipped cream filling is grainy or weeping. Overwhipping is the culprit. Stop as soon as firm peaks hold — the cream should look smooth and silky, not chunky. If it’s already gone too far, gently fold in a tablespoon or two of cold un-whipped cream to bring it back.
Man, oh man… the Swiss meringue is where most people hit a wall. Problem: The meringue is weeping or won’t hold its shape on the cake. The sugar must be fully dissolved before you transfer the mixture to the mixer. Rub a little between your fingers — if you feel any graininess, keep stirring over the heat. Reaching 71°C is the target, but the pinch test is your most reliable backup.
Problem: The cake layers crumbled when I sliced them. This usually points to the flour blend. A certified gluten-free 1:1 cake flour containing xanthan gum is essential — xanthan acts as a binder in the absence of gluten. Without it, the crumb has nothing to hold it together when sliced. The Celiac Disease Foundation’s guide to gluten-free flour sources can help you identify trustworthy blends.
Problem: The meringue is browning too fast or unevenly under the torch. Keep the torch moving in slow, steady passes about 10 cm from the surface. Work in sections and don’t linger in one spot. Uneven torching usually means the torch was too close or stationary for too long.
Storage & Meal Prep
| Method | Duration | Notes |
|---|---|---|
| Counter | Up to 4 hours | Meringue softens at room temp; best served the day it’s torched |
| Fridge | 2–3 days | Cover loosely with a cake dome; meringue may weep slightly |
| Freezer (without meringue) | Up to 2 months | Freeze assembled, un-coated cake; add meringue fresh on the day |
The best make-ahead strategy is to bake and fill the cake up to 24 hours ahead, then keep it chilled in the springform tin. Make the Swiss meringue and torch it on the day you’re serving.
Leftover slices keep in the fridge for 2 to 3 days in an airtight container. The meringue softens over time but the flavour stays lovely. You know… a cold slice straight from the fridge the next morning with a cup of coffee is honestly not a bad way to start the day.
Gluten-Free Vanilla Meringue Cake Recipe FAQs
Can I make this gluten-free meringue cake ahead of time?
Yes. Bake the cake layers and assemble with whipped cream filling up to 24 hours in advance, then keep it chilled in the springform tin. Make the Swiss meringue and torch it on the day you plan to serve. This keeps the meringue looking fresh and prevents it from weeping.
Can I freeze this vanilla meringue cake?
Freeze the assembled, un-coated cake without the meringue for up to 2 months. Wrap it well and thaw overnight in the fridge. Make the Swiss meringue fresh on the day you serve, then torch and decorate as usual. Do not freeze the finished cake with meringue on it.
What flour blend works best for this gluten-free cake?
Use a certified gluten-free 1:1 cake flour blend that already contains xanthan gum. Blends like Bob’s Red Mill 1:1 or King Arthur Measure for Measure are reliable choices. Avoid almond flour or coconut flour blends — they behave too differently and will affect the texture.
How do I store leftovers?
Store leftover slices in an airtight container in the fridge for up to 2 to 3 days. The meringue will soften slightly over time but the flavour remains good. Avoid leaving the finished cake at room temperature for more than 4 hours, as the whipped cream filling needs refrigeration.
Can I add fruit to this recipe?
Yes. Fresh berries work beautifully layered between the whipped cream and cake layers. Scatter strawberries, raspberries, or blueberries over each cream layer before adding the next round of cake. You can also add citrus zest to the batter and cream for a bright, fresh flavour twist.
Serving Suggestions
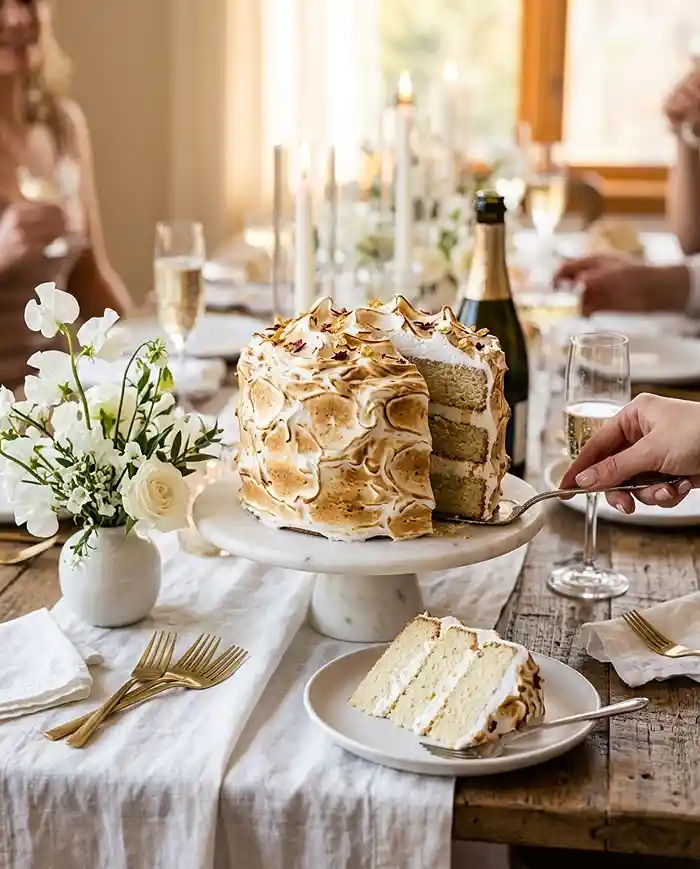
This cake holds its own on a simple plate, but it truly shines at a celebration table. Surround the base with fresh seasonal berries and a few mint sprigs for colour — it’s the kind of dessert centrepiece that earns a round of applause at a birthday dinner or a holiday gathering.
For a complete gluten-free spread, serve it alongside a bright starter like a crisp avocado romaine salad or follow a cosy main like fragrant Vietnamese lemongrass beef. If you love baking, you might also enjoy exploring the full range of gluten-free ube sweet rolls for your next weekend project.
Chilled slices pair beautifully with a cup of Earl Grey or a scoop of good vanilla ice cream alongside — the contrast of the cool cream filling and the lightly toasted meringue is something special.
If you make this gluten-free vanilla meringue cake, I’d genuinely love to hear how it went. Drop a comment below with any tweaks you tried, leave a star rating if it earned one, and share a photo on Pinterest if you’re proud of that torch work — you should be. This one’s a keeper.
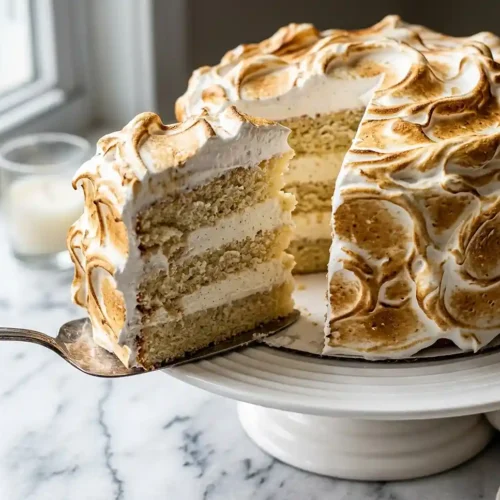
Gluten-Free Vanilla Meringue Cake Recipe | Easy & Stunning
Equipment
- Two 8-inch cake tins
- Baking paper
- Large mixing bowls
- Electric or stand mixer
- Whisk
- Wide spatula
- Wire rack
- Serrated knife
- 8-inch springform tin
- Saucepan
- Heatproof bowl
- Kitchen thermometer
- Cake board or serving plate
- Offset spatula
- Kitchen blowtorch
Ingredients
For the Cake Layers
- 6 large egg whites Room temperature; whip faster and hold more volume
- ½ tsp cream of tartar Stabilizes the whites
- 125 g granulated sugar For the egg whites; add gradually while whipping
- 6 large egg yolks Room temperature
- 125 g granulated sugar For the yolks; whip until pale and puffed
- 1 tbsp gluten-free vanilla extract Check label for gluten-free certification
- 80 ml vegetable oil Keeps the layers moist
- 100 ml whole milk Full-fat for best texture
- 200 g certified gluten-free 1:1 cake flour blend Must contain xanthan gum
- 1 tsp certified gluten-free baking powder Check label carefully
- ¼ tsp salt
For the Whipped Cream Filling
- 1 litre double cream (heavy cream) Use high-fat content for stable peaks
- 200 g icing sugar Sifted
- 1 tbsp gluten-free vanilla extract
For the Swiss Meringue
- 6 large egg whites No trace of yolk
- 300 g granulated sugar
- ¼ tsp salt
- 2 tsp gluten-free vanilla extract Added after whipping
Instructions
- Preheat the oven to 180°C. Line only the bottoms of two 8-inch cake tins with baking paper circles. Do not grease the sides so the batter can grip the tins and rise properly.
- In a large, impeccably clean bowl, whip the egg whites with the cream of tartar until foamy. Gradually add 125 g of granulated sugar while whipping, then continue until stiff, glossy peaks form. Set aside.
- In a separate large bowl, whip the egg yolks, remaining 125 g of granulated sugar, and 1 tablespoon of vanilla extract for about 2 minutes, until lighter in colour and slightly puffed.
- Whisk in the vegetable oil and milk until smooth. Add the certified gluten-free cake flour, baking powder, and salt, mixing only until a smooth batter forms. Do not overmix.
- Gently fold half of the whipped egg whites into the yolk batter to lighten it, then fold in the remainder until no white streaks remain. Divide the batter evenly between the prepared tins.
- Bake for 35 to 40 minutes, until a toothpick inserted into the centre comes out clean and the tops are golden. Immediately invert the cakes, still in their tins, onto a wire rack. Leave until completely cool before unmoulding.
- Whip the double cream, icing sugar, and 1 tablespoon of vanilla extract in a chilled bowl until firm peaks form. Stop whipping as soon as the cream holds its shape.
- Remove the cooled cakes from their tins and level any domed tops with a serrated knife. Slice each cake horizontally to create 4 layers total. Place the first layer in an 8-inch springform tin, spread with one-third of the whipped cream, and repeat with the next two layers. Finish with the fourth cake layer.
- Refrigerate the assembled cake for at least 1 hour to firm it up before coating it with meringue.
- Bring a saucepan of water to a gentle simmer. Combine the egg whites, 300 g of granulated sugar, and salt in a heatproof bowl set over the water, making sure the bowl does not touch the water. Stir continuously until the sugar is fully dissolved and the mixture reaches about 71°C.
- Transfer the warm mixture to a stand mixer and whip on high until stiff, glossy peaks form. Add 2 teaspoons of vanilla extract and mix briefly to combine.
- Remove the chilled cake from the tin and place it on a cake board or serving plate. Cover the top and sides generously with Swiss meringue, creating swoops and peaks with a spatula. Toast the meringue with a kitchen blowtorch until golden in spots. Serve cold or let stand at room temperature for 15 to 20 minutes before slicing.