Chickpea Cookie Dough Bark Recipe
Make this chickpea cookie dough bark recipe with simple pantry ingredients. Creamy, chocolatey, and freezer-friendly — step-by-step instructions and storage tips included.
The first time I blended chickpeas into cookie dough, I genuinely expected disaster. I was prepping a Fourth of July dessert spread and needed something that could sit in the freezer for days without becoming a crumbly mess. What came out of that food processor stopped me cold — smooth, rich, and unmistakably cookie dough.
This gluten-free chickpea cookie dough bark has become one of my most-requested recipes. The chickpeas create a naturally thick base that holds together when you break it into pieces, something no-bake desserts usually struggle with.
Table of Contents
Why You’ll Love This Chickpea Cookie Dough Bark
- Texture that delivers: Creamy and dense like real cookie dough, not dry or crumbly — the chickpeas and nut butter work together to create a fudge-like base.
- Beginner-friendly: No baking, no thermometer, no special equipment beyond a food processor. If you can press a button, you can make this.
- Naturally gluten-free and vegan: Every ingredient is plant-based and certified gluten-free when you use the right oat flour and chocolate chips.
- Freezer-ready: Make it days ahead and pull pieces straight from the freezer when you need a quick dessert or snack.
The Secret to Perfect Gluten-Free Chickpea Cookie Dough Bark
- Dry your chickpeas thoroughly: Moisture is the enemy of a firm bark. After rinsing, pat the chickpeas with a clean towel until they’re completely dry — any leftover liquid prevents the dough from setting properly.
- Blend until genuinely smooth: Don’t stop at “mostly smooth.” Keep processing until the chickpeas are completely broken down with no visible pieces. This gives you that silky cookie dough consistency.
- Use certified gluten-free oat flour: Regular oats and oat flour are often cross-contaminated. The certified gluten-free oat labeling guidance from Beyond Celiac explains exactly what to look for on packaging.
- Freeze completely before cutting: The chocolate layer needs a full 1-2 hours in the freezer to set hard enough to snap cleanly into bark pieces. Cutting it too early gives you messy, smeared edges.
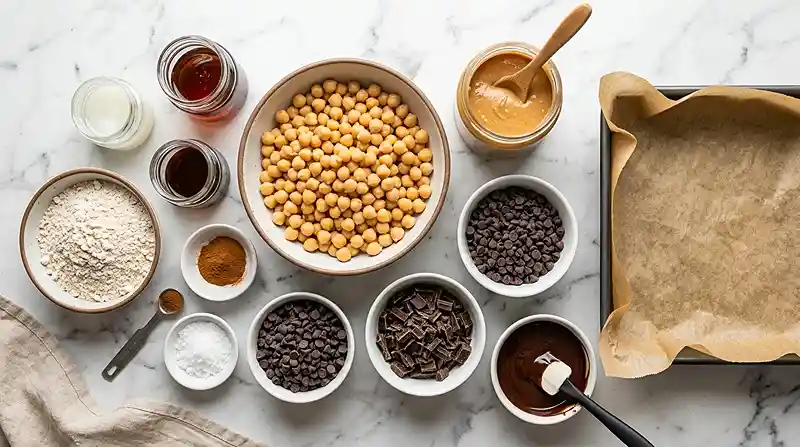
Ingredients
Cookie Dough Base
- 1 1/2 cups canned chickpeas, drained, rinsed, and patted completely dry
- 1/2 cup creamy peanut butter or almond butter
- 1/3 cup pure maple syrup
- 1 tsp vanilla extract
- 1 cup certified gluten-free oat flour
- 1/2 tsp cinnamon
- 1/4 tsp salt
- 1/3 cup mini dark chocolate chips, certified gluten-free
Chocolate Topping
- 1/2 cup gluten-free dark chocolate, melted
- 1 tbsp coconut oil, melted
Note: The coconut oil helps the chocolate layer spread smoothly and set with a slight snap rather than becoming waxy or too hard.
Instructions
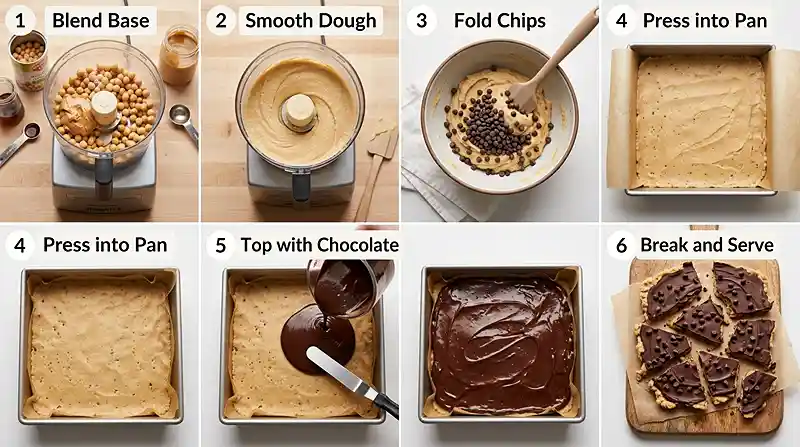
- Prepare your pan. Line a baking sheet or 8-inch square pan with parchment paper, leaving some overhang on the sides for easy lifting later.
- Blend the base. Add the chickpeas, peanut butter, maple syrup, and vanilla to a food processor. Blend until completely smooth and creamy, scraping down the sides as needed. This usually takes 2-3 minutes of processing.
- Add the dry ingredients. Add the oat flour, cinnamon, and salt. Blend again until a thick cookie dough forms. It should pull away from the sides and feel dense when you scrape a spoonful.
- Fold in the chocolate chips. Transfer the dough to a bowl and fold in the mini chocolate chips by hand so they stay intact and don’t melt from the processor blade.
- Spread into the pan. Press and spread the cookie dough evenly over the parchment, about 1/4-inch thick. Use damp fingertips or the back of a spoon to smooth the surface.
- Make the chocolate topping. Melt the dark chocolate with the coconut oil in 30-second microwave bursts, stirring between each, until smooth. Pour over the cookie dough and spread into an even layer — it should pour like warm caramel.
- Add toppings. Sprinkle additional mini chocolate chips over the top while the chocolate is still wet if desired.
- Freeze until firm. Place in the freezer for 1-2 hours, or until the chocolate is completely solid and the dough beneath it has firmed up fully.
- Break and serve. Lift the parchment out of the pan and break or cut into bark-style pieces. Serve chilled directly from the freezer.
Make It Your Own
Well… the peanut butter is doing a lot of heavy lifting in this recipe, but it’s easy to swap. Almond butter works beautifully and creates a slightly lighter flavor. Sunflower seed butter is a great nut-free option, though it may turn the dough a faint greenish color from a natural reaction — it tastes exactly the same.
If you want a lower-sugar version, reduce the maple syrup to 1/4 cup and add a tablespoon of unsweetened applesauce to keep the dough from becoming too dry. The applesauce adds moisture without changing the flavor profile noticeably.
For a different chocolate experience, try white chocolate chips folded into the dough with a dark chocolate topping — the contrast between the two layers is genuinely satisfying. Just make sure any white chocolate you use is certified gluten-free.
You can also press this gluten-free vegan chickpea cookie dough base into mini muffin tins for individual bites instead of bark — perfect for kids’ lunches or party platters where you want easier serving sizes.
Common Problems and Solutions
Problem: The dough is too sticky to spread. This usually means the chickpeas weren’t patted dry enough, or your nut butter was very runny. Add an extra 2 tablespoons of oat flour and blend again — the dough should firm up within a minute of processing.
Problem: The chocolate topping cracks unevenly when breaking. The bark was probably too warm when you tried to cut it. Return it to the freezer for another 30 minutes. A fully frozen bark snaps cleanly, while a partially frozen one tears.
Man, oh man… the first batch I ever made looked absolutely perfect going into the freezer and came out with a chocolate layer that slid right off the dough. I had used old coconut oil that had gone slightly rancid — it prevented proper emulsification. Always use fresh coconut oil and make sure your chocolate isn’t too hot when you pour it.
Problem: The dough tastes bland or beany. More vanilla and a pinch of extra salt usually solve this immediately. The flavor science behind masking legume taste confirms that fat, sweetener, and aromatics like vanilla are the most effective tools for neutralizing beany notes.
Problem: The bark won’t hold together when breaking. Your dough layer was probably too thin, or you didn’t press it firmly enough into the pan. The dough needs to be at least 1/4 inch thick to give the chocolate layer enough support to snap properly.
Storage and Meal Prep
| Method | Duration | Notes |
|---|---|---|
| Counter | 2-3 days | Airtight container; chocolate may soften in warm kitchens |
| Fridge | 5-7 days | Airtight container; bring to room temp for 5 minutes before eating |
| Freezer | 2-3 months | Wrap pieces individually in parchment, then store in a zip bag |
This bark is actually best eaten straight from the freezer — the texture at that temperature is closest to real frozen cookie dough. If you prefer it slightly softer, let it sit at room temperature for about 5 minutes before eating.
For no-waste prep, keep a bag of frozen bark pieces in the freezer and pull one or two out whenever a chocolate craving hits. They thaw fast and feel genuinely indulgent for something this wholesome.
Chickpea Cookie Dough Bark Recipe FAQs
Can I use dried chickpeas instead of canned?
Yes, dried chickpeas work, but you need to cook them fully first. Soak overnight, then boil until very tender. Canned chickpeas are easier since they’re already at the right softness level for smooth blending. Firm or grainy chickpeas will create a lumpy dough that won’t fully smooth out.
How do I make chickpea cookie dough bark without a food processor?
A high-powered blender works as a substitute. Blend in short bursts and scrape the sides frequently. A hand mixer won’t break down the chickpeas finely enough. If your blender struggles, add one extra tablespoon of nut butter to help it move.
Why did my chocolate layer turn white after freezing?
That’s called fat bloom, and it’s completely harmless. It happens when chocolate cools too quickly or cocoa butter separates. It doesn’t affect the flavor at all. To minimize it, let the chocolate layer rest at room temperature for 5 minutes before placing the pan in the freezer.
Can I make this into bites instead of bark?
Yes — skip the chocolate topping and roll the dough into balls. Chill for 30 minutes, then dip in melted chocolate or leave plain. These are a great portable variation and work well for kids’ snacks or party platters.
How long does chickpea cookie dough bark last in the freezer?
It keeps well for up to 2-3 months in the freezer. Wrap pieces individually in parchment paper, then store in a sealed zip bag to prevent freezer burn. Pull pieces out as needed and eat straight from the freezer for the best texture.
Serving Suggestions
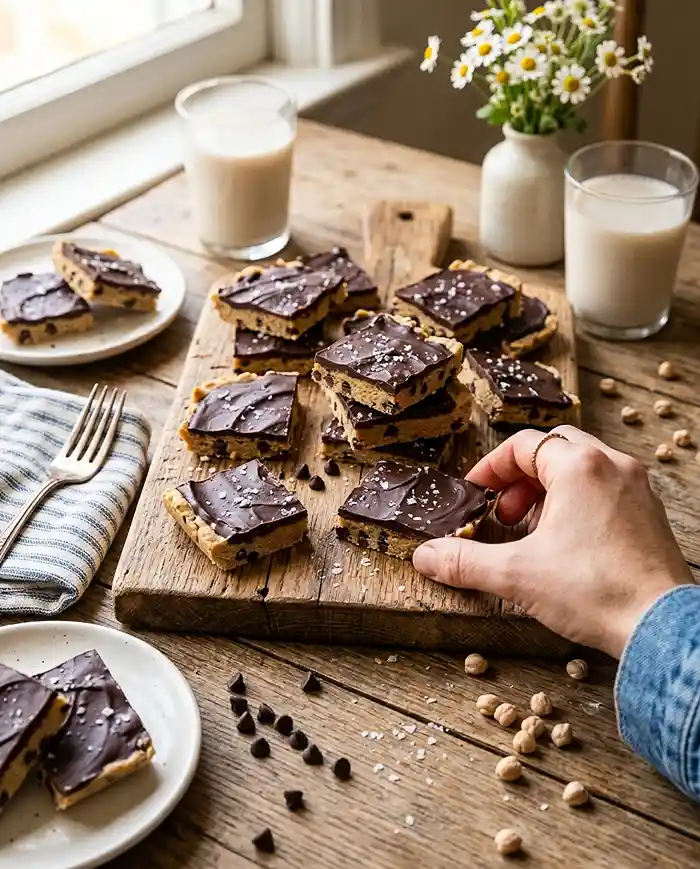
You know… this bark pairs really well with a scoop of vanilla coconut milk ice cream for a dessert plate that looks like you spent hours on it. The contrast between the cold, dense bark and the creamy ice cream is like biting into a chocolate-covered truffle — firm outside, soft center.
It’s also a natural fit for holiday cookie trays at Thanksgiving or Christmas gatherings — it travels well from the freezer, looks impressive, and gives guests with dietary restrictions something genuinely satisfying to eat.
For a full chickpea dessert spread, pair this bark with these gluten-free banana chickpea cookies — the banana flavor balances the chocolate richness beautifully.
If you made this recipe, leave a star rating and let me know in the comments how it turned out — I read every single one. Save it to your Pinterest boards so you can find it again when that next chocolate craving hits.

Chickpea Cookie Dough Bark Recipe That Actually Tastes Indulgent
Equipment
- Food processor
- Baking sheet or 8-inch square pan
- Parchment paper
- Mixing bowl
- Spatula
- Microwave-safe bowl
Ingredients
Cookie Dough Base
- 1 ½ cups Canned chickpeas Drained, rinsed, and patted completely dry
- ½ cup Creamy peanut butter or almond butter
- ⅓ cup Pure maple syrup
- 1 tsp Vanilla extract
- 1 cup Certified gluten-free oat flour
- ½ tsp Cinnamon
- ¼ tsp Salt
- ⅓ cup Mini dark chocolate chips Certified gluten-free
Chocolate Topping
- ½ cup Gluten-free dark chocolate Melted
- 1 tbsp Coconut oil Melted
Instructions
- Line a baking sheet or 8-inch square pan with parchment paper, leaving some overhang on the sides for easy lifting later.
- Add the chickpeas, peanut butter or almond butter, maple syrup, and vanilla to a food processor. Blend until completely smooth and creamy, scraping down the sides as needed. This usually takes 2–3 minutes of processing.
- Add the oat flour, cinnamon, and salt. Blend again until a thick cookie dough forms. It should pull away from the sides and feel dense when you scrape a spoonful.
- Transfer the dough to a bowl and fold in the mini chocolate chips by hand so they stay intact and do not melt from the processor blade.
- Press and spread the cookie dough evenly over the parchment, about 1/4-inch thick. Use damp fingertips or the back of a spoon to smooth the surface.
- Melt the dark chocolate with the coconut oil in 30-second microwave bursts, stirring between each, until smooth. Pour over the cookie dough and spread into an even layer.
- Sprinkle additional mini chocolate chips over the top while the chocolate is still wet, if desired.
- Place in the freezer for 1–2 hours, or until the chocolate is completely solid and the dough beneath it has firmed up fully.
- Lift the parchment out of the pan and break or cut into bark-style pieces. Serve chilled directly from the freezer.