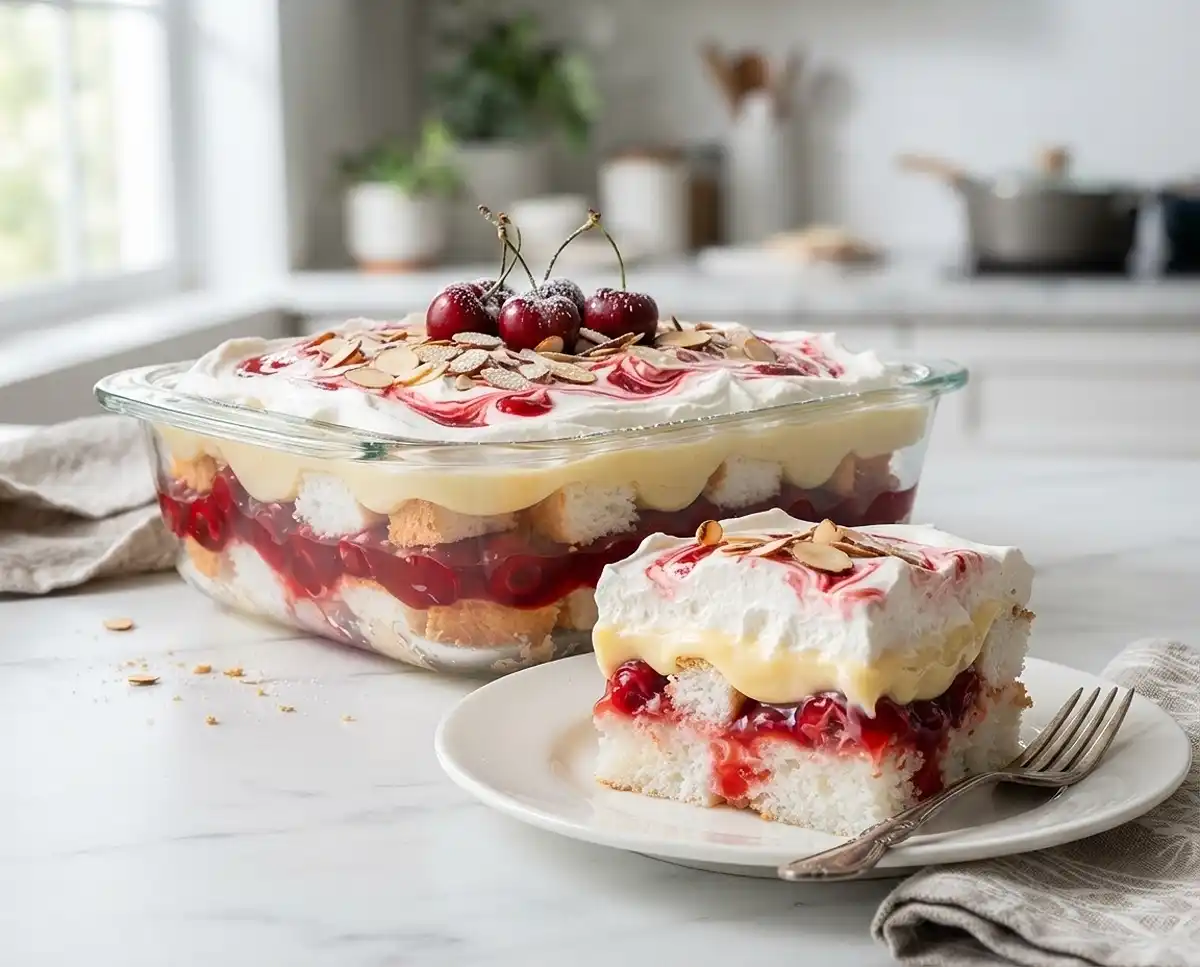
Gluten-Free Heaven on Earth Cake
Step-by-step gluten-free heaven on earth cake with angel food cake, cherry filling, and creamy vanilla pudding layers. No baking required — just chill and serve.
The first time I made a gluten-free heaven on earth cake, I was scrambling to bring something to our Fourth of July cookout that my celiac niece could actually eat.
I grabbed a certified gluten-free angel food cake, layered it with cherry pie filling and a sour cream pudding mixture, and crossed my fingers. She took one bite and asked if there was more. That was all the testing I needed.
What makes this no-bake dessert so special? It requires zero oven time, just a handful of ingredients, and a night in the fridge. Can it really be this easy to make something that tastes this cloud-light and indulgent all at once?
Well… it absolutely can. This gluten-free heaven on earth cake recipe is proof that simple and stunning aren’t mutually exclusive.
Why You’ll Love This Gluten-Free Heaven on Earth Cake
- No baking required. The whole thing comes together in about 20 minutes of hands-on time, then the fridge does the rest.
- Cloud-soft texture. After an overnight chill, the angel food cake absorbs the creamy layers and becomes as fluffy as clouds soaked in vanilla cream — completely irresistible.
- Beginner-friendly. If you can whisk pudding mix and layer ingredients in a dish, you can make this recipe confidently.
- Crowd-pleaser for any occasion. This works beautifully as a potluck dessert, holiday treat, or weeknight indulgence for the whole family.
The Secret to Perfect Gluten-Free Heaven on Earth Cake
- Use certified gluten-free angel food cake. Trusted celiac resources like Beyond Celiac recommend always choosing certified products. Cross-contamination risk is real, so look for the GFCO or NSF certification on the label.
- Whisk the pudding with sour cream, not just milk. Combining whole milk and sour cream creates a thicker, tangier pudding layer that holds its shape beautifully when sliced.
- Let it rest overnight. Refrigerating for 12–16 hours allows the pudding and cherry filling to fully absorb into the cake cubes. Rushing this step results in a drier, less cohesive texture.
- Swirl — don’t stir — the cherry topping. Using a toothpick to gently swirl the remaining cherry filling through the whipped topping gives a gorgeous marbled finish without muddying the layers.
Table of Contents
Ingredients
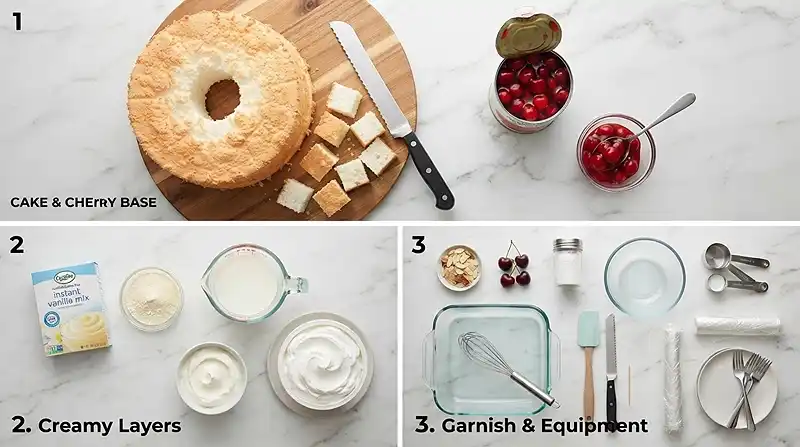
Here’s everything you need, organized by component. Always verify each product carries a certified gluten-free label before you begin.
Cake Layer
| Ingredient | Amount | Notes |
|---|---|---|
| Certified gluten-free prepared angel food cake | 14 ounces | Kinnikinnick is a reliable brand; check your local gluten-free aisle |
| Certified gluten-free cherry pie filling | 1 can (21 ounces) | Divided — used in two layers |
| Certified gluten-free instant vanilla pudding mix | 1 box (3.4 ounces) | Confirm “gluten-free” on the label — not all pudding mixes are |
| Whole milk | 1½ cups | Full-fat milk gives the pudding the best body |
| Sour cream | 1 cup | Adds tang and thickness to the pudding layer |
| Gluten-free whipped topping, thawed | 8 ounces | Cool Whip is gluten-free; verify your brand’s labeling |
Optional Garnish
| Ingredient | Amount |
|---|---|
| Sliced almonds | ¼ cup |
| Fresh cherries | To taste |
| Powdered sugar | To taste |
Instructions
Prep Time: 20 minutes | Chill Time: 8–16 hours | Servings: 9–12
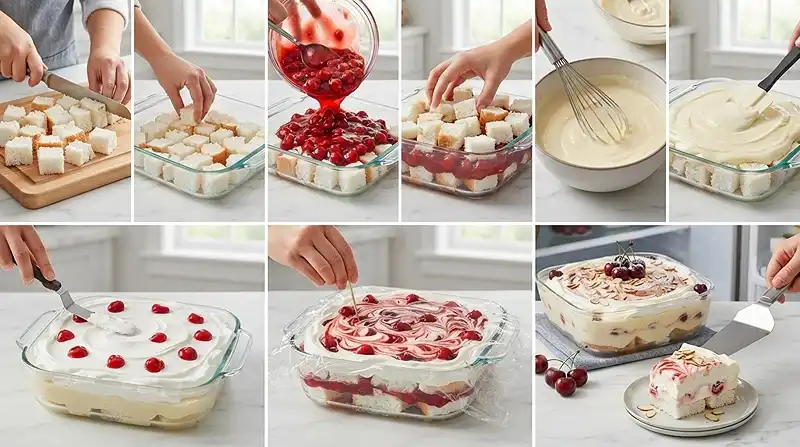
Step 1: Cut the Cake
Use a serrated knife to cut the gluten-free angel food cake into approximately 1-inch cubes. A serrated blade makes clean cuts without compressing the delicate cake.
Step 2: Prepare Your Dish
Use a deep-dish 8×8-inch baking dish. If you don’t have one, a 9×9-inch baking dish works well. The deeper the dish, the better the layers hold together when you slice and serve.
Step 3: First Cake Layer
Arrange half of the angel food cake cubes evenly across the bottom of the dish. Press them gently to create a stable base — but don’t smash them into the dish.
Step 4: First Cherry Layer
Spread about half of the cherry pie filling over the cake cubes. Try to distribute the cherries evenly so every slice gets a good ratio of fruit to cake.
Step 5: Second Cake Layer
Add the remaining angel food cake cubes in an even layer over the cherry filling. This second layer will trap the pudding and keep the structure intact.
Step 6: Make the Pudding Mixture
In a medium bowl, whisk together the instant vanilla pudding mix, whole milk, and sour cream for 1–2 minutes, until smooth and thick.
Let it stand for a few minutes if necessary to finish setting. The mixture should be thick enough to hold its shape when you spread it — not runny.
Pro Tip: Cold milk helps the pudding set faster. Pull it straight from the fridge before whisking.
Step 7: Spread the Pudding
Spread the pudding mixture evenly over the angel food cake. Work from the center outward using an offset spatula or the back of a large spoon. You want full, edge-to-edge coverage.
Step 8: Whipped Topping Layer
Spread the thawed whipped topping over the pudding layer. This is your finishing canvas, so take a moment to make it smooth and even across the surface.
Step 9: Top with Cherry Filling
Spoon the remaining cherry pie filling over the whipped topping in small dollops. Space them out across the entire surface for even distribution.
Step 10: Swirl
Use a toothpick or the back of a spoon to gently swirl the cherry filling through the whipped topping. A few slow, sweeping strokes are all you need for a gorgeous marbled look.
Step 11: Cover and Refrigerate
Cover the dish tightly with plastic wrap or a lid. Refrigerate for at least 8 hours, preferably overnight for 12–16 hours.
This allows the cake to absorb the creamy layers and develop its signature soft texture. Rushing this step is the most common mistake — don’t skip it.
Step 12: Garnish and Serve
Just before serving, sprinkle the sliced almonds over the top if desired. Slice and serve chilled directly from the refrigerator. A sharp knife dipped in warm water makes clean, picture-worthy slices.
Make It Your Own
You know… one of the best things about this easy gluten-free heaven on earth cake is how forgiving it is to customize. The layered structure welcomes a range of swaps without falling apart — literally.
Swap the cherry filling for another fruit. Blueberry, strawberry, or peach pie filling all work beautifully here. Stick with certified gluten-free canned versions and verify the label. The fruit adds the same sweet-tart punch regardless of which variety you choose.
Make it dairy-free. Use full-fat coconut milk in place of whole milk and swap the sour cream for a dairy-free alternative like coconut cream. Replace the whipped topping with a certified dairy-free brand. The texture will be slightly lighter, but the layers still hold nicely overnight.
Try a chocolate pudding layer. If you love chocolate-covered cherries, swap the vanilla pudding mix for a certified gluten-free chocolate instant pudding. The combination of chocolate, cherry, and whipped topping is deeply satisfying. You can also find gluten-free box cake inspiration if you want to experiment further.
Skip the almonds if needed. The sliced almonds add a gentle crunch and visual appeal, but the cake is just as enjoyable without them. If you’re serving guests with nut allergies, simply leave them off or substitute a sprinkle of powdered sugar for garnish.
Common Problems & Solutions
Man, oh man… gluten-free layered desserts can feel intimidating, but most problems have a simple fix once you understand what’s happening beneath the surface.
Problem: The cake is soggy after chilling. This usually means the pudding mixture was too thin when you spread it. Make sure your pudding has fully set — it should be thick and spreadable, not pourable — before layering it over the cake.
Problem: The layers slide apart when sliced. This is almost always a timing issue. The cake needs the full 8–12 hours to absorb moisture and bind the layers together. Slicing too early leads to structural collapse. Chill it overnight for the cleanest results.
Problem: The whipped topping is weeping or watery. Fully thaw your whipped topping in the refrigerator — not on the counter — before using it. Counter-thawing causes uneven texture and can lead to separation after a few hours in the dish.
Problem: The cherry filling sinks through the whipped layer. Spoon the cherries on in small, spaced-out dollops rather than dumping them in the center. Then swirl gently. If the dollops are too large, their weight pulls them down through the topping.
Problem: The cake doesn’t taste gluten-free safe. Always double-check every label — pudding mix, canned fruit filling, and whipped topping included. Certified gluten-free labeling guidance recommends looking for GFCO certification (10 ppm or less) for the highest safety standard, especially for those with celiac disease.
Storage & Meal Prep
| Method | Duration | Notes |
|---|---|---|
| Counter | Not recommended | Whipped topping and pudding require refrigeration |
| Fridge | 3–4 days | Keep tightly covered; best within the first 2 days |
| Freezer | Not recommended | Texture of whipped topping and pudding changes significantly after freezing |
This cake is best eaten within 48 hours of assembly, when the layers are perfectly absorbed but the whipped topping still holds its structure. After day three, the topping may soften further and the base can become quite dense.
If you’re making this ahead for a party or holiday gathering, assemble it the night before and keep it covered in the refrigerator until you’re ready to serve. Hold off on garnishing with almonds until just before serving so they stay crisp.
Leftover individual slices can be covered with plastic wrap and refrigerated separately for easy grab-and-go servings over the next couple of days.
Gluten-Free Heaven on Earth Cake
Can I use a homemade gluten-free angel food cake instead of a store-bought one?
Yes, you can use homemade gluten-free angel food cake in this recipe. Make sure it is fully cooled and firm before cutting it into cubes — a warm or slightly underbaked cake will crumble instead of holding its shape in the layers. Allow it to cool inverted in the pan, just as you would with a traditional angel food cake, then chill it briefly before slicing.
How do I keep the layers from mixing together?
The key is patience between each step. Let the pudding fully set before spreading it over the cake, and spread each layer gently using an offset spatula or the back of a spoon. Refrigerating overnight allows everything to firm up into distinct, clean layers that hold together when sliced.
What’s the best gluten-free whipped topping to use?
Cool Whip is widely considered gluten-free and is available at most grocery stores. If you prefer a dairy-free option, look for certified gluten-free coconut whipped topping brands such as So Delicious CocoWhip. Always thaw it completely in the refrigerator — not on the counter — before using.
Why did my pudding layer turn out runny?
Runny pudding usually means it wasn’t whisked long enough or didn’t have time to set. Whisk the pudding mix, whole milk, and sour cream for a full 1–2 minutes, then let it stand for 3–5 minutes before spreading. If it still seems thin, refrigerate it for 10 minutes before adding it to the dish.
Can I make this gluten-free heaven on earth cake the day before serving?
Absolutely — and you should. This cake is actually better the next day. The overnight chill allows the angel food cake to fully absorb the pudding and cherry layers, creating that signature soft, cloud-like texture the recipe is known for. Make it the evening before, cover it tightly, and refrigerate until ready to serve.
Serving Suggestions
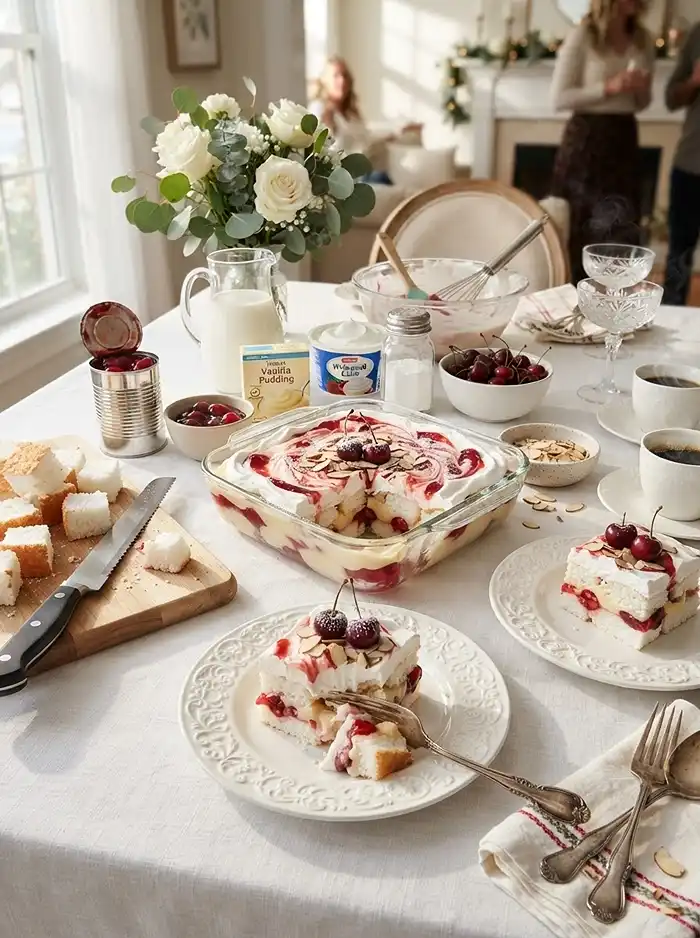
Serve this cake straight from the refrigerator with a light dusting of powdered sugar and a few fresh cherries on the side for an elegant presentation.
It pairs beautifully with a scoop of gluten-free vanilla ice cream or alongside a warm mug of coffee — the contrast of cold, creamy layers against something hot is wonderfully satisfying.
This dessert is a natural fit for summer gatherings, Easter brunch, or any holiday potluck where you need something crowd-friendly and easy to slice. It travels well in the dish and looks impressive without any last-minute effort.
If you love gluten-free no-bake desserts, you’ll also enjoy this gluten-free cinnamon roll poke cake — another effortless layered treat. For something a little richer, the gluten-free Italian chocolate olive oil cake is a deeply satisfying option.
I’d love to know how yours turned out! Drop a comment below with any substitutions you tried, leave a star rating if you made it, and save it to your Pinterest boards so other gluten-free families can find it too. Your feedback genuinely helps this little corner of the gluten-free internet grow.
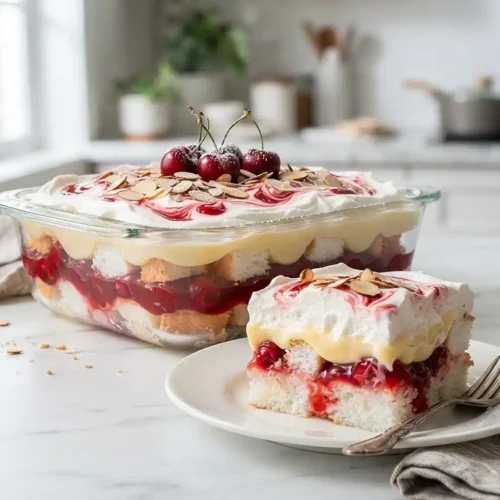
Gluten-Free Heaven on Earth Cake
Equipment
- Serrated knife
- Deep-dish 8×8-inch baking dish
- Medium mixing bowl
- Whisk
- Offset spatula
- Toothpick
- Plastic wrap or lid
Ingredients
Cake Layer
- 14 ounces Certified gluten-free prepared angel food cake Cut into approximately 1-inch cubes
- 1 can (21 ounces) Certified gluten-free cherry pie filling Divided for two layers
- 1 box (3.4 ounces) Certified gluten-free instant vanilla pudding mix Confirm gluten-free labeling
- 1 ½ cups Whole milk Use cold milk for best pudding consistency
- 1 cup Sour cream Adds thickness and tang
- 8 ounces Gluten-free whipped topping Thawed completely in the refrigerator
Optional Garnish
- ¼ cup Sliced almonds Optional
- Fresh cherries To taste, optional
- Powdered sugar To taste, optional
Instructions
- Use a serrated knife to cut the gluten-free angel food cake into approximately 1-inch cubes.
- Use a deep-dish 8×8-inch baking dish. A 9×9-inch dish can also be used.
- Arrange half of the angel food cake cubes evenly across the bottom of the dish, pressing them gently without smashing them.
- Spread about half of the cherry pie filling evenly over the cake cubes.
- Add the remaining angel food cake cubes in an even layer over the cherry filling.
- In a medium bowl, whisk together the instant vanilla pudding mix, whole milk, and sour cream for 1–2 minutes, until smooth and thick. Let it stand for a few minutes if needed so it fully sets.
- Spread the thickened pudding mixture evenly over the second cake layer, working from the center outward.
- Spread the thawed gluten-free whipped topping evenly over the pudding layer.
- Spoon the remaining cherry pie filling over the whipped topping in small, spaced-out dollops.
- Use a toothpick or the back of a spoon to gently swirl the cherry filling through the whipped topping to create a marbled finish.
- Cover the dish tightly with plastic wrap or a lid and refrigerate for at least 8 hours, preferably overnight for 12–16 hours.
- Just before serving, garnish with sliced almonds, fresh cherries, or powdered sugar if desired. Serve chilled.