How to bake Gluten-Free chickpeas
Learn how to bake gluten-free chickpeas with just 7 ingredients. Step-by-step instructions, seasoning ideas, troubleshooting tips, and storage advice included.
Gluten-free baked chickpeas were my accidental obsession. I was trying to find a crunchy snack my kids could grab at Thanksgiving without me worrying about hidden wheat in store-bought crackers — and one pan of oven-roasted chickpeas later, the bag of chips never made it to the table.
The first time I made them, though, I pulled soggy little balls out of the oven after 25 minutes and wondered what went wrong. Turns out I hadn’t dried the chickpeas nearly well enough. That one mistake cost me the crunch — and I’ve never skipped thorough drying since.
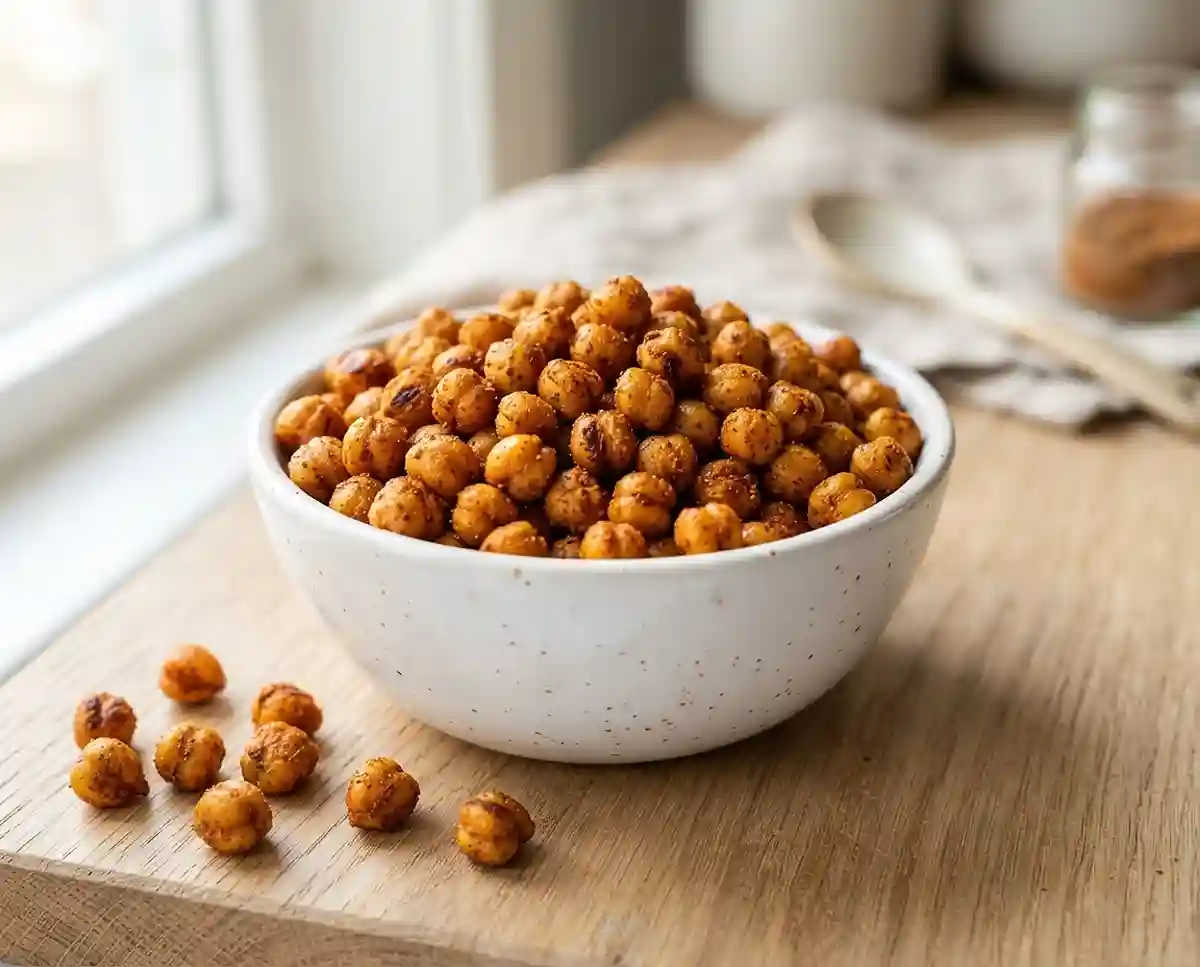
Perfectly crispy and irresistibly crunchy, learning How to Bake Gluten-Free Chickpeas gives you the ultimate healthy snack. Hungry for more? Explore my whole lineup of easy gluten-free chickpea ideas.
Why You’ll Love This Baked Chickpeas Recipe
- Genuinely crispy texture — when dried and spaced correctly, these come out crackling and light, like a cross between a crouton and a corn nut.
- Only 7 ingredients — everything is pantry-staple simple, and all of it is naturally gluten-free.
- Endlessly versatile — works as a snack, salad topper, soup garnish, or bowl addition.
- Meal prep friendly — make a double batch on Sunday and snack all week.
The Secret to Perfect Gluten-Free Baked Chickpeas
Crispy baked chickpeas come down to moisture management — everything else is secondary. Here’s what actually makes the difference:
- Aggressive drying — surface moisture turns to steam in the oven, which softens the skin instead of crisping it. Pat the chickpeas with paper towels until the towel comes away nearly dry.
- High oven heat — 425°F is the sweet spot. Lower temperatures draw out moisture slowly but don’t create the intense dry heat needed for a crackly exterior.
- Single layer with space between — crowded chickpeas steam each other. Spread them out so hot air can circulate around every single one.
- Cooling time matters — chickpeas continue to crisp for 5–10 minutes after they leave the oven. Pull them at golden brown, not deep brown, and let the cooling rack do the rest.
According to Healthline’s evidence-based guide to chickpea nutrition, chickpeas are a strong source of plant-based protein and fiber — making this one of the few snacks that actually keeps you full.
Table of Contents
Ingredients
| Ingredient | Amount | Notes |
|---|---|---|
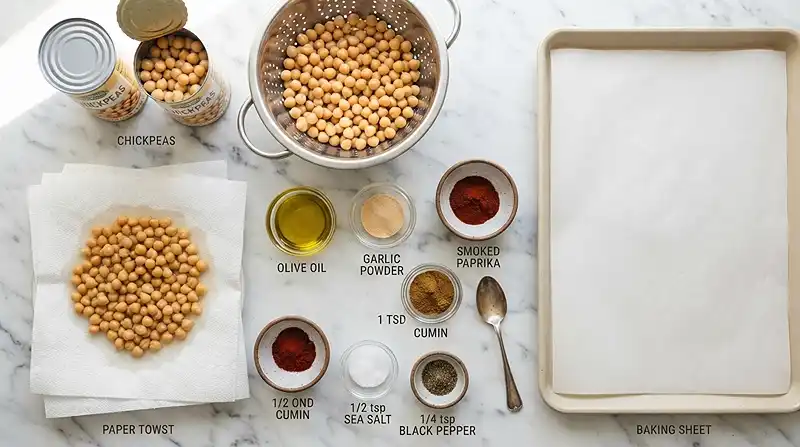
| Chickpeas, drained and rinsed | 2 cans (15 oz each) | Dry them very thoroughly — this is the most important step |
| Olive oil | 2 tbsp | Helps the spices stick and promotes even browning |
| Garlic powder | 1 tsp | Fresh garlic burns at high heat — powder is the right call here |
| Smoked paprika | 1 tsp | Adds depth and a subtle warmth; regular paprika also works |
| Ground cumin | 1/2 tsp | |
| Salt | 1/2 tsp | |
| Black pepper | 1/4 tsp |
Instructions
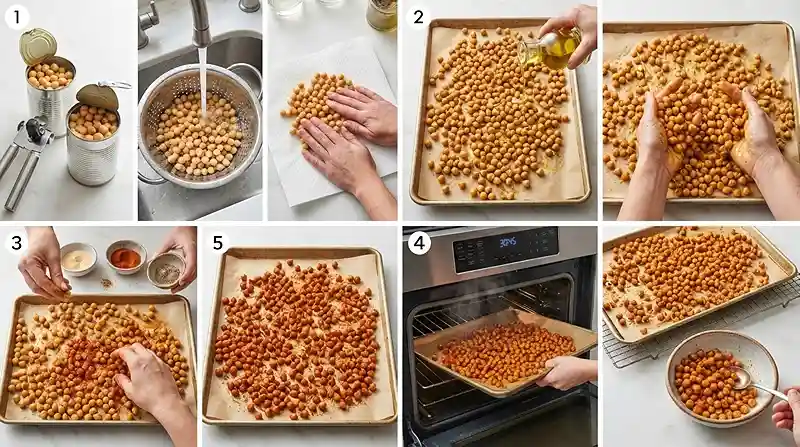
Preheat and prep. Preheat the oven to 425°F and line a large baking sheet with parchment paper. Getting the oven fully up to temperature before the chickpeas go in ensures they hit immediate dry heat rather than warming up slowly.
Dry the chickpeas thoroughly. Drain and rinse the chickpeas, then spread them on a clean kitchen towel or several layers of paper towels. Pat firmly and roll them around until the surface moisture is gone. This step directly determines how crispy your final result will be — don’t rush it.
Coat with oil. Spread the dried chickpeas on the prepared baking sheet. Drizzle with olive oil and toss until every chickpea is evenly coated with a thin, glistening layer.
Season generously. Sprinkle the garlic powder, smoked paprika, cumin, salt, and black pepper over the chickpeas. Toss again so the spices distribute evenly across all of them — you want that toasty, spiced aroma on every bite.
Space them out. Spread the chickpeas into a single layer, leaving visible space between each one. Crowding the pan is the fastest way to end up with soft, steamed chickpeas instead of crispy ones.
Bake, shaking every 10 minutes. Bake for 25–35 minutes, shaking the pan or stirring with a spatula every 10 minutes. You’re looking for a deep golden-brown color and a noticeably dry, matte surface — not shiny or soft.
Cool before serving. Let the chickpeas cool on the pan for 5–10 minutes. They’ll crisp up further as moisture continues to evaporate — this cooling time is what takes them from good to genuinely crackling.
Serve your way. Enjoy as a snack straight from the pan, scatter over a salad, spoon into a grain bowl, or float on top of a bowl of soup as a crunchy, gluten-free crouton alternative.
Pro Tip: If your chickpeas lose their crunch after a day, spread them back on a baking sheet and pop them in a 350°F oven for 5–8 minutes. They’ll crisp right back up.
Make It Your Own
You know… the spice blend here is just the starting point. For a warm, slightly sweet variation, swap the smoked paprika for cinnamon and add 1 teaspoon of maple syrup with the oil. The sugars caramelize as they bake, and the result is something closer to a candied nut than a savory snack.
For a bolder, spicier version, add 1/4 teaspoon of cayenne pepper alongside the existing spices. This is especially good if you’re using these as a salad topper — that heat works beautifully against creamy dressings and cool greens.
Want to skip the oil entirely? You can — but expect a slightly less crispy result and slightly less even seasoning. Oil helps the spices adhere and promotes browning through fat conduction. Without it, the chickpeas will still roast, but they’ll take a few extra minutes and the exterior won’t be quite as satisfying.
If you’re building a full chickpea-forward snack spread, try pairing these alongside our gluten-free hummus made from scratch with dried chickpeas — the contrast between the smooth dip and the crispy bites is genuinely hard to put down.
Common Problems & Solutions
Problem: The chickpeas came out soft instead of crispy. The most likely cause is surface moisture — either from insufficient drying before baking or from overcrowding on the pan. Next time, dry them longer, use a larger sheet pan, and make sure there’s breathing room between every chickpea. Steam is the enemy of crunch.
Problem: The spices burned before the chickpeas crisped up. This usually happens when the oil coating is uneven, leaving dry spice patches exposed to direct oven heat. Make sure every chickpea gets a thorough toss in oil before you add the seasoning — the oil acts as a buffer between the spices and the pan’s heat.
Man, oh man… Problem: The chickpeas are crispy coming out of the oven but go soft within hours. Humidity is usually the culprit here. Store them uncovered on the counter for the first hour after cooling, then transfer to a loosely covered container — not an airtight one. Sealing them while still warm traps residual steam and undoes all your work.
Problem: The chickpeas are chewy in the middle. They need more time in the oven. Baking time varies based on how wet your chickpeas were to start and how your oven runs. Extend baking in 5-minute increments, shaking the pan between each, until the centers feel firm when you press one gently. You can read more about why moisture content affects roasting outcomes in this in-depth crispy chickpea technique breakdown from Serious Eats.
Storage & Meal Prep
| Method | Duration | Notes |
|---|---|---|
| Counter | 2–3 days | Loosely covered container — not airtight — to prevent sogginess |
| Fridge | 5–7 days | Texture softens; re-crisp in oven before serving |
| Freezer | 2–3 months | Freeze in a single layer first, then bag; re-crisp from frozen at 375°F |
To re-crisp, spread on a baking sheet and bake at 350°F for 5–8 minutes. This works even for chickpeas that have been in the fridge — give them a few minutes and they’ll snap back to something close to fresh-from-the-oven texture.
For meal prep, bake a double batch and portion them into small containers for the week. They hold up well as a salad topper even after a day or two in the fridge, especially if you add them to the salad right before eating rather than tossing them in ahead of time.
How to bake Gluten-Free chickpeas FAQs
How do I keep baked chickpeas crispy?
Store them in a loosely covered container at room temperature rather than an airtight one. Sealing them traps moisture and softens the exterior. If they lose their crunch, re-crisp them on a baking sheet at 350 degrees Fahrenheit for 5 to 8 minutes.
Can I use dried chickpeas instead of canned?
Yes, but they need to be cooked first. Cook dried chickpeas until just tender — not mushy — then dry them very thoroughly before roasting. The texture is often even better with dried-then-cooked chickpeas because they start with lower moisture content than canned.
Why did my chickpeas turn out chewy instead of crispy?
Chewiness almost always comes from one of two things: insufficient drying before baking, or not enough time in the oven. Make sure the chickpeas are patted completely dry before they go in, spread them in a single layer with space between them, and extend baking time in 5-minute increments if needed.
What’s the best seasoning for baked chickpeas?
The smoked paprika, garlic, and cumin blend in this recipe is a reliable all-purpose base. For sweeter variations, try cinnamon and a touch of maple syrup. For spicier, add cayenne. Everything bagel seasoning is another crowd favorite — just toss it on after oiling and before baking.
How do I make baked chickpeas without oil?
You can roast them oil-free, but expect a slightly less crispy result and less even browning. Without oil acting as a heat conductor and spice binder, the chickpeas may take a few extra minutes and the seasoning won’t adhere as well. A light spritz of water can help the spices stick if you’re going oil-free.
Serving Suggestions
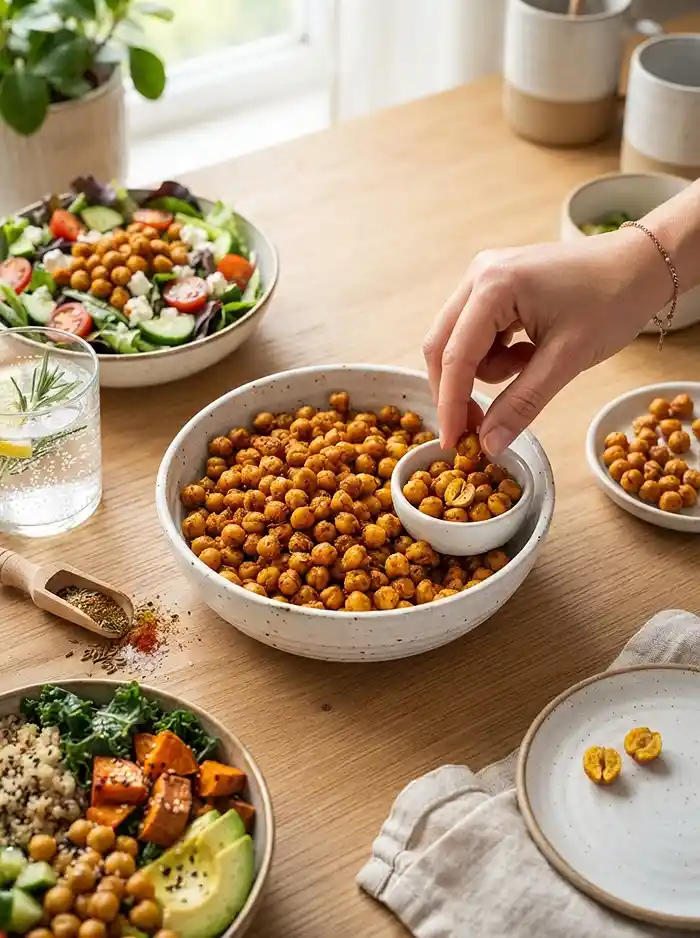
These baked chickpeas are at their best straight from the pan while still warm and crackling — scatter them over a big green salad with lemon tahini dressing, or spoon them into a grain bowl with roasted vegetables and a drizzle of olive oil.
They also make a genuinely crowd-pleasing snack bowl for game day or a Super Bowl spread, especially alongside our pan-fried gluten-free falafel with canned chickpeas for a full chickpea snack table.
For a complete weeknight dinner, use them as a protein-rich topping over our marry me chickpeas with coconut milk — the contrast between the saucy base and the crunchy topping is a textural win every time.
Conclusion
Once you learn how to bake gluten-free chickpeas that actually stay crispy, you’ll keep canned chickpeas stocked at all times. The technique is simple — dry thoroughly, spread wide, bake hot — and the payoff is a snack you’ll reach for every single day.
Give this recipe a try and drop a comment telling me what seasoning blend you used. If you loved it, sharing it on Pinterest helps other gluten-free snackers find it — and I genuinely appreciate every share.
How to bake Gluten-Free chickpeas
Equipment
- Large baking sheet
- Parchment paper
- Kitchen towel
- Spatula
Ingredients
- 2 cans (15 oz each) Chickpeas Drained and rinsed; dry very thoroughly
- 2 tbsp Olive oil Helps spices stick and promotes even browning
- 1 tsp Garlic powder Fresh garlic can burn at high heat
- 1 tsp Smoked paprika Regular paprika can also be used
- ½ tsp Ground cumin
- ½ tsp Salt
- ¼ tsp Black pepper
Instructions
- Preheat and prep. Preheat the oven to 425°F and line a large baking sheet with parchment paper.
- Dry the chickpeas thoroughly. Drain and rinse the chickpeas, then spread them on a clean kitchen towel or several layers of paper towels. Pat firmly and roll them around until the surface moisture is gone.
- Coat with oil. Spread the dried chickpeas on the prepared baking sheet. Drizzle with olive oil and toss until every chickpea is evenly coated with a thin layer of oil.
- Season generously. Sprinkle the garlic powder, smoked paprika, cumin, salt, and black pepper over the chickpeas. Toss again to distribute the spices evenly.
- Space them out. Spread the chickpeas into a single layer, leaving visible space between each one so hot air can circulate and prevent steaming.
- Bake, shaking every 10 minutes. Bake for 25–35 minutes, shaking the pan or stirring with a spatula every 10 minutes. Look for a deep golden-brown color and a noticeably dry, matte surface.
- Cool before serving. Let the chickpeas cool on the pan for 5–10 minutes. They will continue to crisp as they cool.
- Serve your way. Enjoy as a snack, scatter over a salad, spoon into a grain bowl, or use as a crunchy gluten-free crouton alternative for soup.