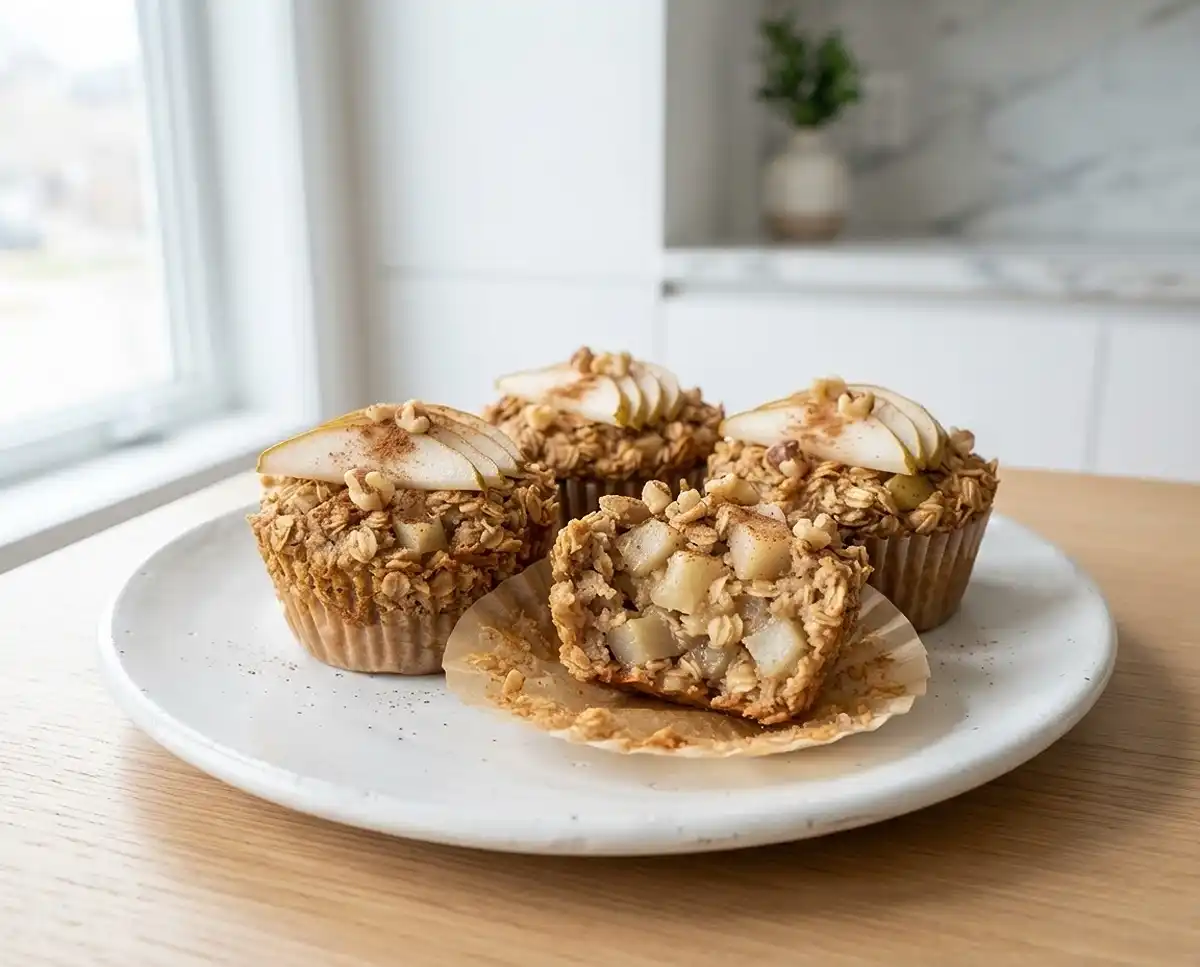
Pear Cardamom Baked Oat Cups
Step-by-step gluten-free baked oat cups with warming cardamom and juicy pear. Easy make-ahead breakfast with simple ingredients and soft, satisfying texture.
The first time I made gluten-free baked oat cups, I overfilled every single muffin well and ended up with twelve oat volcanoes erupting all over my oven. Total mess—but the flavor? Absolutely worth it. That batch taught me the three-quarters rule I now swear by, and it’s baked into every cup I’ve made since.
These gluten-free pear cardamom baked oat cups have become my weekday anchor. Fragrant with warm spice, studded with juicy pear, and sturdy enough to grab cold on a Tuesday morning—they hit everything I need before 7 a.m.
What’s the best part about a make-ahead breakfast that actually holds up all week? You make it once, and mornings stop feeling like a sprint.
Why You’ll Love These Baked Oat Cups
- Soft without being mushy: The oat flour binds the batter so each cup holds its shape but still has a tender, almost cake-like crumb.
- Beginner-friendly: One bowl for dry, one for wet, stir, rest five minutes, bake. No mixer, no special equipment.
- Naturally dairy-free adaptable: Use any milk you love—oat, almond, or full-fat coconut all work beautifully here.
- Built for meal prep: Bake a batch Sunday evening and breakfast is handled through Friday.
The Secret to Perfect Gluten-Free Pear Cardamom Baked Oat Cups
- The five-minute rest matters: Letting the batter sit before baking gives the oats time to hydrate. Skip it and the cups turn dense and gummy in the center.
- Certified gluten-free oats are non-negotiable: Regular oats are processed on shared equipment and cross-contact is real. According to trusted celiac disease research from the Celiac Disease Foundation, oat products must be certified to be safe for those with celiac disease.
- Cardamom and ginger amplify the pear: These spices don’t compete with the fruit—they draw out its natural sweetness and add depth that cinnamon alone can’t deliver.
- Finely diced pear distributes evenly: Large chunks sink and create wet pockets. Dice small and you get fruit in every single bite.
Table of Contents
Ingredients
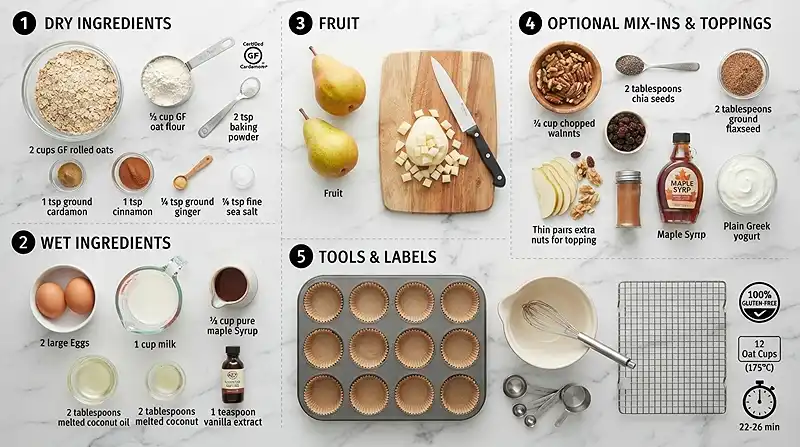
Dry Ingredients
| Ingredient | Amount | Notes |
|---|---|---|
| Certified gluten-free old-fashioned rolled oats | 2 cups | Look for the GF certification symbol on the bag |
| Certified gluten-free oat flour | ½ cup | Blend GF oats in a food processor if you can’t find oat flour |
| Baking powder (certified gluten-free) | 2 teaspoons | Check the label—some brands contain cornstarch with shared lines |
| Ground cardamom | 1 teaspoon | Freshly ground from pods gives the brightest flavor |
| Ground cinnamon | 1 teaspoon | Ceylon cinnamon works especially well here |
| Ground ginger | ¼ teaspoon | Adds warmth without heat |
| Fine sea salt | ¼ teaspoon | Balances the maple sweetness |
Wet Ingredients
| Ingredient | Amount | Notes |
|---|---|---|
| Large eggs | 2 | Room temperature blends more smoothly |
| Milk of choice | 1 cup | Dairy, oat, almond, or full-fat coconut all work |
| Pure maple syrup | ⅓ cup | Grade A amber has the best flavor depth |
| Melted coconut oil or unsalted butter | 2 tablespoons | Coconut oil keeps these dairy-free |
| Vanilla extract | 1 teaspoon | Pure vanilla, not imitation |
Fruit & Optional Mix-Ins
| Ingredient | Amount | Notes |
|---|---|---|
| Ripe pears, peeled and finely diced | 2 | Bartlett or Bosc; ripe but not mushy |
| Chopped walnuts or pecans (optional) | ¼ cup | Adds crunch and healthy fat |
| Chia seeds (optional) | 2 tablespoons | Boosts fiber and helps bind |
| Ground flaxseed (optional) | 2 tablespoons | Adds omega-3s; use golden for milder flavor |
| Raisins or dried cranberries (optional) | ¼ cup | Cranberries add tartness that plays well with cardamom |
Optional Toppings
- Thin pear slices
- Chopped nuts
- Cinnamon sprinkle
- Maple syrup drizzle
- Plain Greek yogurt
Instructions
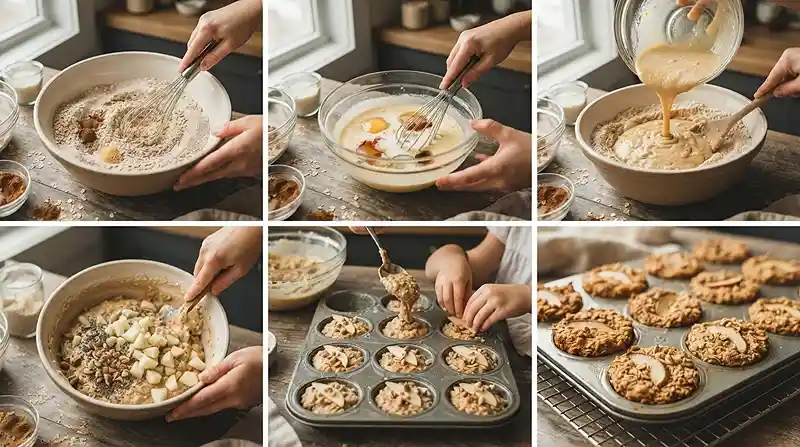
Step 1: Prep Your Pan and Oven
Preheat the oven to 350°F (175°C). Lightly grease or line a 12-cup muffin pan. Silicone liners release cleanest; parchment rounds are your next best option.
Step 2: Mix the Dry Ingredients
In a large mixing bowl, whisk together the 2 cups certified gluten-free rolled oats, ½ cup oat flour, 2 teaspoons baking powder, 1 teaspoon cardamom, 1 teaspoon cinnamon, ¼ teaspoon ginger, and ¼ teaspoon fine sea salt. You should smell the spices bloom as they hit the bowl—that cardamom aroma is your first sign this batch is going to be something special.
Step 3: Whisk the Wet Ingredients
In a separate bowl, whisk together the 2 eggs, 1 cup milk, ⅓ cup maple syrup, 2 tablespoons melted coconut oil, and 1 teaspoon vanilla until smooth. Whisk until the mixture looks slightly ribbony—fully emulsified means even texture in every cup.
Step 4: Combine Wet and Dry
Pour the wet ingredients into the dry ingredients and stir until just combined. Don’t overmix—a few uneven streaks are fine. Overmixing develops what little structure gluten-free oat flour has and can lead to dense, tough cups.
Step 5: Fold in the Pears and Mix-Ins
Fold in the 2 finely diced pears and any optional mix-ins you’re using. Use a gentle folding motion rather than stirring to keep the pear pieces intact and the batter airy.
Step 6: Rest the Batter
Let the batter rest for 5 minutes. This is the step most people skip—and it’s the reason some batches come out gummy in the middle. Those 5 minutes let the oats absorb liquid and the baking powder activate properly.
Step 7: Fill the Muffin Cups
Divide the mixture evenly among the 12 prepared muffin cups, filling each about ¾ full. Top with a few thin pear slices or chopped nuts if you’d like a prettier finished cup. The ¾ mark is your key measurement here—trust it.
Step 8: Bake
Bake for 22–26 minutes, or until the tops are lightly golden and a toothpick inserted into the center comes out clean. The edges will pull slightly from the pan sides and the tops should feel set, not springy.
Step 9: Cool and Serve
Cool in the pan for 5 minutes, then transfer the oat cups to a wire rack to cool completely. Enjoy warm or chilled with a spoonful of Greek yogurt or a drizzle of maple syrup. They’re as cozy as a weekend morning even on a Wednesday.
Make It Your Own
Well… the beauty of baked oat cups is how forgiving they are once you understand the base ratio. Swap the pears for peeled, finely diced apples if pears aren’t in season—the texture and bake time stay the same. Fuji and Honeycrisp both hold up without turning mushy.
For a dairy-free version, use full-fat coconut milk for the richest result, or unsweetened oat milk if you want something lighter. Both produce tender, fully cooked cups with no gummy center—as long as you don’t skip the rest period in Step 6.
If you’re looking to boost the protein in your pear cardamom breakfast, stir in 2 tablespoons of ground flaxseed or chia seeds from the optional mix-ins list. These additions also help the cups hold together more firmly, which makes them easier to grab and eat on the go. For more high-protein breakfast inspiration, check out this sweet potato egg white breakfast stack—it pairs beautifully with a batch of these oat cups for a full weekend brunch spread.
For a nut-free option, simply leave the walnuts or pecans out of the mix-ins and skip the chopped nut topping. The oat cups bake just as well without them—you’ll just lose the little crunch on top. Pumpkin seeds make a good nut-free topping substitute if you want texture back.
To reduce the sweetness for toddlers or kids with sensitive palates, cut the maple syrup back to ¼ cup. The cups will still bake through properly; the maple flavor just becomes more subtle, letting the pear and cardamom come forward. These are a consistent hit at our table every Thanksgiving weekend when I’m looking for a make-ahead breakfast the whole family can grab before the main cooking chaos starts.
Common Problems & Solutions
Problem: Cups are gummy or wet in the middle
The fix is almost always the five-minute rest. If you skip it, the oats don’t absorb enough liquid before baking and the center never fully sets. Let the batter rest, and verify your oven temperature is accurate with an oven thermometer—a 25-degree low can mean underbaked centers even at the correct time.
Problem: Cups crumble when you remove them from the pan
This usually means they came out of the pan too soon. The 5-minute rest in the pan isn’t optional—it’s when the structure finishes setting up. If crumbling is still an issue, make sure your oat flour measurement is exact; too little and there isn’t enough binding agent to hold the cups together.
Problem: Tops are browning too fast
Man, oh man… this one catches people by surprise with cardamom-spiced batters because the warm tones can look more golden than they are. Tent the muffin pan loosely with foil around the 18-minute mark and continue baking until the toothpick test passes. This preserves the soft interior while protecting the top.
Problem: Pear pieces sinking to the bottom
Large chunks of pear have more weight and will always migrate downward. Dice the pear finely—about ¼-inch pieces—and fold them in gently rather than stirring. Tossing the diced pear lightly in a teaspoon of the oat flour before folding in can also help suspend them more evenly in the batter.
Problem: Batter seems too thick or too thin
Oat batters vary based on the specific brand and how dry your oats are. If it looks thicker than pancake batter, add milk one tablespoon at a time. If it looks soupy, add a tablespoon of oat flour and let it rest an additional 2 minutes. The ideal consistency pours slowly and holds a soft mound in the muffin cup.
Storage & Meal Prep
| Method | Duration | Notes |
|---|---|---|
| Counter | 2–3 days | Airtight container at room temperature |
| Fridge | 5–7 days | Bring to room temp or reheat before eating |
| Freezer | 2–3 months | Wrap individually in plastic, then store in a zip bag |
To reheat from the fridge, microwave a cup for 30–45 seconds or warm in a 300°F oven for 8 minutes. From frozen, microwave for 60–90 seconds or thaw overnight in the fridge and reheat as above.
For no-waste meal prep, crumble a leftover cup over Greek yogurt with a drizzle of honey for an easy parfait, or warm one and serve it alongside this green chile hash brown egg casserole for a full savory-sweet brunch spread.
Pear Cardamom Baked Oat Cups FAQs
Can I make these oat cups ahead of time?
Yes, these are built for make-ahead mornings. Bake a full batch and store in an airtight container in the refrigerator for up to 7 days. They reheat in under a minute in the microwave and taste just as good on day six as they do fresh from the oven.
How do I keep gluten-free baked oat cups from falling apart?
Use certified gluten-free oat flour as written and do not skip the 5-minute batter rest. The oat flour acts as the primary binder in this recipe. Letting the batter hydrate before baking gives the structure time to develop so the cups hold together cleanly when you remove them from the pan.
What’s the best pear variety for this recipe?
Bartlett and Bosc are both excellent. Bartlett is softer and releases more juice into the batter, which keeps the cups extra moist. Bosc holds its shape slightly better after baking, which gives you more defined pear pieces in the finished cup. Either works—just make sure the pear is ripe but not overripe.
Why did my baked oat cups come out dense?
Dense cups usually mean the batter rested too long (over 10 minutes) or the baking powder was old. Certified gluten-free baking powder can lose its leavening power faster than conventional brands once opened. If your cups are consistently dense, test your baking powder in hot water—it should bubble actively within a few seconds.
Can I make these egg-free?
You can, though the texture will be softer and less structured. Replace each egg with a flax egg: 1 tablespoon ground flaxseed mixed with 3 tablespoons water, rested for 5 minutes until gel-like. Two flax eggs work reasonably well here, especially if you also add the optional chia seeds for extra binding.
Serving Suggestions
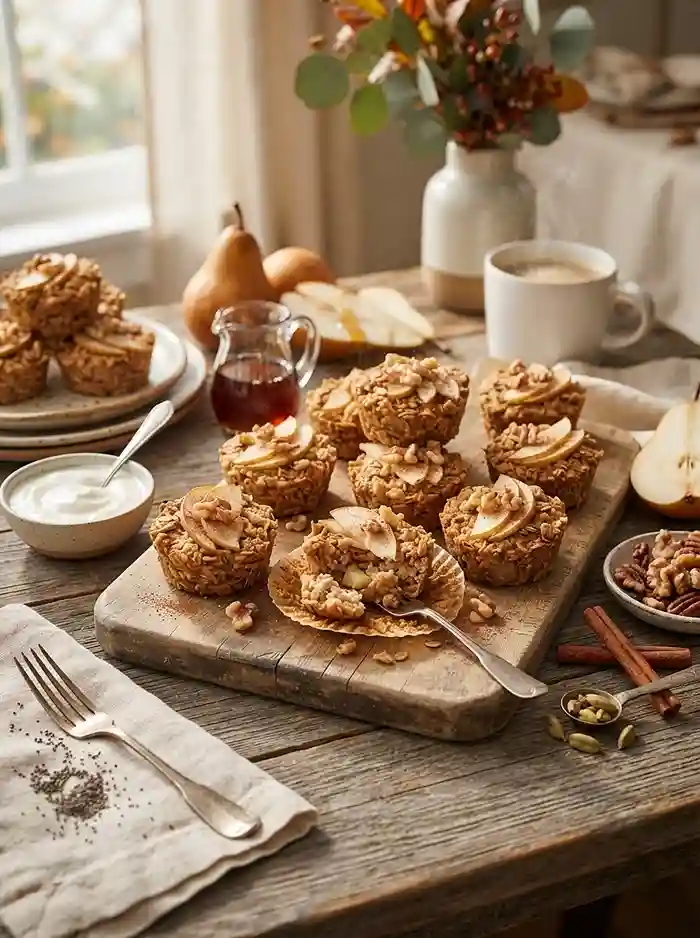
Serve warm with a spoonful of plain Greek yogurt and a drizzle of maple syrup for a breakfast that feels like a treat without going off track. You know—sometimes the simplest pairings are the ones that make a weekday morning feel genuinely good.
For a full brunch spread, pair these alongside the cottage cheese banana bread bowl—both prep ahead, both travel well, and together they cover a range of textures and flavors that keeps everyone at the table happy. These cups also work beautifully as part of a holiday breakfast bar, especially for Christmas morning or a New Year’s Day brunch when you want something warm, hands-free, and ready before the chaos starts.
For image alt text: photograph the cups on a wooden board with a halved pear, a small bowl of Greek yogurt, and scattered cardamom pods. Suggested alt text: “Gluten-free pear cardamom baked oat cups on a wooden board with Greek yogurt and fresh pear slices.”
Final Thoughts
These gluten-free pear cardamom baked oat cups aren’t complicated—they’re just carefully thought through. The five-minute rest, the certified oats, the finely diced pear: every detail has a reason behind it, and once you make them once, you’ll understand why they earn a permanent spot in your rotation.
If you give these a try, I’d love to hear how they turned out. Leave a rating and let me know what mix-ins you used—I read every comment. And if you’re sharing on Pinterest, a photo of your batch makes my day every single time.
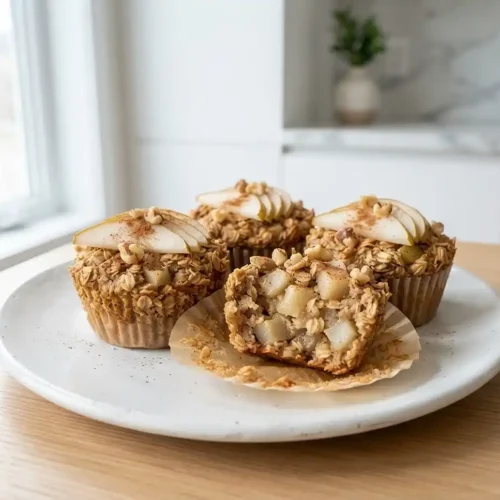
Gluten-Free Pear Cardamom Baked Oat Cups Recipe
Equipment
- 12-cup muffin pan
- Large mixing bowl
- Medium mixing bowl
- Whisk
- Measuring cups and spoons
- Wire cooling rack
Ingredients
Dry Ingredients
- 2 cups certified gluten-free old-fashioned rolled oats
- ½ cup certified gluten-free oat flour
- 2 teaspoons gluten-free baking powder
- 1 teaspoon ground cardamom
- 1 teaspoon ground cinnamon
- ¼ teaspoon ground ginger
- ¼ teaspoon fine sea salt
Wet Ingredients
- 2 large eggs room temperature
- 1 cup milk of choice dairy or non-dairy
- ⅓ cup pure maple syrup
- 2 tablespoons melted coconut oil or unsalted butter
- 1 teaspoon vanilla extract
Fruit & Optional Mix-Ins
- 2 ripe pears peeled and finely diced
- ¼ cup chopped walnuts or pecans optional
- 2 tablespoons chia seeds optional
- 2 tablespoons ground flaxseed optional
- ¼ cup raisins or dried cranberries optional
Optional Toppings
- thin pear slices optional
- chopped nuts optional
- cinnamon sprinkle optional
- maple syrup drizzle optional
- plain Greek yogurt optional
Instructions
- Preheat the oven to 350°F (175°C) and lightly grease or line a 12-cup muffin pan.
- Whisk together the rolled oats, oat flour, baking powder, cardamom, cinnamon, ginger, and salt in a large bowl.
- In a separate bowl, whisk together the eggs, milk, maple syrup, melted coconut oil, and vanilla until smooth.
- Pour the wet ingredients into the dry ingredients and stir until just combined.
- Fold in the diced pears and any optional mix-ins.
- Let the batter rest for 5 minutes.
- Divide the batter evenly among the muffin cups, filling each about three-quarters full. Add optional toppings if desired.
- Bake for 22–26 minutes, until lightly golden and a toothpick inserted in the center comes out clean.
- Cool in the pan for 5 minutes, then transfer to a wire rack to cool completely. Serve warm or chilled.