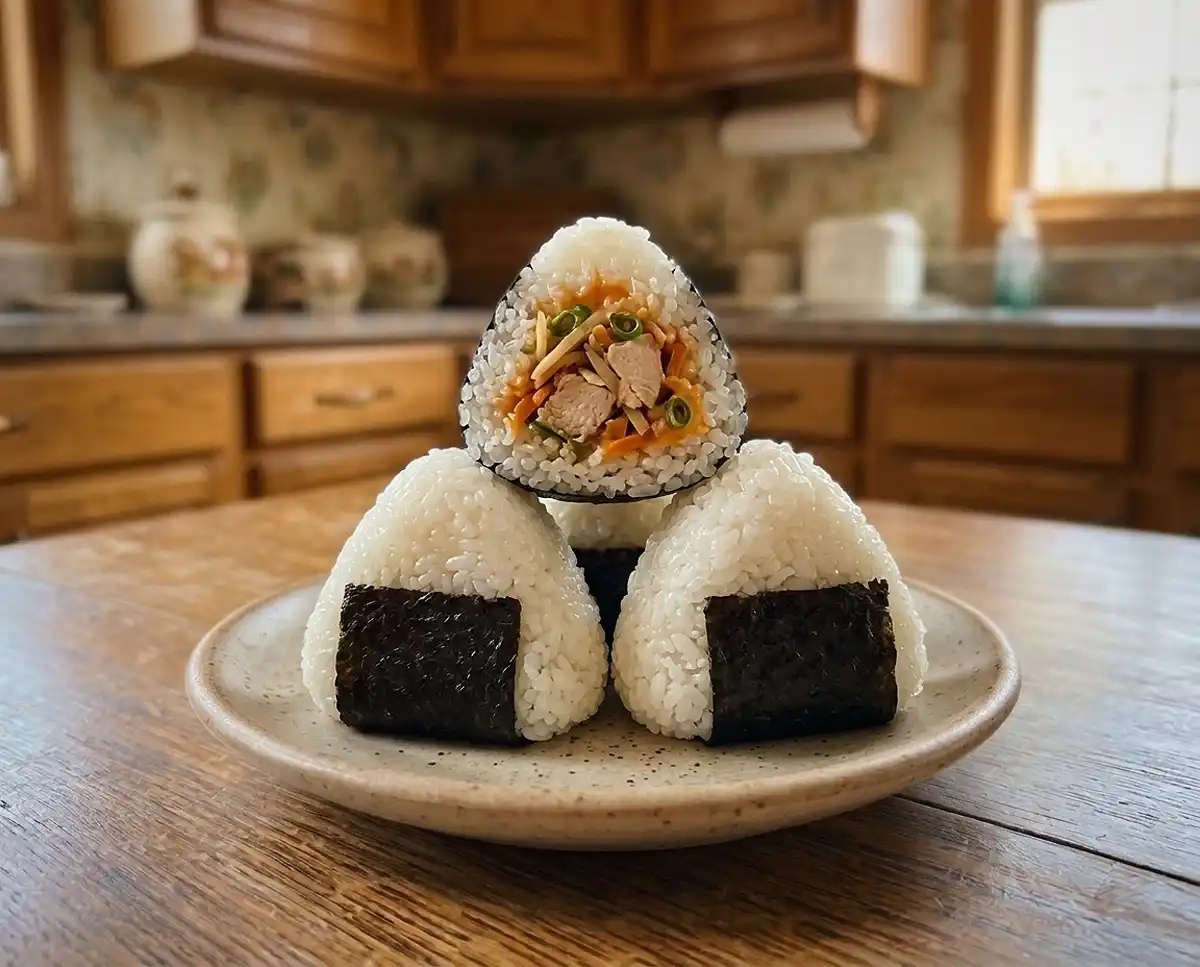
Gluten-Free Chicken Onigiri
This gluten-free chicken onigiri recipe walks you through marinating, shaping, and filling rice triangles with spicy mayo, step by step, at home.
A student in my Saturday workshop once told me she had given up on rice balls entirely. Every convenience store onigiri she remembered from a trip had soy sauce somewhere in it, and every homemade attempt fell apart in her hands.
Gluten-free chicken onigiri is easier to get right than she thought, once you know where the traps are.
These chicken onigiri are tasty, portable little bites perfect for busy days, lunchboxes, and road trips! Discover more gluten-free snacks on the go for easy grab-and-go ideas that make eating well away from home so much easier!
At a Glance: Why This Gluten-Free Chicken Onigiri Delivers
- Texture and flavor: Tender chicken strips in a garlicky, gingery marinade, plain salted rice, and a spicy mayonnaise center that adds creaminess and a little heat.
- Difficulty level: Beginner-friendly. The only real skill is shaping, and wet hands do most of the work.
- Dietary fit: Dairy-free as written, with every label-sensitive ingredient flagged for gluten-free verification.
- Best for: Lunchboxes, picnics, and quick dinners. The recipe makes four onigiri for two servings.
What Makes This Gluten-Free Chicken Onigiri Actually Work
- Short-grain rice holds itself together. It has more surface starch than long-grain rice, so the grains cling without any binder. That matters in gluten-free cooking, where we cannot lean on wheat.
- Salting the warm rice seasons it evenly. Warm grains absorb salt more readily than cold ones, and they shape more easily. Fluffing instead of stirring keeps the grains distinct.
- Thin strips marinate and cook fast. Tamari seasons the surface of the chicken, and the sake adds mild savory depth. Fifteen minutes is enough for strips this size.
- The spicy mayonnaise protects the filling. Lean chicken breast can dry out, and the mayonnaise adds moisture and fat exactly where the bite needs it.
Table of Contents
Ingredients
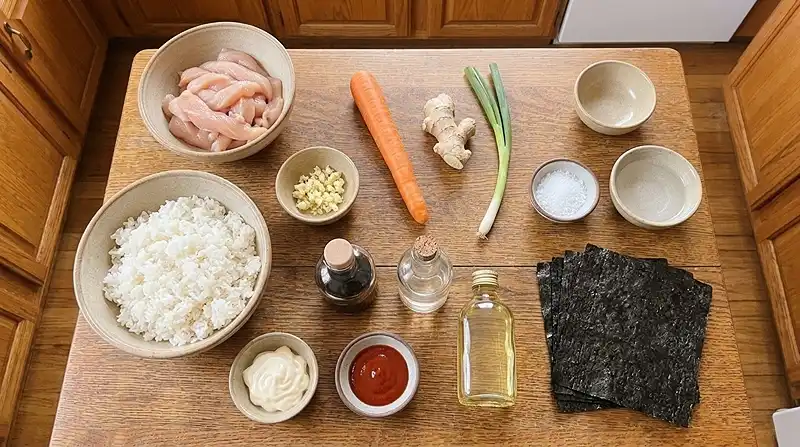
For the chicken filling
- ⅓ pound boneless, skinless chicken breast, cut into thin strips
- 2 cloves garlic, minced
- 1 tablespoon gluten-free tamari (confirm the label says gluten-free)
- 1 tablespoon sake, verified gluten-free (cooking sake may contain additives, so read the label)
- 1 tablespoon vegetable oil
- 1 small carrot, peeled and cut into thin strips
- 1 thumb-sized piece fresh ginger, peeled and cut into thin strips
- 1 scallion, thinly sliced
For the spicy mayonnaise
- 2 tablespoons mayonnaise, labeled gluten-free
- 1 tablespoon sriracha sauce, labeled gluten-free
For the rice and assembly
- 2 cups cooked Japanese short-grain rice (warm, not hot)
- Kosher salt, to taste
- 2–4 nori sheets, labeled gluten-free (plain roasted nori is safest; seasoned snack nori can contain soy sauce)
Regular soy sauce is brewed with wheat, which is why tamari matters here. The Celiac Disease Foundation lists soy sauce among common hidden sources of gluten.
It also notes that tamari made without wheat is gluten-free. Always check the label anyway, since formulas vary by brand.
Instructions
Prep
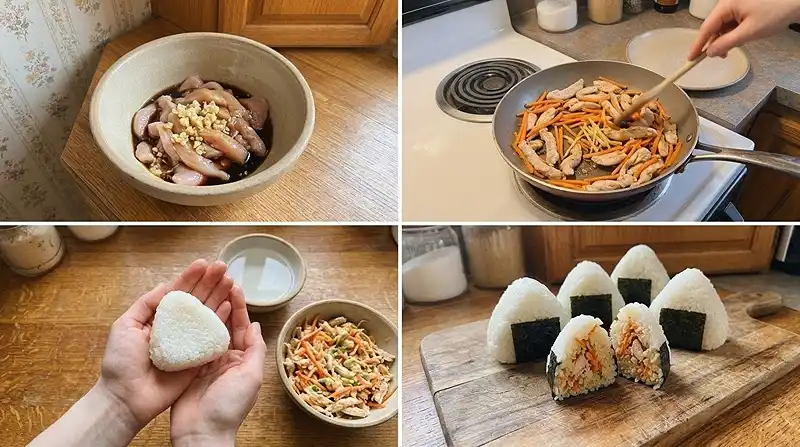
- Marinate the chicken. Place the chicken strips in a bowl with the minced garlic, gluten-free tamari, and sake. Mix well, cover, and refrigerate for 15 minutes. Pro Tip: Cut the strips about as thick as a pencil so they marinate quickly and cook evenly.
- Make the spicy mayonnaise. In a small bowl, stir together the mayonnaise and gluten-free sriracha until smooth. Set aside. It should be an even coral color with no streaks.
- Season the rice. Place the warm cooked Japanese rice in a large bowl. Sprinkle with kosher salt and gently fluff with a wooden or plastic spoon until evenly seasoned. Avoid mashing the rice. Warm rice smells faintly sweet, like steamed grain on a cool morning, and that is your cue to shape it.
Cook
- Cook the vegetables. Heat the vegetable oil in a skillet over medium heat. Add the carrot and ginger strips and stir-fry for 2–3 minutes, until softened but still slightly crisp. Transfer to a plate.
- Cook the chicken. Using the same skillet, add the marinated chicken. Cook over medium heat for about 5–7 minutes, stirring occasionally, until fully cooked and the center reaches 165°F (74°C), the poultry minimum on USDA’s safe temperature chart. Remove from the heat. Pro Tip: An instant-read thermometer beats guessing with thin strips.
Shape and Serve
- Prepare for shaping. Set a small bowl of water beside your ingredients. Cut the nori sheets into pieces large enough to wrap around the onigiri.
- Shape the rice. Wet your hands with water to prevent sticking. Divide the rice into 4 equal portions. Flatten one portion in your palm and gently shape it into a triangle.
- Add the filling. Make a small indentation in the center of the rice triangle. Spread a little spicy mayonnaise inside, then add a few strips of scallion, carrot, and ginger. Place 1–2 pieces of cooked chicken on top.
- Seal and shape. Gently fold the rice around the filling, adding a little more rice if necessary. Press carefully to seal the filling inside and reshape into a firm triangle. The pressure should be firm enough to hold, but loose enough that the grains stay distinct.
- Wrap with nori. Place each onigiri in the center of a nori sheet or strip and fold the seaweed around the bottom and sides.
- Serve. Arrange the chicken onigiri on two plates and serve immediately, while the rice is soft and the filling is flavorful.
Adapting This Recipe to Your Kitchen
Coconut aminos instead of tamari. Use it one for one if you need a soy-free option. It is sweeter and less salty, so taste the marinated chicken and add a small pinch of salt if it seems flat.
Chicken thighs instead of breast. Trust me on this one… boneless, skinless thighs forgive a few extra minutes of cooking far better than breast does. Slice them into the same thin strips and still cook to 165°F (74°C).
A teriyaki-style finish. The tamari and sake marinade is not a true teriyaki glaze, since it has no sugar or mirin. For a sweeter flavor, stir a small spoonful of gluten-free teriyaki sauce into the cooked chicken, and check the label first.
A convenience store-style tuna filling. Swap the chicken for drained canned tuna folded into the spicy mayonnaise, a nod to classic fillings sold at Japanese convenience stores. No cooking is needed for the filling.
Different rice. Sushi rice labeled as short-grain works well. Long-grain rice will not stick together, because it has less of the surface starch that holds an onigiri together.
Troubleshooting: Fixes for the Most Common Issues
Problem: The rice falls apart when you press it. Use freshly cooked short-grain rice while it is still warm, and wet your hands before every portion.
The starch on the grain surface is what glues an onigiri together, and it sets less well as the rice cools and dries out.
Problem: The rice sticks to your hands. Rewet your hands between each onigiri and keep the water bowl close. A thin film of water stops the starch from grabbing your skin, but too much makes the rice gummy, so shake off the drips.
Problem: The chicken is dry. I’ll be straight with you… overcooked breast is the most common complaint I hear about this kind of filling.
Pull the skillet off the heat as soon as the center hits 165°F (74°C). Thin strips go from juicy to chalky in under a minute, and the spicy mayonnaise cushions small mistakes.
Problem: The nori turns soggy. Wrap the nori just before eating, or pack it separately. Nori absorbs moisture from warm rice quickly, which is why store-bought onigiri use a plastic film to keep the seaweed apart until you unwrap it.
Problem: The filling leaks out. Use a modest amount of filling and cover it completely with rice on every side. Overfilling pushes the center toward the seam, and a thin layer of mayonnaise plus 1–2 pieces of chicken is plenty.
Storage & Meal Prep
| Method | Duration | Notes |
|---|---|---|
| Counter | Up to 2 hours | Cooked chicken and mayonnaise should not sit out longer, so this replaces the usual 2-3 days |
| Fridge | 1-2 days | Wrap each onigiri individually; leave the nori off until serving |
| Freezer | Not recommended | Mayonnaise separates when thawed; freeze plain seasoned rice portions instead (up to 1 month) |
To reheat, remove any nori and microwave the onigiri under a damp paper towel for about 30 seconds, until steaming hot in the center. Add fresh nori afterward.
For no-waste ideas, crumble leftover chicken and vegetables over a rice bowl and finish with a drizzle of the spicy mayonnaise.
Frequently Asked Questions
Can I make gluten-free chicken onigiri ahead of time?
Yes, you can shape and fill them up to a day ahead and refrigerate them. Wrap each one tightly in plastic wrap so the rice does not dry out, and leave the nori off until you are ready to eat so it stays crisp.
How do I keep the nori crisp?
Wrap the nori around the onigiri only when you are about to eat, or pack it separately. Moisture from the rice softens the seaweed within minutes.
What’s the best rice for onigiri?
Japanese short-grain rice is the best choice. Its higher surface starch makes the grains cling together without any binder, so cook it fresh and shape it while warm.
Why did my rice taste flat?
Most often, the rice was under-salted. Salt added to warm rice distributes more evenly than salt added later, so taste a few grains after fluffing and add a small pinch if needed before shaping.
Can I use regular soy sauce?
No, regular soy sauce usually contains wheat and is not safe for celiac disease. Choose a tamari labeled gluten-free, or coconut aminos for a soy-free option, and check the labels on the sake, mayonnaise, sriracha, and nori too.
Serving Suggestions
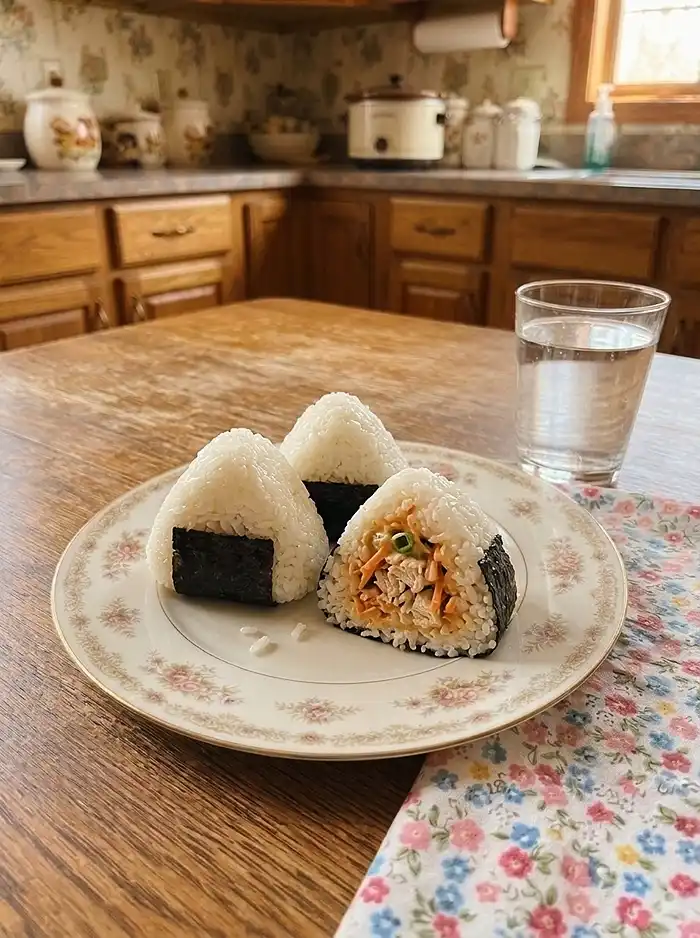
Serve the onigiri with a crisp cucumber salad and a cup of hot tea, or alongside a bowl of soup. If you choose miso soup, pick one made without barley, since some miso contains it.
These travel well in a cooler, which makes them a natural fit for a Memorial Day picnic, as long as they stay on ice. Round out the spread with Korean street food skewers or slow cooker teriyaki meatballs.
If someone at the table wants bread, set out gluten-free pretzel rolls.
Final Thoughts
Make a batch this week and see how the shaping feels in your own hands. If you change the filling or run into a snag, leave a comment and tell me what happened in your kitchen.
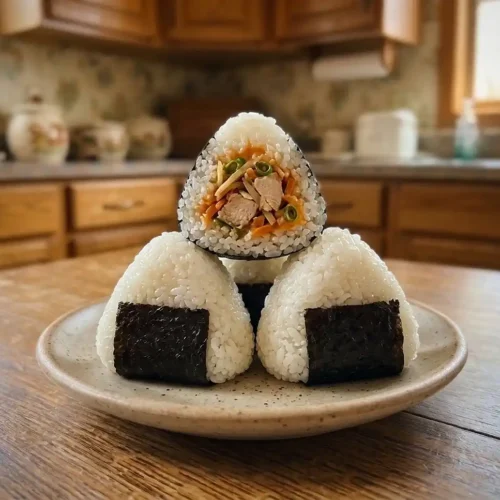
Gluten-Free Chicken Onigiri
Equipment
- Mixing bowls
- Skillet
- Wooden or plastic spoon
- Small bowl
- Knife
- Cutting board
- Measuring cups and spoons
- Instant-read thermometer
Ingredients
For the chicken filling
- ⅓ pound boneless, skinless chicken breast cut into thin strips
- 2 cloves garlic minced
- 1 tablespoon gluten-free tamari confirm the label says gluten-free
- 1 tablespoon sake verified gluten-free; check for additives
- 1 tablespoon vegetable oil
- 1 small carrot peeled and cut into thin strips
- 1 thumb-sized piece fresh ginger peeled and cut into thin strips
- 1 scallion thinly sliced
For the spicy mayonnaise
- 2 tablespoons mayonnaise labeled gluten-free
- 1 tablespoon sriracha sauce labeled gluten-free
For the rice and assembly
- 2 cups cooked Japanese short-grain rice warm, not hot
- to taste kosher salt
- 2–4 sheets nori labeled gluten-free; plain roasted nori recommended
Instructions
- Marinate the chicken. Place the chicken strips in a bowl with the minced garlic, gluten-free tamari, and sake. Mix well, cover, and refrigerate for 15 minutes. Cut the strips about as thick as a pencil so they marinate quickly and cook evenly.
- Make the spicy mayonnaise. In a small bowl, stir together the mayonnaise and gluten-free sriracha until smooth. Set aside.
- Season the rice. Place the warm cooked Japanese rice in a large bowl. Sprinkle with kosher salt and gently fluff with a wooden or plastic spoon until evenly seasoned. Avoid mashing the rice.
- Cook the vegetables. Heat the vegetable oil in a skillet over medium heat. Add the carrot and ginger strips and stir-fry for 2–3 minutes, until softened but still slightly crisp. Transfer to a plate.
- Cook the chicken. Using the same skillet, add the marinated chicken. Cook over medium heat for about 5–7 minutes, stirring occasionally, until fully cooked and the center reaches 165°F (74°C). Remove from the heat.
- Prepare for shaping. Set a small bowl of water beside your ingredients. Cut the nori sheets into pieces large enough to wrap around the onigiri.
- Shape the rice. Wet your hands with water to prevent sticking. Divide the rice into 4 equal portions. Flatten one portion in your palm and gently shape it into a triangle.
- Add the filling. Make a small indentation in the center of the rice triangle. Spread a little spicy mayonnaise inside, then add a few strips of scallion, carrot, and ginger. Place 1–2 pieces of cooked chicken on top.
- Seal and shape. Gently fold the rice around the filling, adding a little more rice if necessary. Press carefully to seal the filling inside and reshape into a firm triangle. Apply enough pressure to hold the shape while keeping the grains distinct.
- Wrap with nori. Place each onigiri in the center of a nori sheet or strip and fold the seaweed around the bottom and sides.
- Serve. Arrange the chicken onigiri on two plates and serve immediately, while the rice is soft and the filling is flavorful.